By: SecureIT Since: August 2019 Licence: MIT
1. Introduction
Welcome to SecureIT!

Skeptical about apps that store your confidential information online? But tired of having to keep track of all of them manually? Well look no further! Now you can enjoy the best of both worlds.
SecureIT is specifically designed to help manage your confidential information all in one application. More importantly, it stores your information locally, and does not use any form of online storage!
SecureIT is optimized for those who prefer to work with a Command Line Interface (CLI) while still having the benefits of a Graphical User Interface (GUI). For those of you who are type fast, SecureIT can manage your confidential information faster than traditional GUI apps.
Interested? Jump to the Section 3, “Quick Start” to get started. Enjoy!
2. Basic Information
This following guide will teach you how you can use SecureIT to keep track of your confidential information so you will never have to worry about your information ever again.
Confused? You refer to Section 3, “Quick Start” for a simple set-up.
If you are overwhelmed by all the instructions and don’t know which one to use, our Section 5, “CheatSheet of commands” is here to help you.
The following list of icons below will assist you to understand our material:
Icon |
Meaning |
Some tips for you to familiarise with the commands |
|
Warning! Danger zone. Make sure you know what you are doing |
3. Quick Start
-
Ensure you have Java
11or above installed in your Computer. -
Download the latest
SecureIT.jarhere. -
Copy the file to the folder you want to use as the home folder for your SecureIT.
-
Double-click the file to start the app. The GUI should appear in a few seconds.
-
Since this is the first time that you are using SecureIT, you will be asked to create a new master password. Type your preferred master password in the command box and hit the
Enterkey. -
With that, you have created your very own SecureIT account. You can now enter commands in the command box and press
Enterto execute it.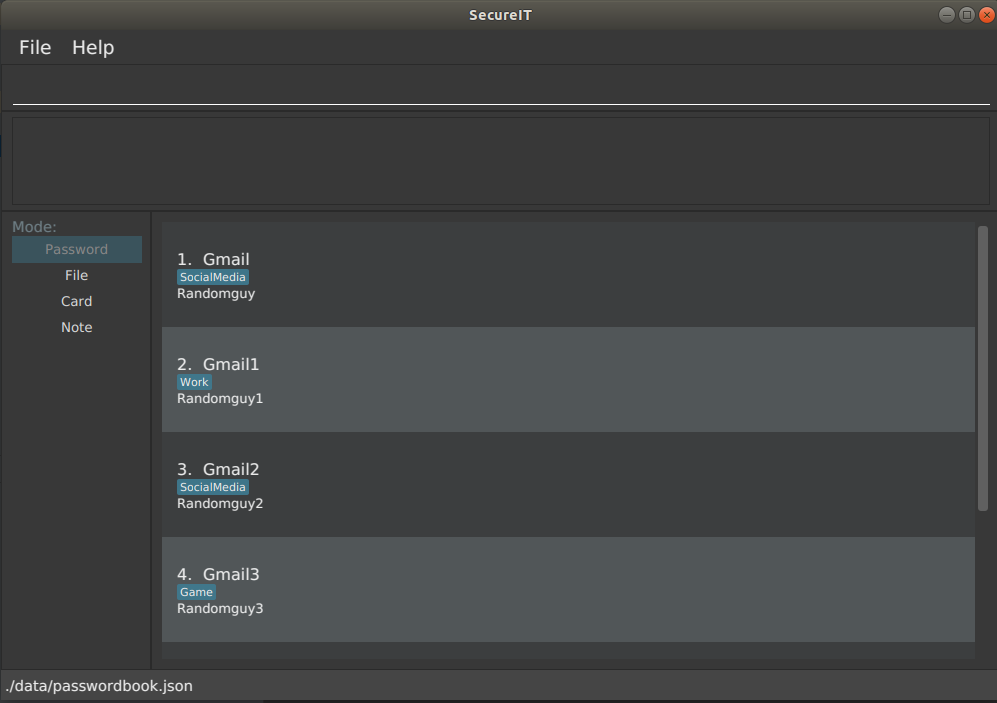
-
Here are some example commands that you can try out:
-
add d/Gmail u/randomGuy p/qwerty123: adds a password with username 'randomGuy' and password 'qwerty123' -
analyse: briefly analyses all your passwords and produces a security report -
analyse strong/1: analyses your first password and produces a detailed security report -
generate: generates a random strong password for you -
encrypt <filepath>: encrypts the file in the specified filepath
-
-
You may refer to Section 4, “Features” for more details of all our available commands.
4. Features
Command Format
-
Words in
UPPER_CASEare the parameters to be supplied by you e.g. inadd u/USERNAME,USERNAMEis a parameter which can be used asadd u/User Doe. -
Items in square brackets are optional e.g
u/USERNAME [t/TAG]can be used asu/User Doe t/workor asn/User Doe. -
Items with
… after them can be used multiple times until a limit including zero times e.g.[t/TAG]…can be used ast/Work,t/SocialMedia t/Personaletc. -
Parameters can be in any order e.g. if the command specifies
u/USERNAME p/PASSWORD,p/PASSWORD u/USERNAMEis also acceptable. -
All index specified must be a positive number 1,2,3…
4.1. Password
You can access the password directory using this command : goto password
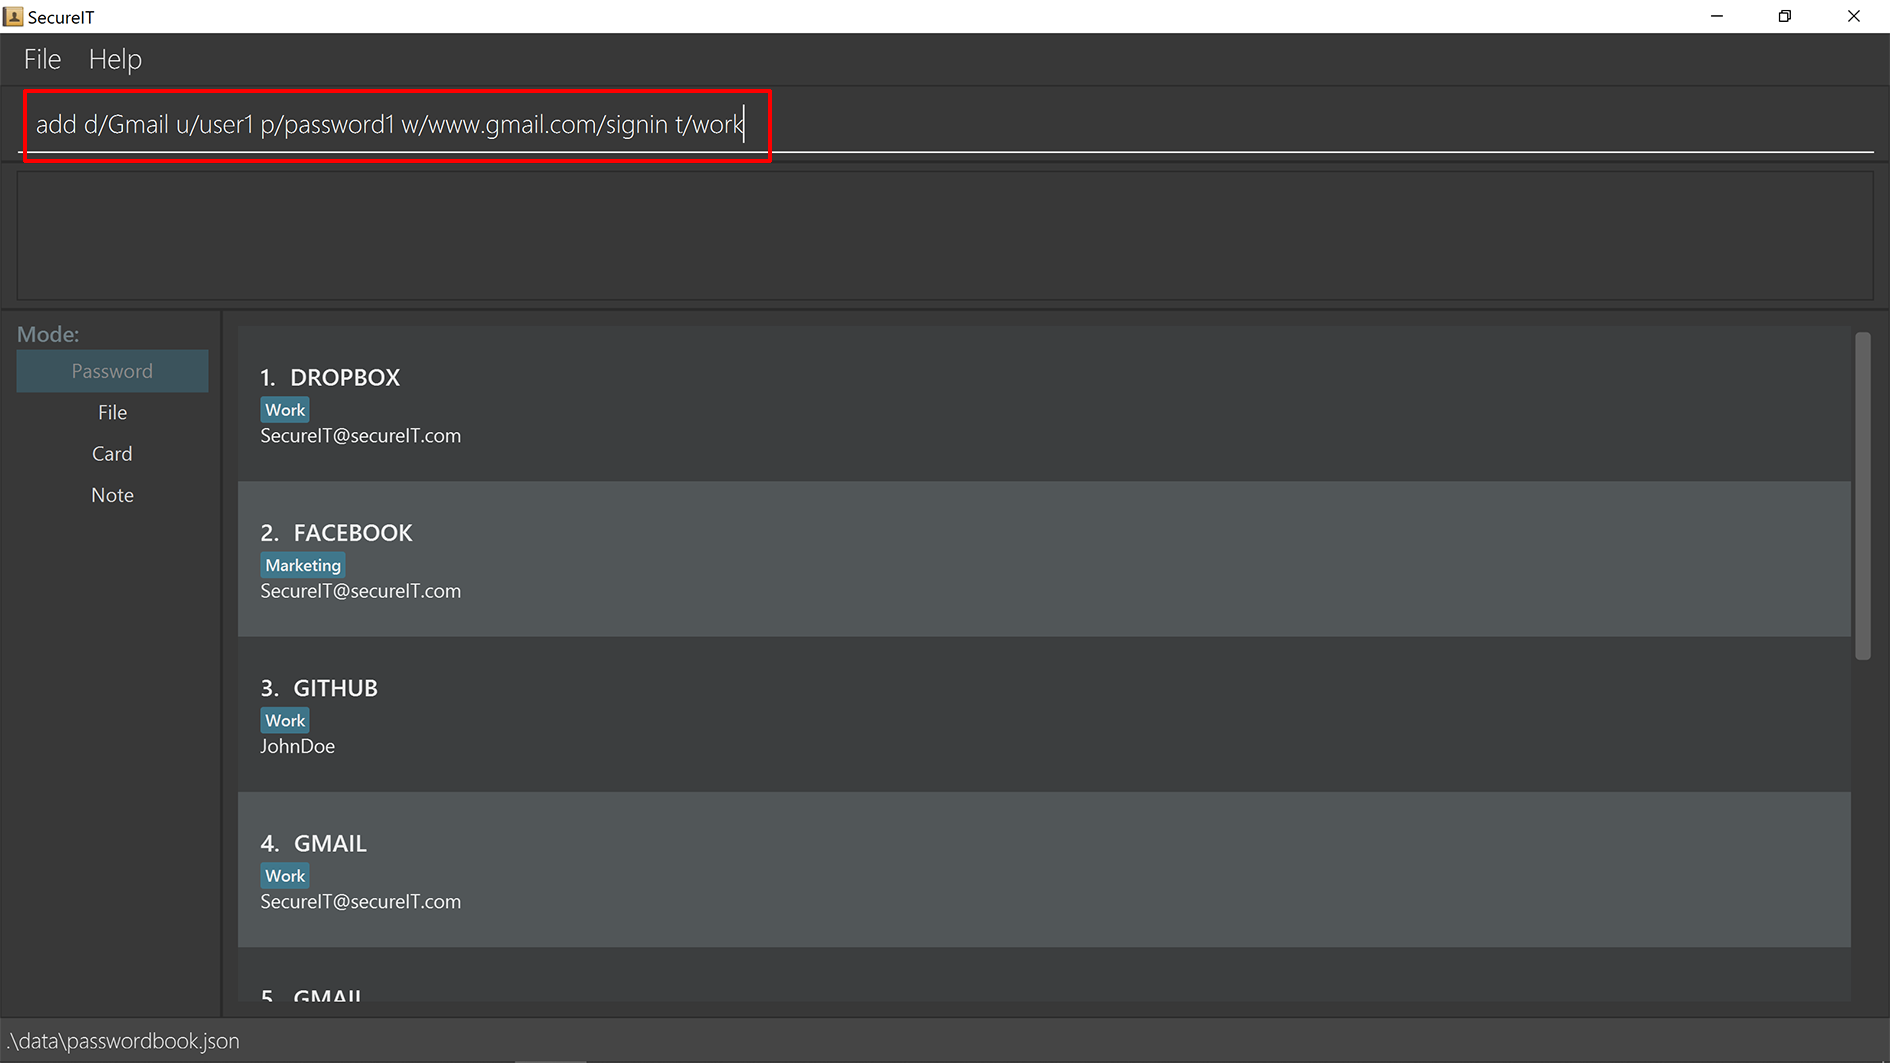
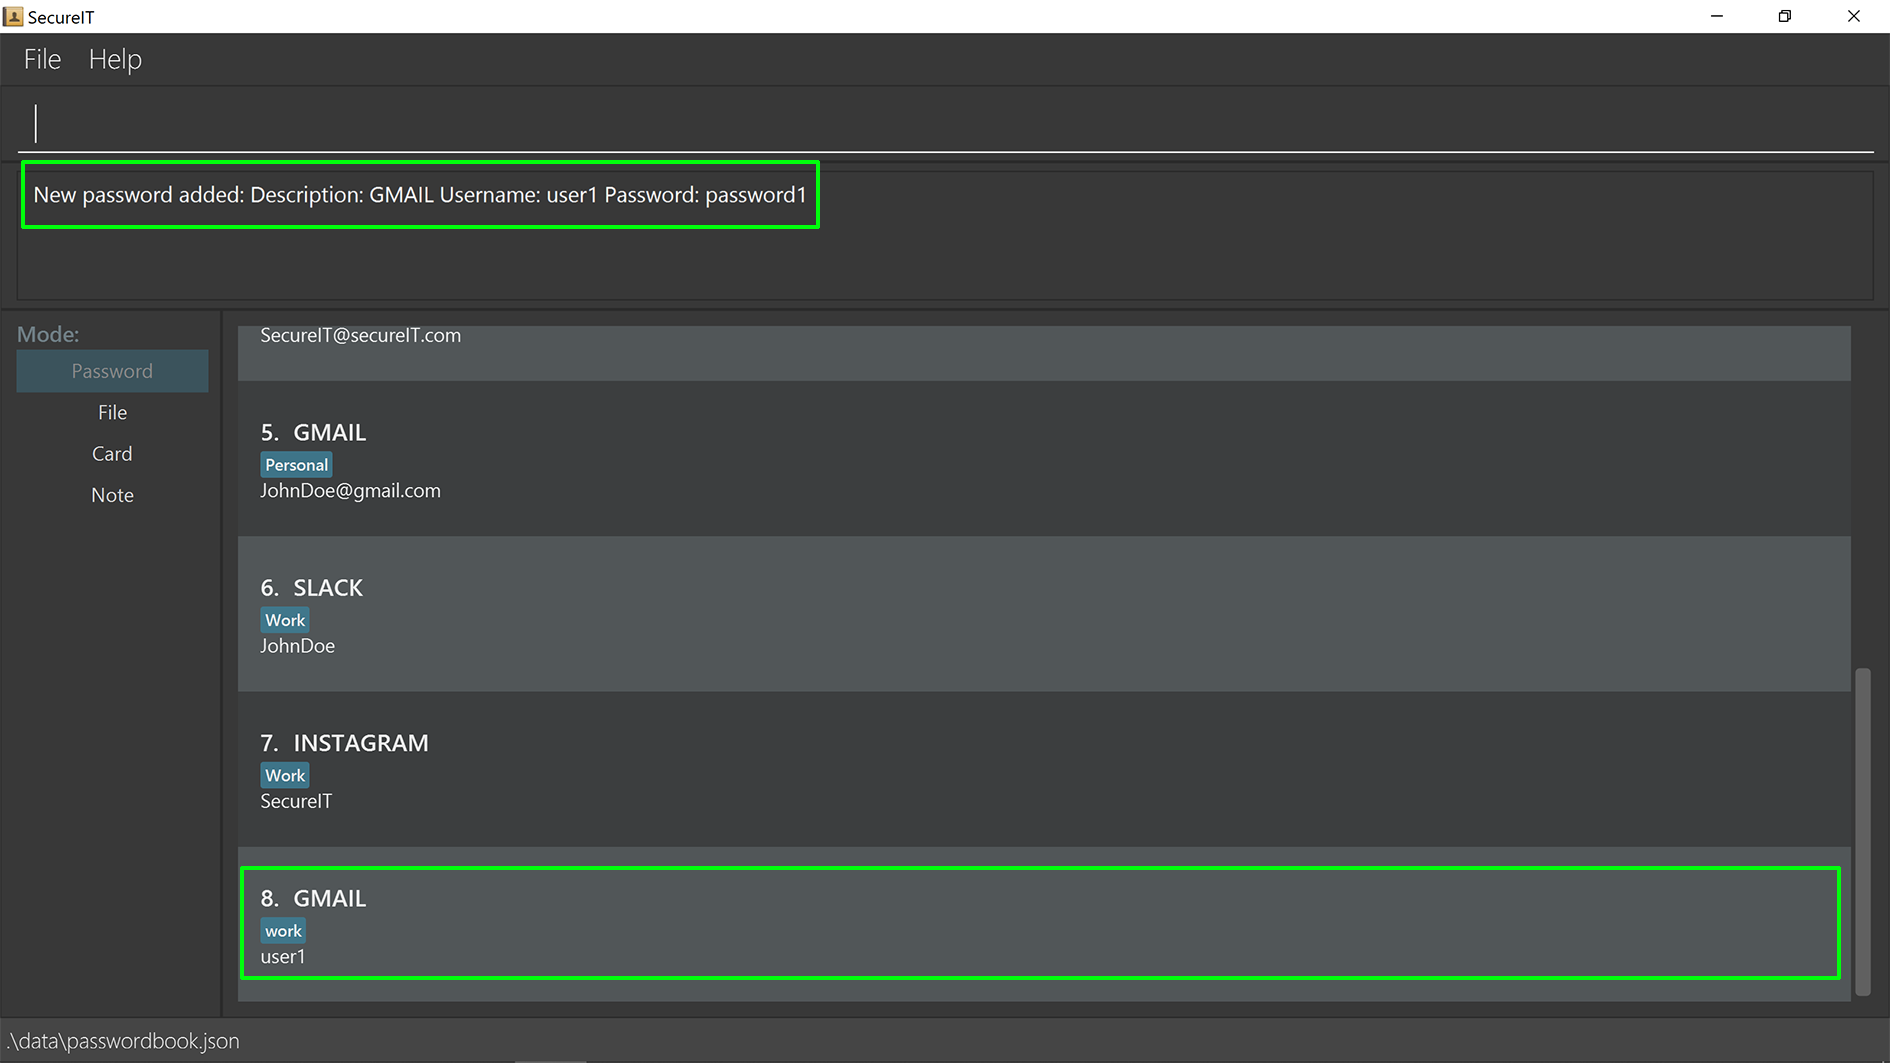
4.1.1. Adding a password : add
Too many passwords to remember? You can add a password to the application.
Format: add d/DESCRIPTION u/USERNAME p/PASSWORD [w/WEBSITE] [t/TAG]…
Example: add d/Gmail u/user1 p/password1 w/www.gmail.com/signin t/work
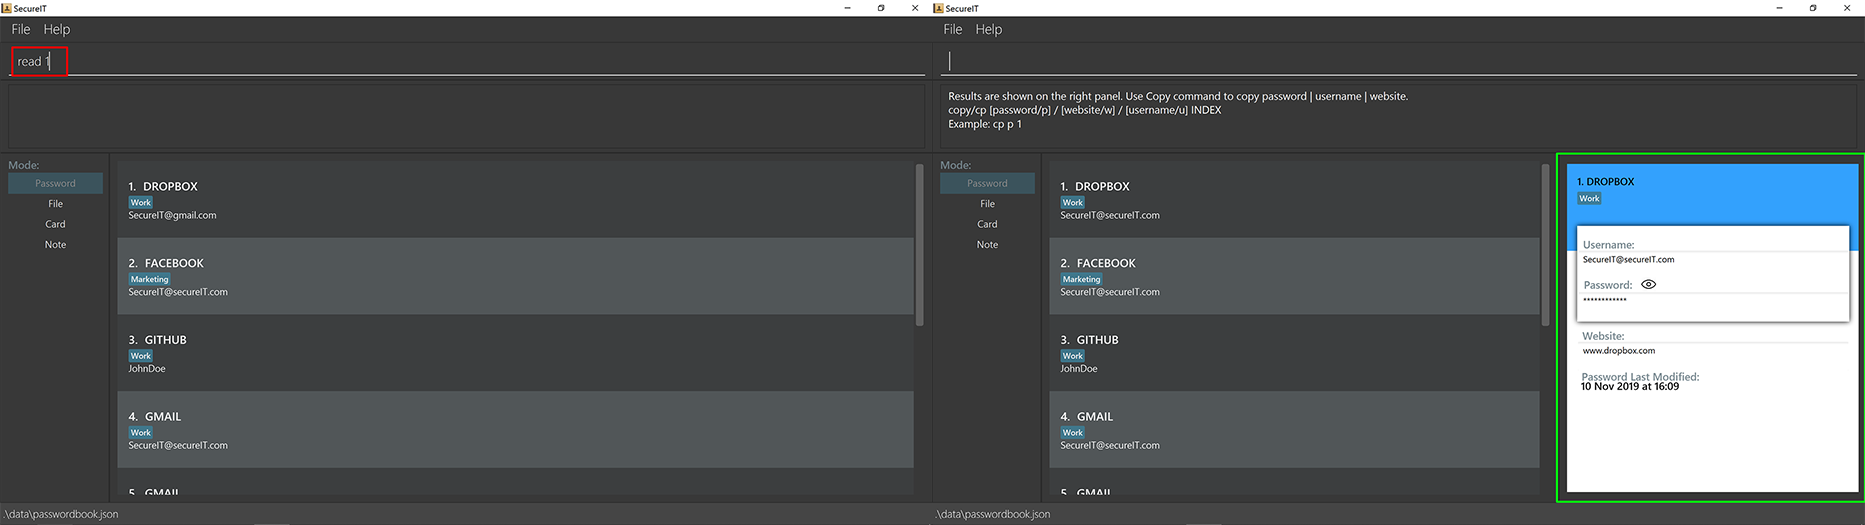
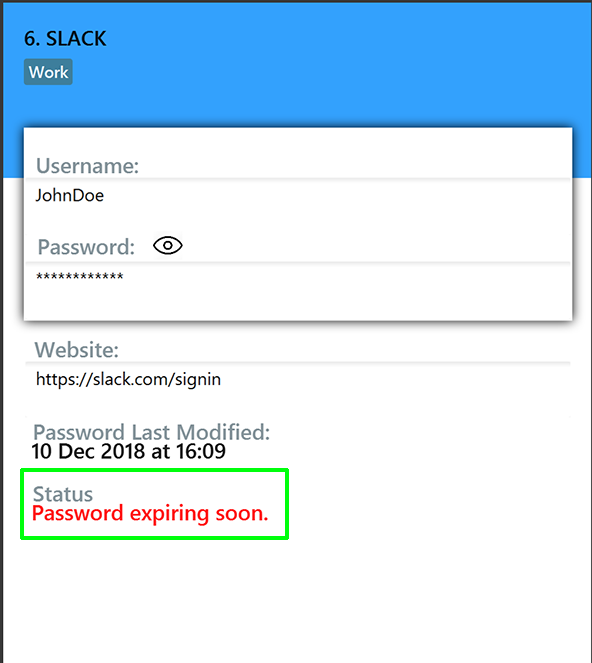
4.1.2. Accessing a password : read
You can open and view the password for the specified index.
Format: read INDEX
Example: read 1
Tip
-
Your password will expire expire in a year.
-
You will be reminded if your password is expired or about to expire.
-
You can toggle the eye icon to see your password. Be wary of surveillance by secret agents or people standing behind you
You will see this reminder 30 days before your password expires.
You will see this reminder if you have not changed your password for over a year.

4.1.3. Copying a field in a password : copy
You can copy the password value, website or username for the specific index.
Format: copy password INDEX
Format: copy username INDEX
Format: copy website INDEX
Tip
-
You can type cp for copy, p for password, u for username and w for website.
-
You can only copy one field at a time
Example: copy password 1
Example: cp p 1
Example: cp username 2
Example: cp w 2
4.1.4. Updating a password : edit
Added a wrong password? No worries, you can edit the password.
Format: edit INDEX [d/DESCRIPTION] [u/USERNAME] [p/PASSWORD] [w/WEBSITE] [t/TAG]
Tip
-
You do not need not type all the fields of the password again.
-
You can just type the fields that you want to change.
-
At least one of the optional fields must be provided.
-
When editing tags, the existing tags of the password will be removed i.e adding of tags is not cumulative.
-
You can remove all the password’s tags by typing t/ without specifying any tags after it.
Example: edit 1 u/NewUsername
Example: edit 1 p/password123 t/
4.1.5. Deleting a password: delete
Warning
-
Deleted passwords are not recoverable
No longer use the user account? You can delete the password.
Format: delete INDEX
Example: delete 2
4.1.6. Finding a password: find
Too many passwords? Simply type find and the description of the password.
Format: find KEYWORD
Tip
-
The search is case insensitive. e.g
gmailwill matchGMAIL -
Only the description is searched.
-
Incomplete-words will be matched e.g.
Hanwill matchHans
Example: find Gmail
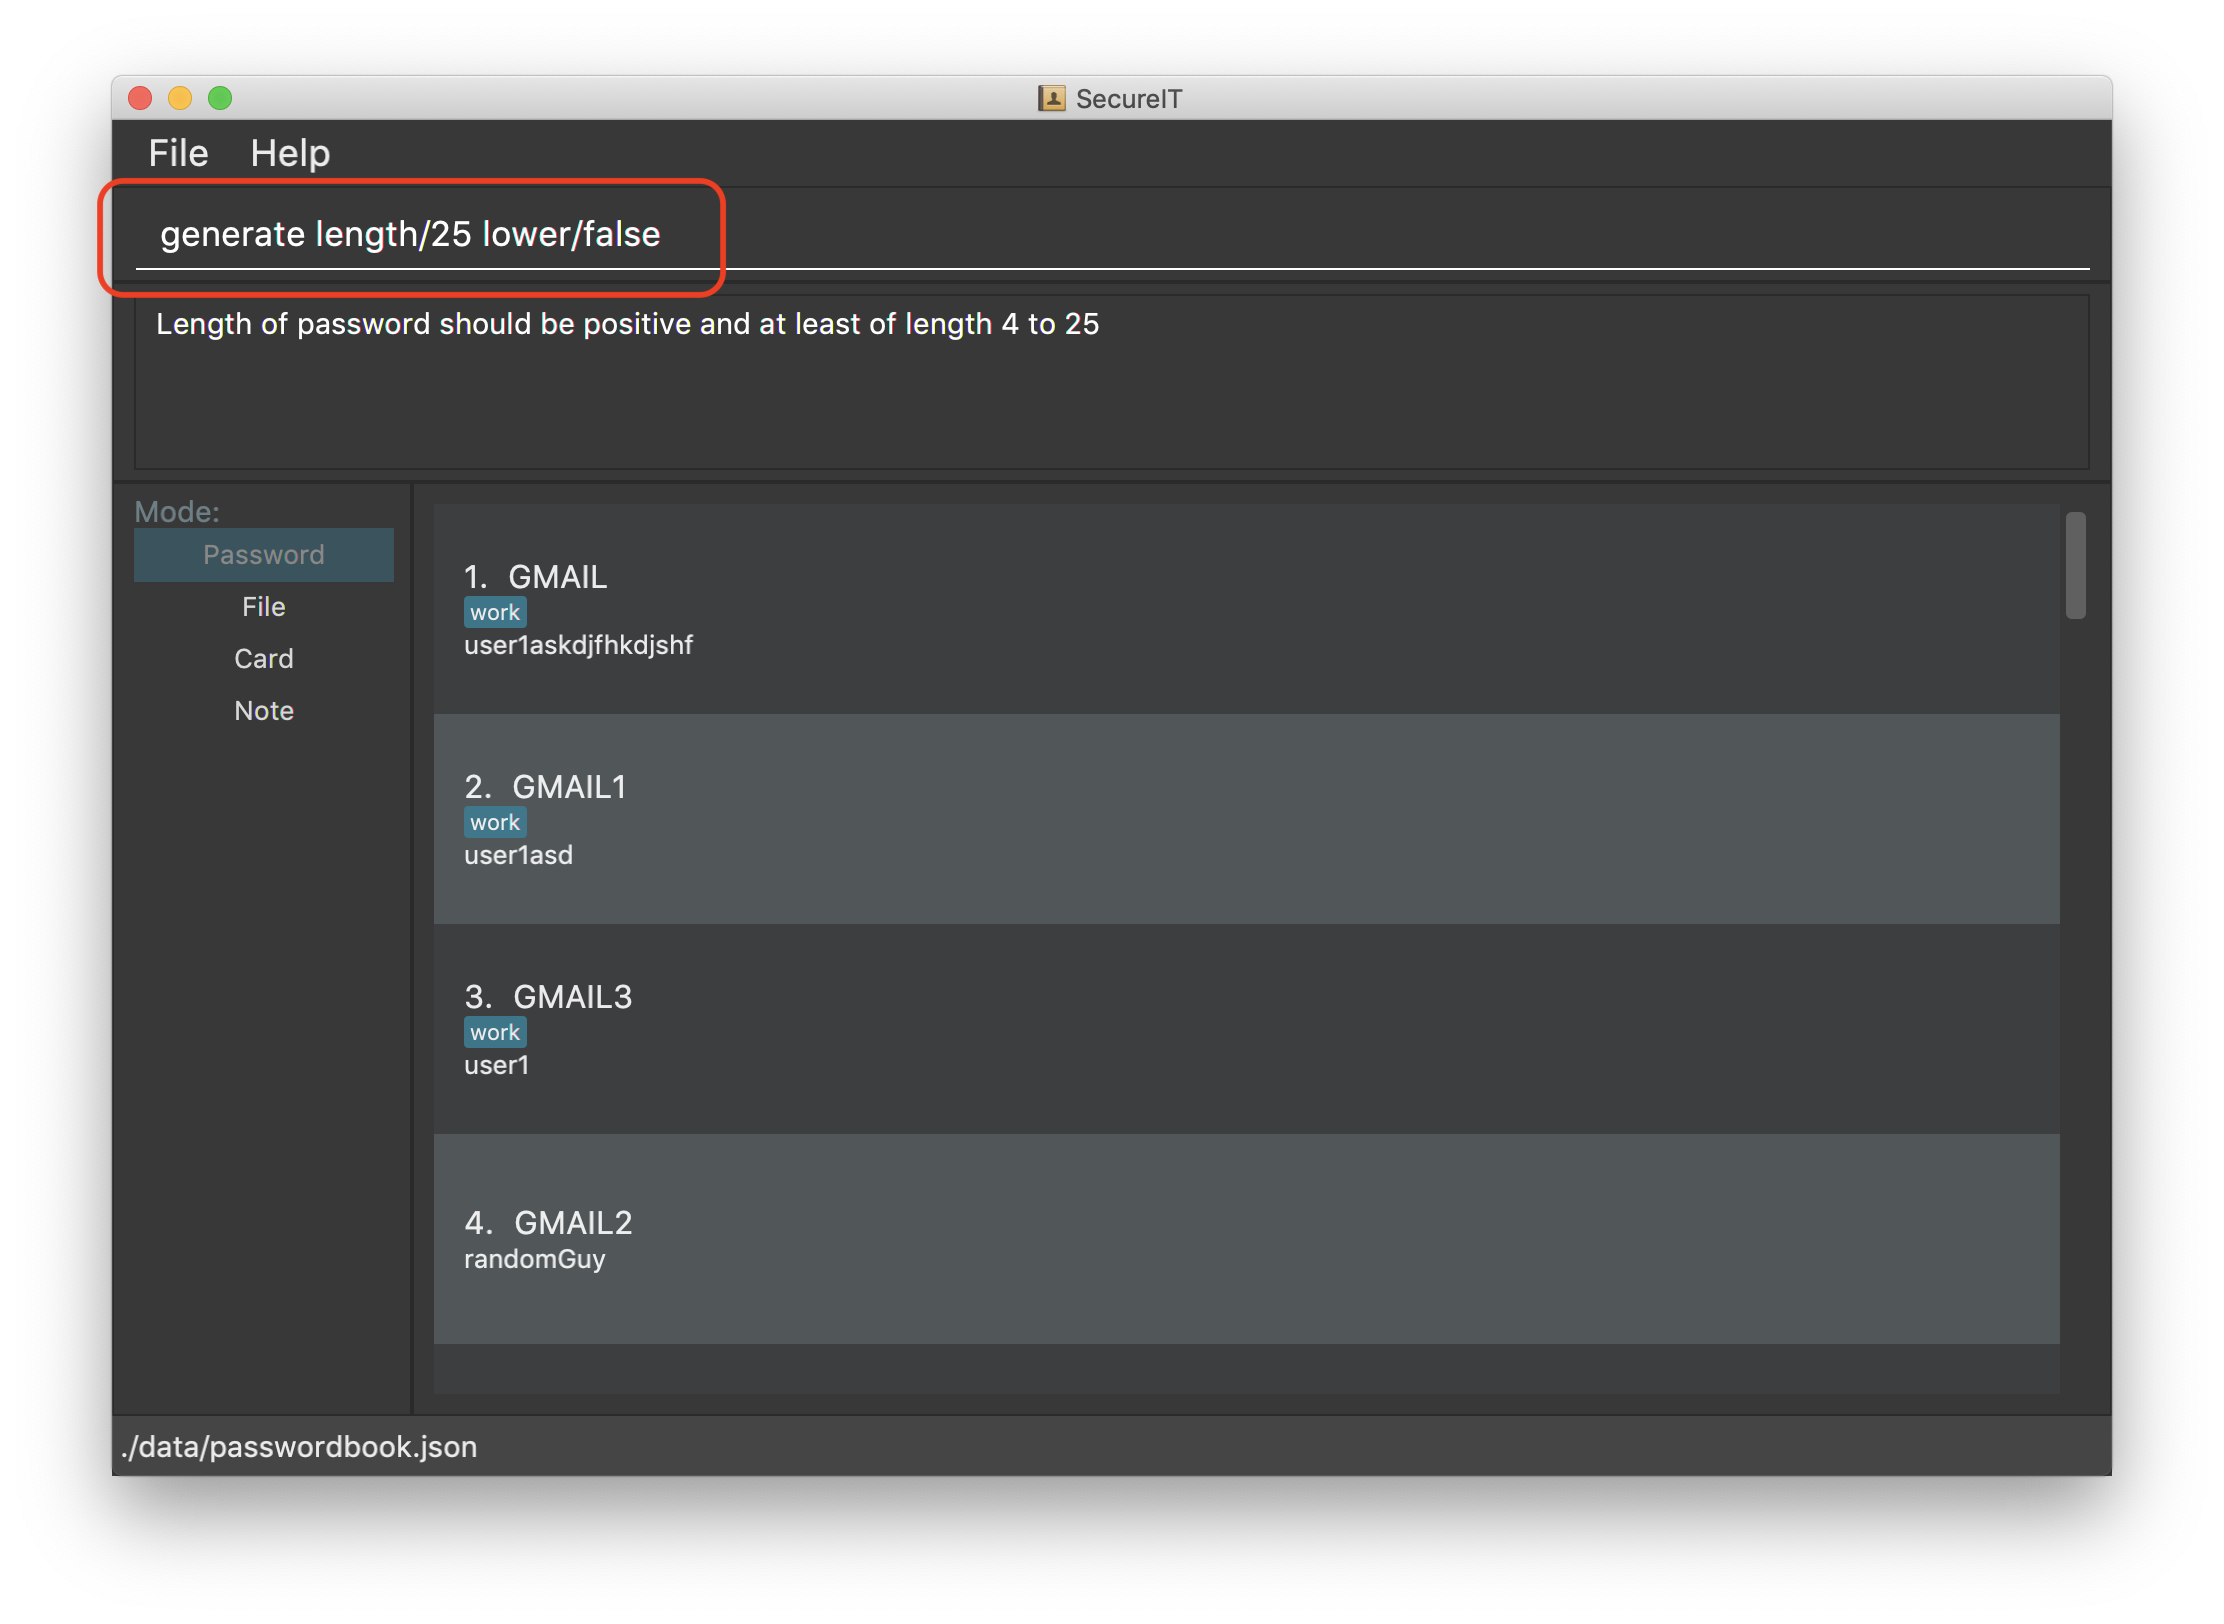
4.1.7. Generating a new password: generate
Lazy to think of a strong password?
Simply enter generate into the command box to get one. It’s random, secure and totally hassle-free!
Try it out!
-
Want to customise your password? Don’t worry, we’ve got that covered too. You can customise the following fields during generation:
-
Length of password (Between 4 and 25)
-
Exclusion of lower alphabets
-
Exclusion of upper alphabets
-
Exclusion of numbers
-
Exclusion of special characters
-
-
Refer to usage format below for more details.
| You are only required to indicate for fields you wish to exclude! |
| Please ensure at least one character set is included. |
Format: generate [length/LENGTH] [lower/FALSE] [upper/FALSE] [num/FALSE] [special/FALSE]
Example: generate
Example: generate length/10
Example: generate lower/false special/false

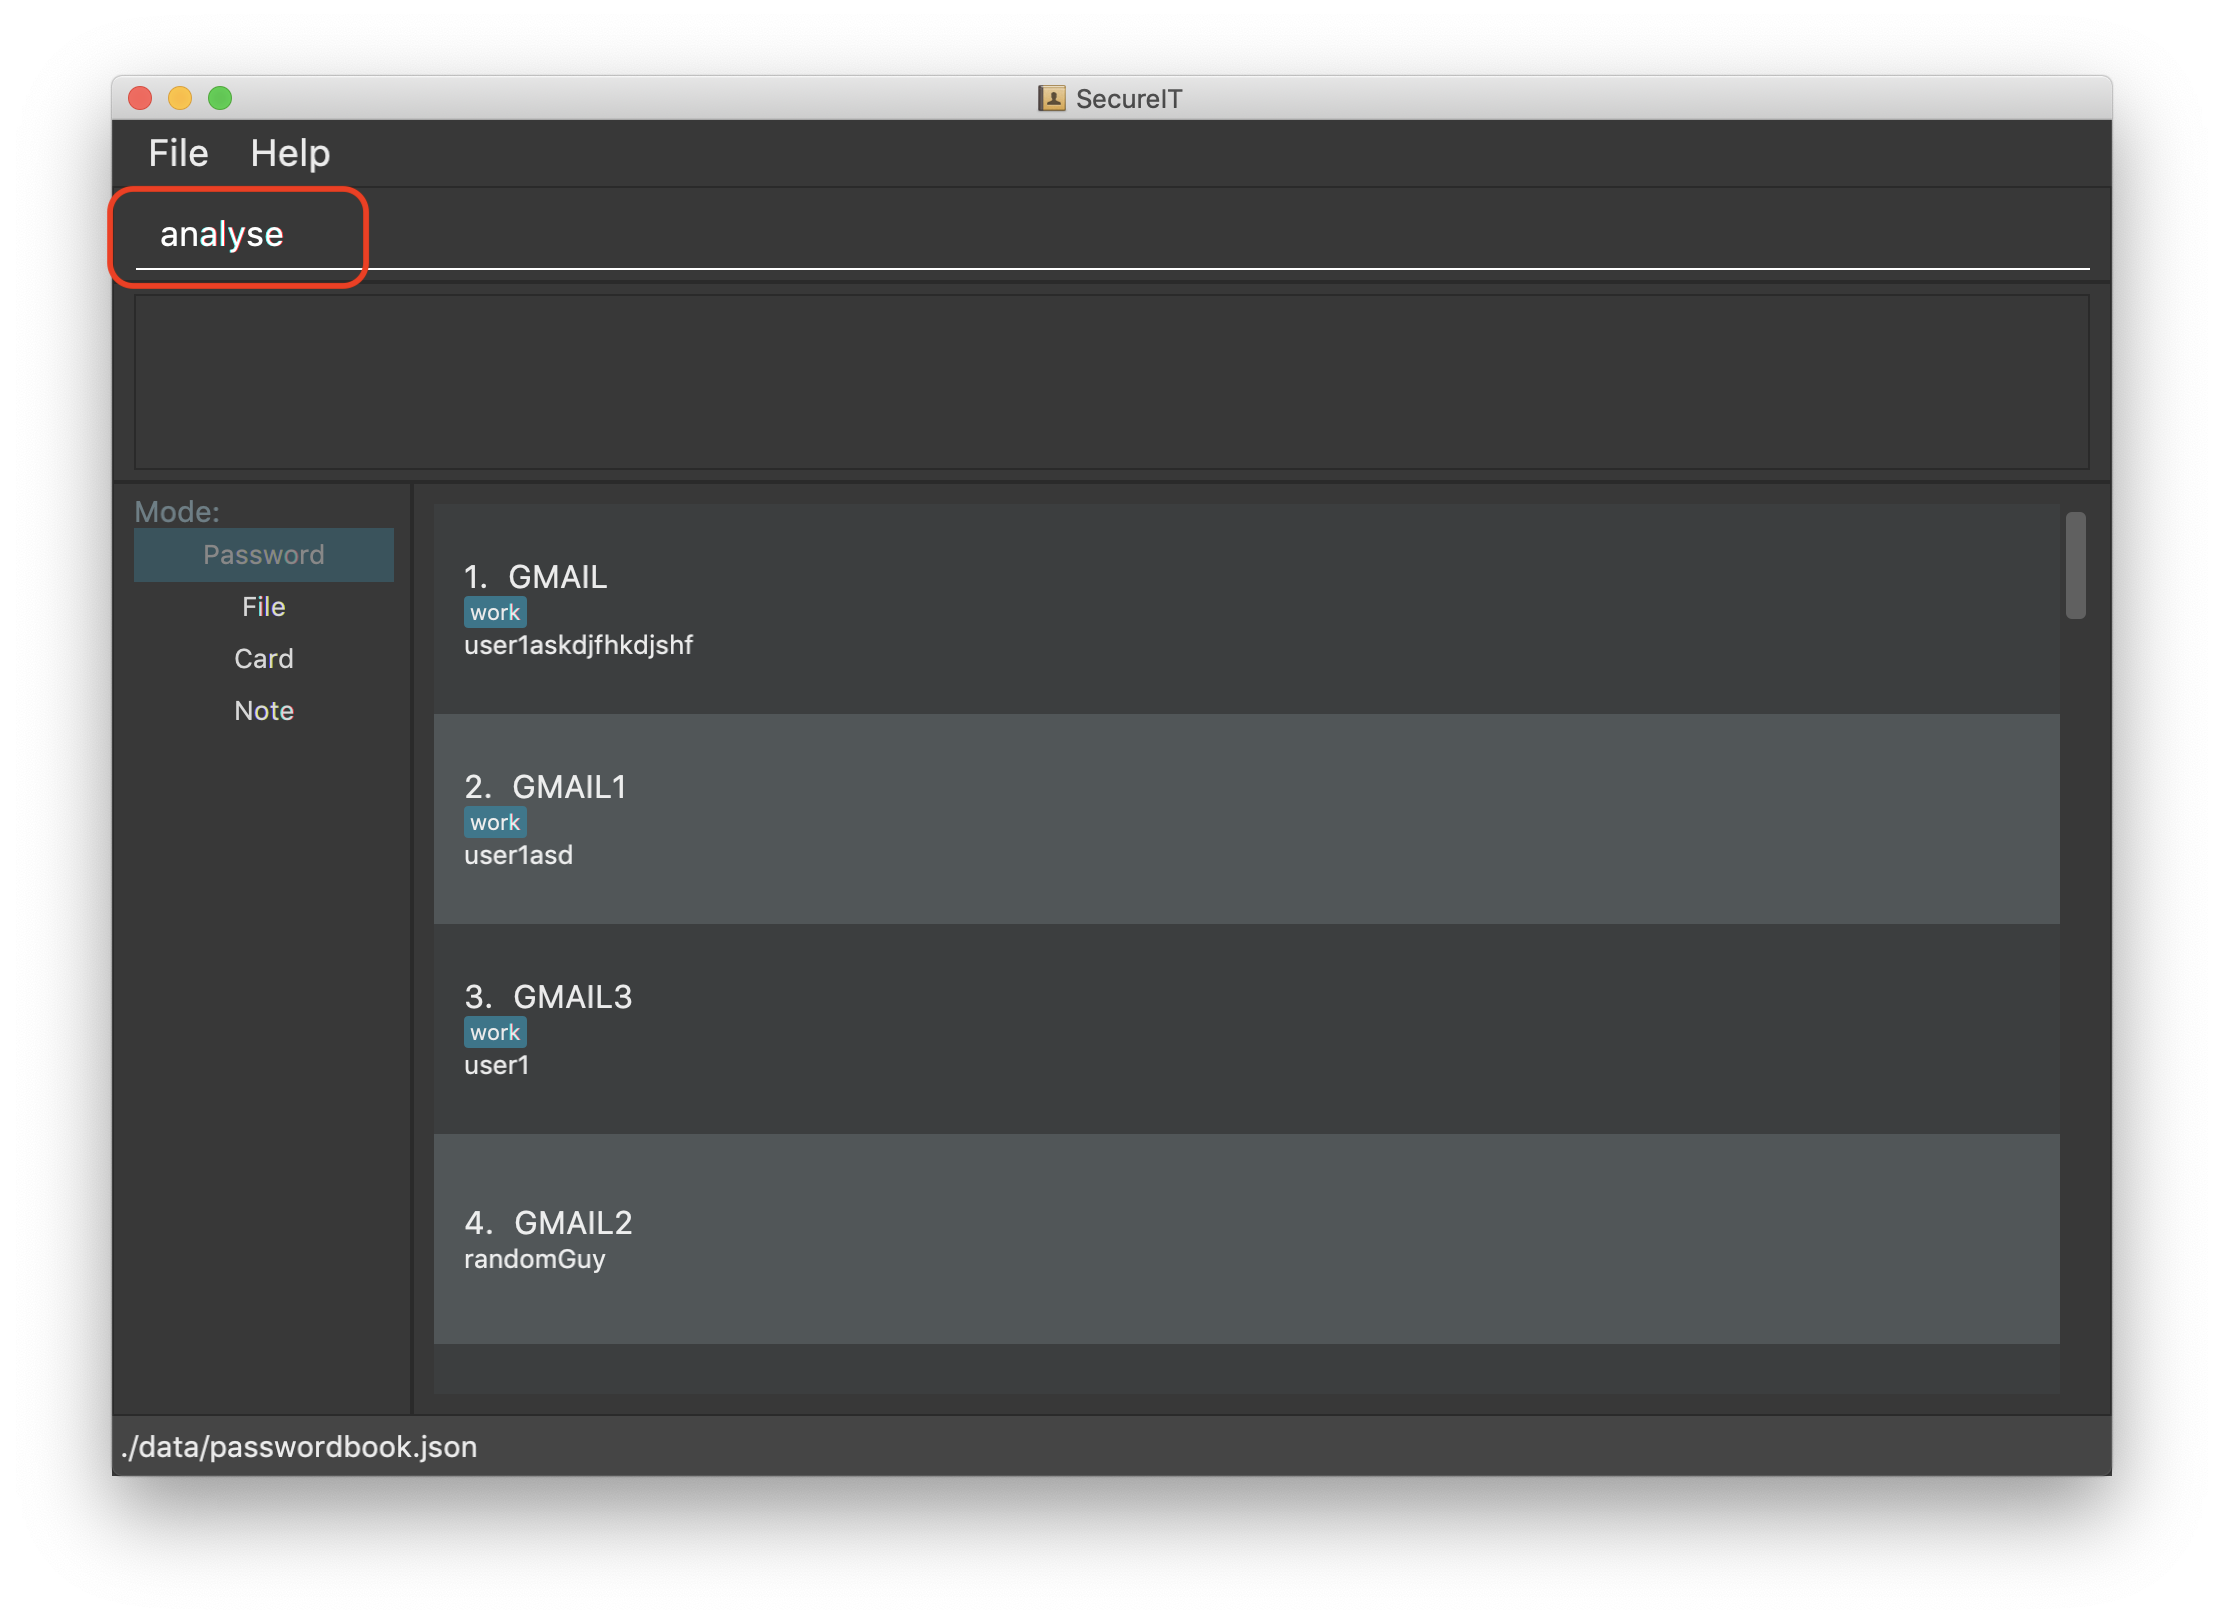
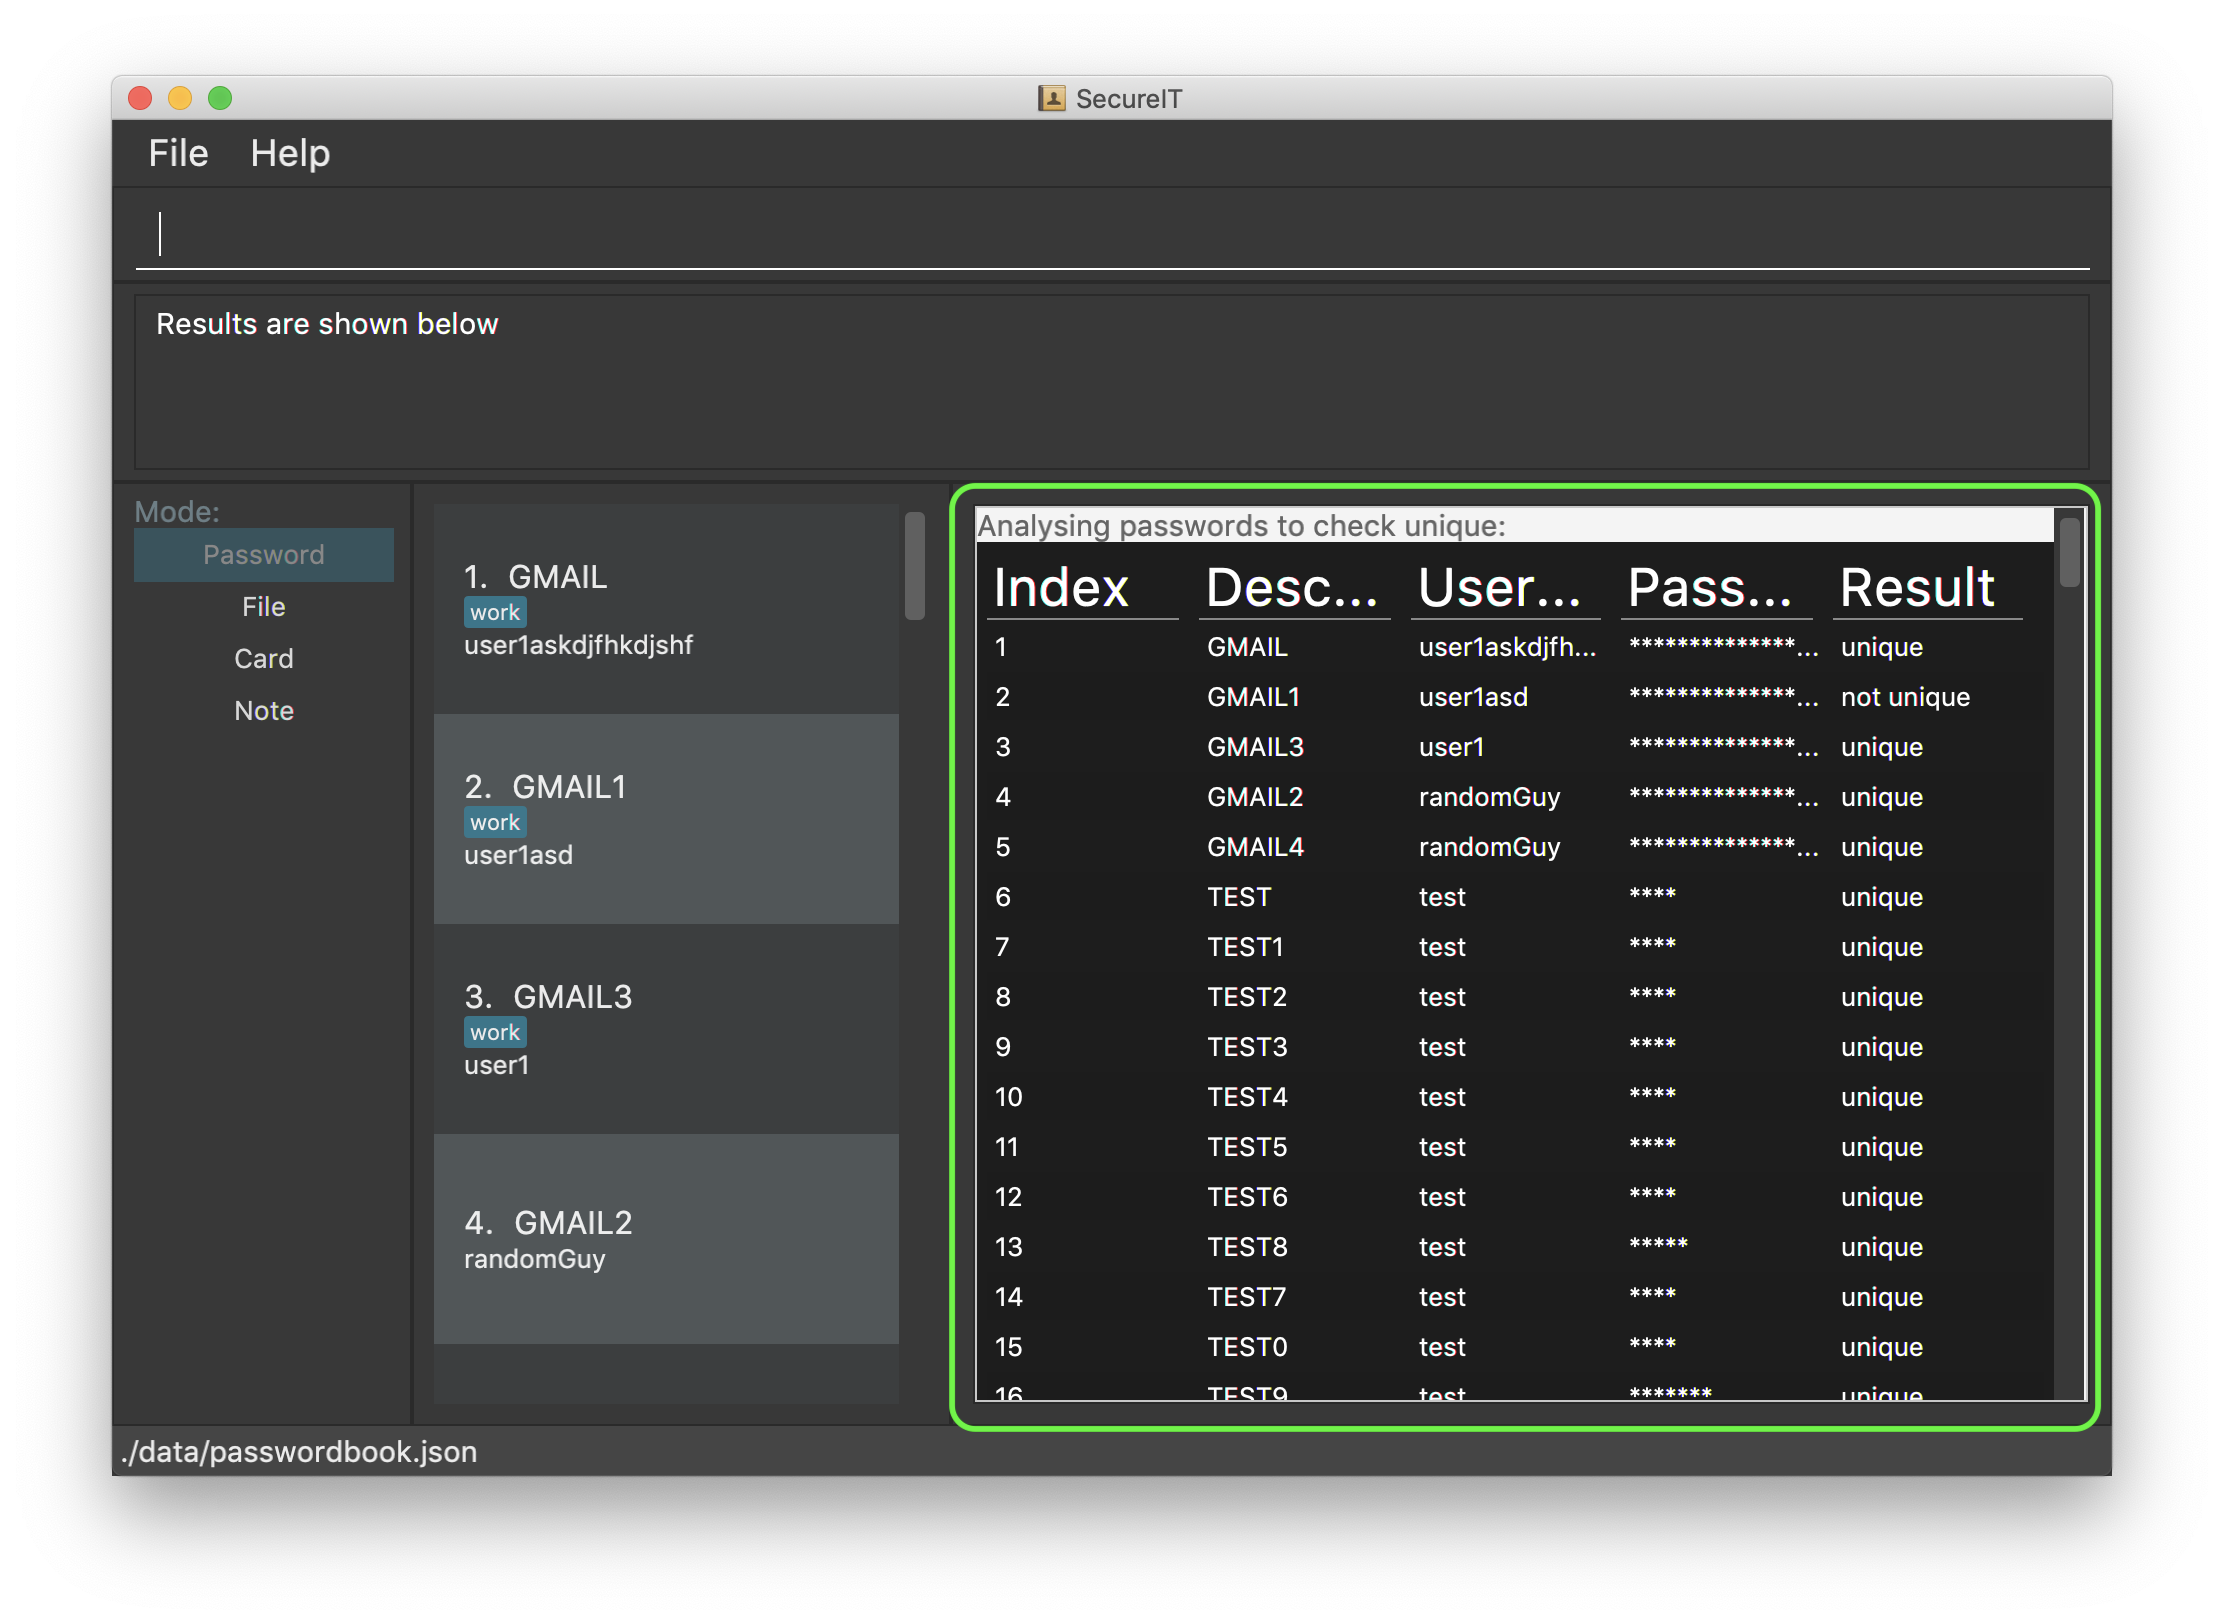
4.1.8. Analysing passwords : analyse
Curious to know how secure your passwords really are? Type analyse into the command box to find out. You might be surprised…
Try it out!
-
You can opt to view:
-
A general, summary security report for all passwords, or
-
A detailed security report for a specific password.
-
-
To view the detailed analysis of a particular password, simply add in the
strongprefix with theINDEX
INDEX used should be that of an existing password.
|
-
Refer to usage format below for more details.
Format: analyse [strong/INDEX]
Example: analyse
Example: analyse strong/8


4.2. Card
Too many credit cards to carry around? With SecureIT, you can easily manage your card information.
To access your cards, simply enter goto card in the command box.
4.2.1. Creating a card : add
You can easily adds cards to the application.
Format: add d/DESCRIPTION c/CARDNUMBER v/CVC e/EXPIRY [t/TAG]
Example: add d/VisaPOSB c/5203123458392748 v/456 e/12/25 t/groceries
Format:
-
Description entered is case sensitive.
-
Card numbers can be entered with or without dashes.
-
With dashes: 1234-5678-1234-5678
-
Without dashes: 1234567812345678
-
-
Card expiry is of the format MM/YY.
-
You can include up to 5 tags.
Note:
-
SecureIT does not support cards types that are not MasterCard or Visa.
-
All card numbers entered must have 16 digits.
Tip
-
After adding your cards, a card’s description and its index in the list are interchangeable with each other. In other words, the following commands accept either description or index, but not both.
-
If you know exactly which card you need, you can easily type the description without needing to scroll through the list.
-
When your card is about the expire, SecureIT warns you with a notification upon start up. On top of that, you can easily see which cards are expiring or expired in the cards list.
4.2.2. Reading a card : read
If you already have a card in mind and want to view its details, you can easily do so by entering the card description and its CVC.
Format: read d/DESCRIPTION v/CVC
Example: read d/VisaPOSB v/456
You can also obtain the same result by using a card’s index in the list with the correct CVC.
Format: read INDEX v/CVC
Example: read 1 v/456
4.2.3. Copying a card : copy
You can copy a specific card’s card number to your clipboard as well.
You can choose to copy the card number using its description:
Format: copy d/DESCRIPTION v/CVC
Example: copy d/VisaPOSB v/456
Alternatively, you can also perform the command with the card’s index in the list.
Format: copy INDEX v/CVC
Example: copy 1 v/456
Note:
-
This command only copies the specified card number, and not the CVC. This is because users are expected to remember their CVC so that their card security is not compromised.
4.2.4. Deleting a card: delete
Warning
-
Deleted cards are not recoverable
If your card has expired, you can easily remove it from the application.
Again, you could do this by the card’s description:
Format: delete DESCRIPTION
Example: delete VisaPOSB
Or by its index:
Format: delete INDEX
Example: delete 1
4.3. File
SecureIT has a file manager which helps you keep confidential files that you do not wish others to see. Using your master password, SecureIT converts your files into an encrypted format which cannot be read by other applications.
To access the file manager, simply enter goto file in the command box.
4.3.1. Encrypting a file : encrypt
You can encrypt a local file using its file path. You may also tag the file at the same time for easy reference later on.
Encrypted files have the prefix [LOCKED] in their file names.
Format: encrypt FILEPATH [t/TAG]…
Example:
For Windows: encrypt C:\Users\YOUR_USERNAME\Desktop\Test.txt t/personal
For macOS: encrypt /Users/YOUR_USERNAME/Desktop/Test.txt t/personal
(The actual file path may differ on your OS. Hence, it is always recommended to drag the file in the input field.)
Tip
-
Instead of typing the file path, you can drag the file into the input field to easily append the file path. This also applies to other commands (e.g.
add,move). -
The app may freeze for some time if the file to be encrypted is large. Please do not force exit the app during encryption.
-
The app does not support encryption of files larger than 2GB.
Warning
-
The
encryptcommand only alters the file content but does not set up additional access rights. In other words, it keeps your information secret but does not keep your files safe from malicious alteration or deletion. -
If you wish to prevent alternation or deletion of files, please set up additional access rights using your operating system. SecureIT is not responsible for any data loss resulting from lack of access right settings.
-
If you are using Windows, please close the file before encryption.
4.3.2. Decrypting a file : decrypt
You can decrypt a local file using its displayed index number.
Format: decrypt INDEX
Example: decrypt 1 (This command decrypts the first file in the displayed file list.)
Tip
-
If you notice that the file decryption fails, it may be because you have renamed the file or moved the file to another location without using SecureIT (for example, using your operating system directly).
-
In that case, use
removecommand to remove the file from the list first, and then useaddcommand to add the renamed/moved file. Please refer to theremoveandaddcommand sections for detailed instructions.
4.3.3. Adding an encrypted file : add
You can add an encrypted file using its file path. You may tag the file at the same time for easy reference later on. The file must be encrypted by SecureIT previously.
Format: add FILENAME [t/TAG]…
Example:
For Windows: add C:\Users\YOUR_USERNAME\Desktop\[LOCKED] Test.txt t/personal
For macOS: add /Users/YOUR_USERNAME/Desktop/[LOCKED] Test.txt t/personal
(The actual file path may differ on your OS. Hence, it is always recommended to drag the file in the input field.)
Tip
-
The file name does not have to contain the prefix
[LOCKED]. SecureIT can recognise the file and automatically prepend the prefix.
4.3.4. Removing a file : remove
You can remove an encrypted file record using its displayed index number.
Please note that only the file record within SecureIT is removed. The actual file is not deleted from the file system.
Format: remove INDEX
Example: remove 1
Warning
-
The "encrypted at" and "last edited at" timestamps are stored within SecureIT and will be discarded if you remove the record from SecureIT. They are not recoverable even if you add the file back using
addcommand.
4.3.5. Renaming an encrypted file : rename
You can rename an encrypted file using its index number. The prefix [LOCKED] is retained.
Format: rename INDEX TARGET_FILENAME
Example: rename 1 Test2
Tip
-
The file extension of the file is retained using
renamecommand. If you give a file extension in the target file name, it will be ignored.
4.3.6. Moving an encrypted file : move
You can move an encrypted file using its index number. The target directory must be a real directory (not a shortcut, alias, symbolic link, etc.)
Format: move INDEX TARGET_DIRECTORY
Example:
For Windows: move 1 C:\Users\YOUR_USERNAME\Desktop
For macOS: move 1 /Users/YOUR_USERNAME/Desktop
(The actual file path may differ on your OS. Hence, it is always recommended to drag the directory in the input field.)
Tip
-
It is recommended to rename and move files using SecureIT to better manage your files.
-
If you have renamed or moved your files without using SecureIT (for example, using the operating system directly), you have to use
removecommand to remove the file from the list first, and then useaddcommand to add the renamed/moved file.
4.3.7. Finding encrypted files : find
You can find matching encrypted files using the search keywords.
To return from search results, use list command.
Format: find KEYWORDS…
Example: find Test
Tip
-
The search is case insensitive. e.g
testwill matchTest. -
Both the file name and the file path are searched. Hence, you can look for files with certain types (e.g.
find .png .jpg) or files inside certain directories (e.g.find /Desktop).
4.3.9. Viewing an encrypted file : preview
You can preview an encrypted file using its index number. You can only preview .txt, .jpg, .png, .pdf, and .docx files.
Format: preview INDEX
Example: preview 1
Tip
-
The app may freeze for some time if the file to be previewed is large. Please do not force exit the app.
-
The file preview is for your reference only. Due to various standards on file formats, the preview can be different from the actual file. For example, your annotations on PDF files may not be correctly displayed, and the text format of Word files may not be retained in the preview.
4.4. Note
Want to have a secure place to write down some of your confidential information? SecureIT’s notes feature is here to help!
Accessing note directory : goto note
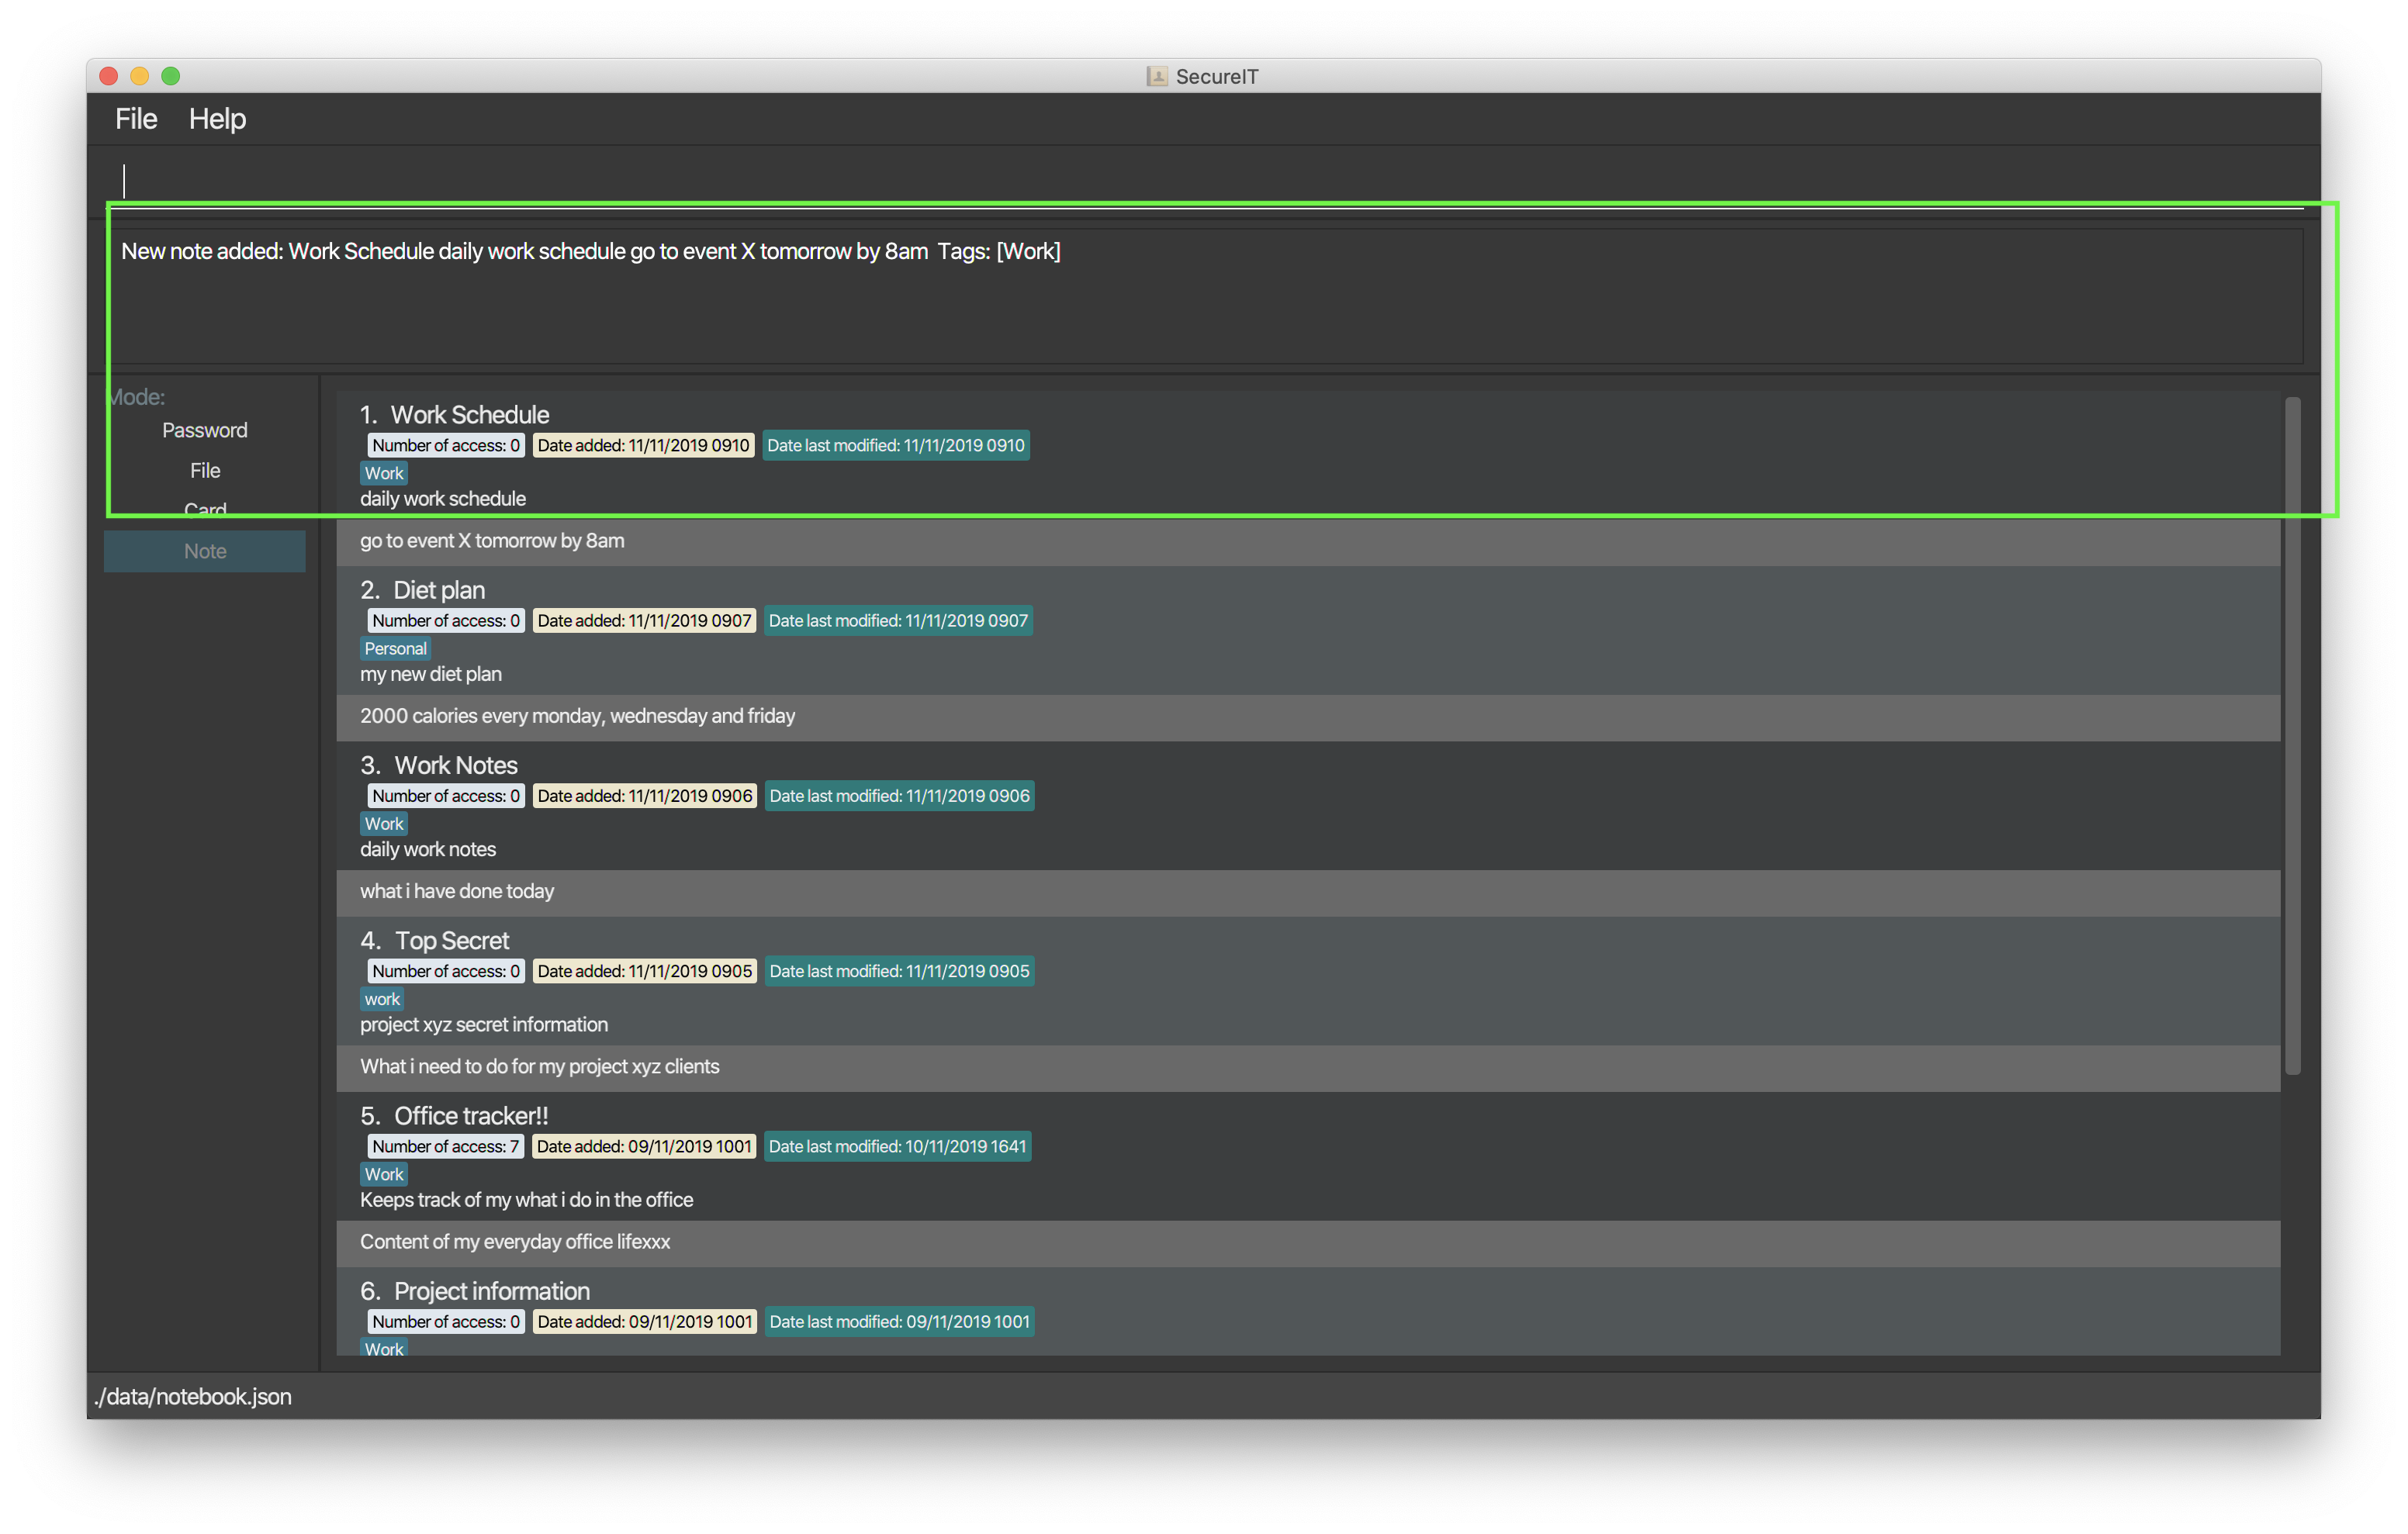
4.4.1. Creating a note : add
Simply add a note into SecureIT using our add command!
Format: `add ti/TITLE d/DESCRIPTION t/TAG [c/CONTENT] `
Example: `add ti/Work Schedule t/Work d/daily work schedule c/go to event X tomorrow at 8am `
Warning
-
You are not allowed to add notes with the same title.
-
Title, description and tag fields must not be empty.
-
Content field with c/ prefix is optional.
4.4.2. Editing a note: edit
Want to update or make changes to any parts of your note?
Make use of our edit command!
Format: edit INDEX [ti/TITLE] [d/DESCRIPTION] [t/TAG]… [c/CONTENT]
Example: edit 1 ti/April Daily Work Schedule
Warning
-
INDEX and at least one optional field is compulsory to successfully edit the note.
-
You are not allowed to edit notes to have the same title.
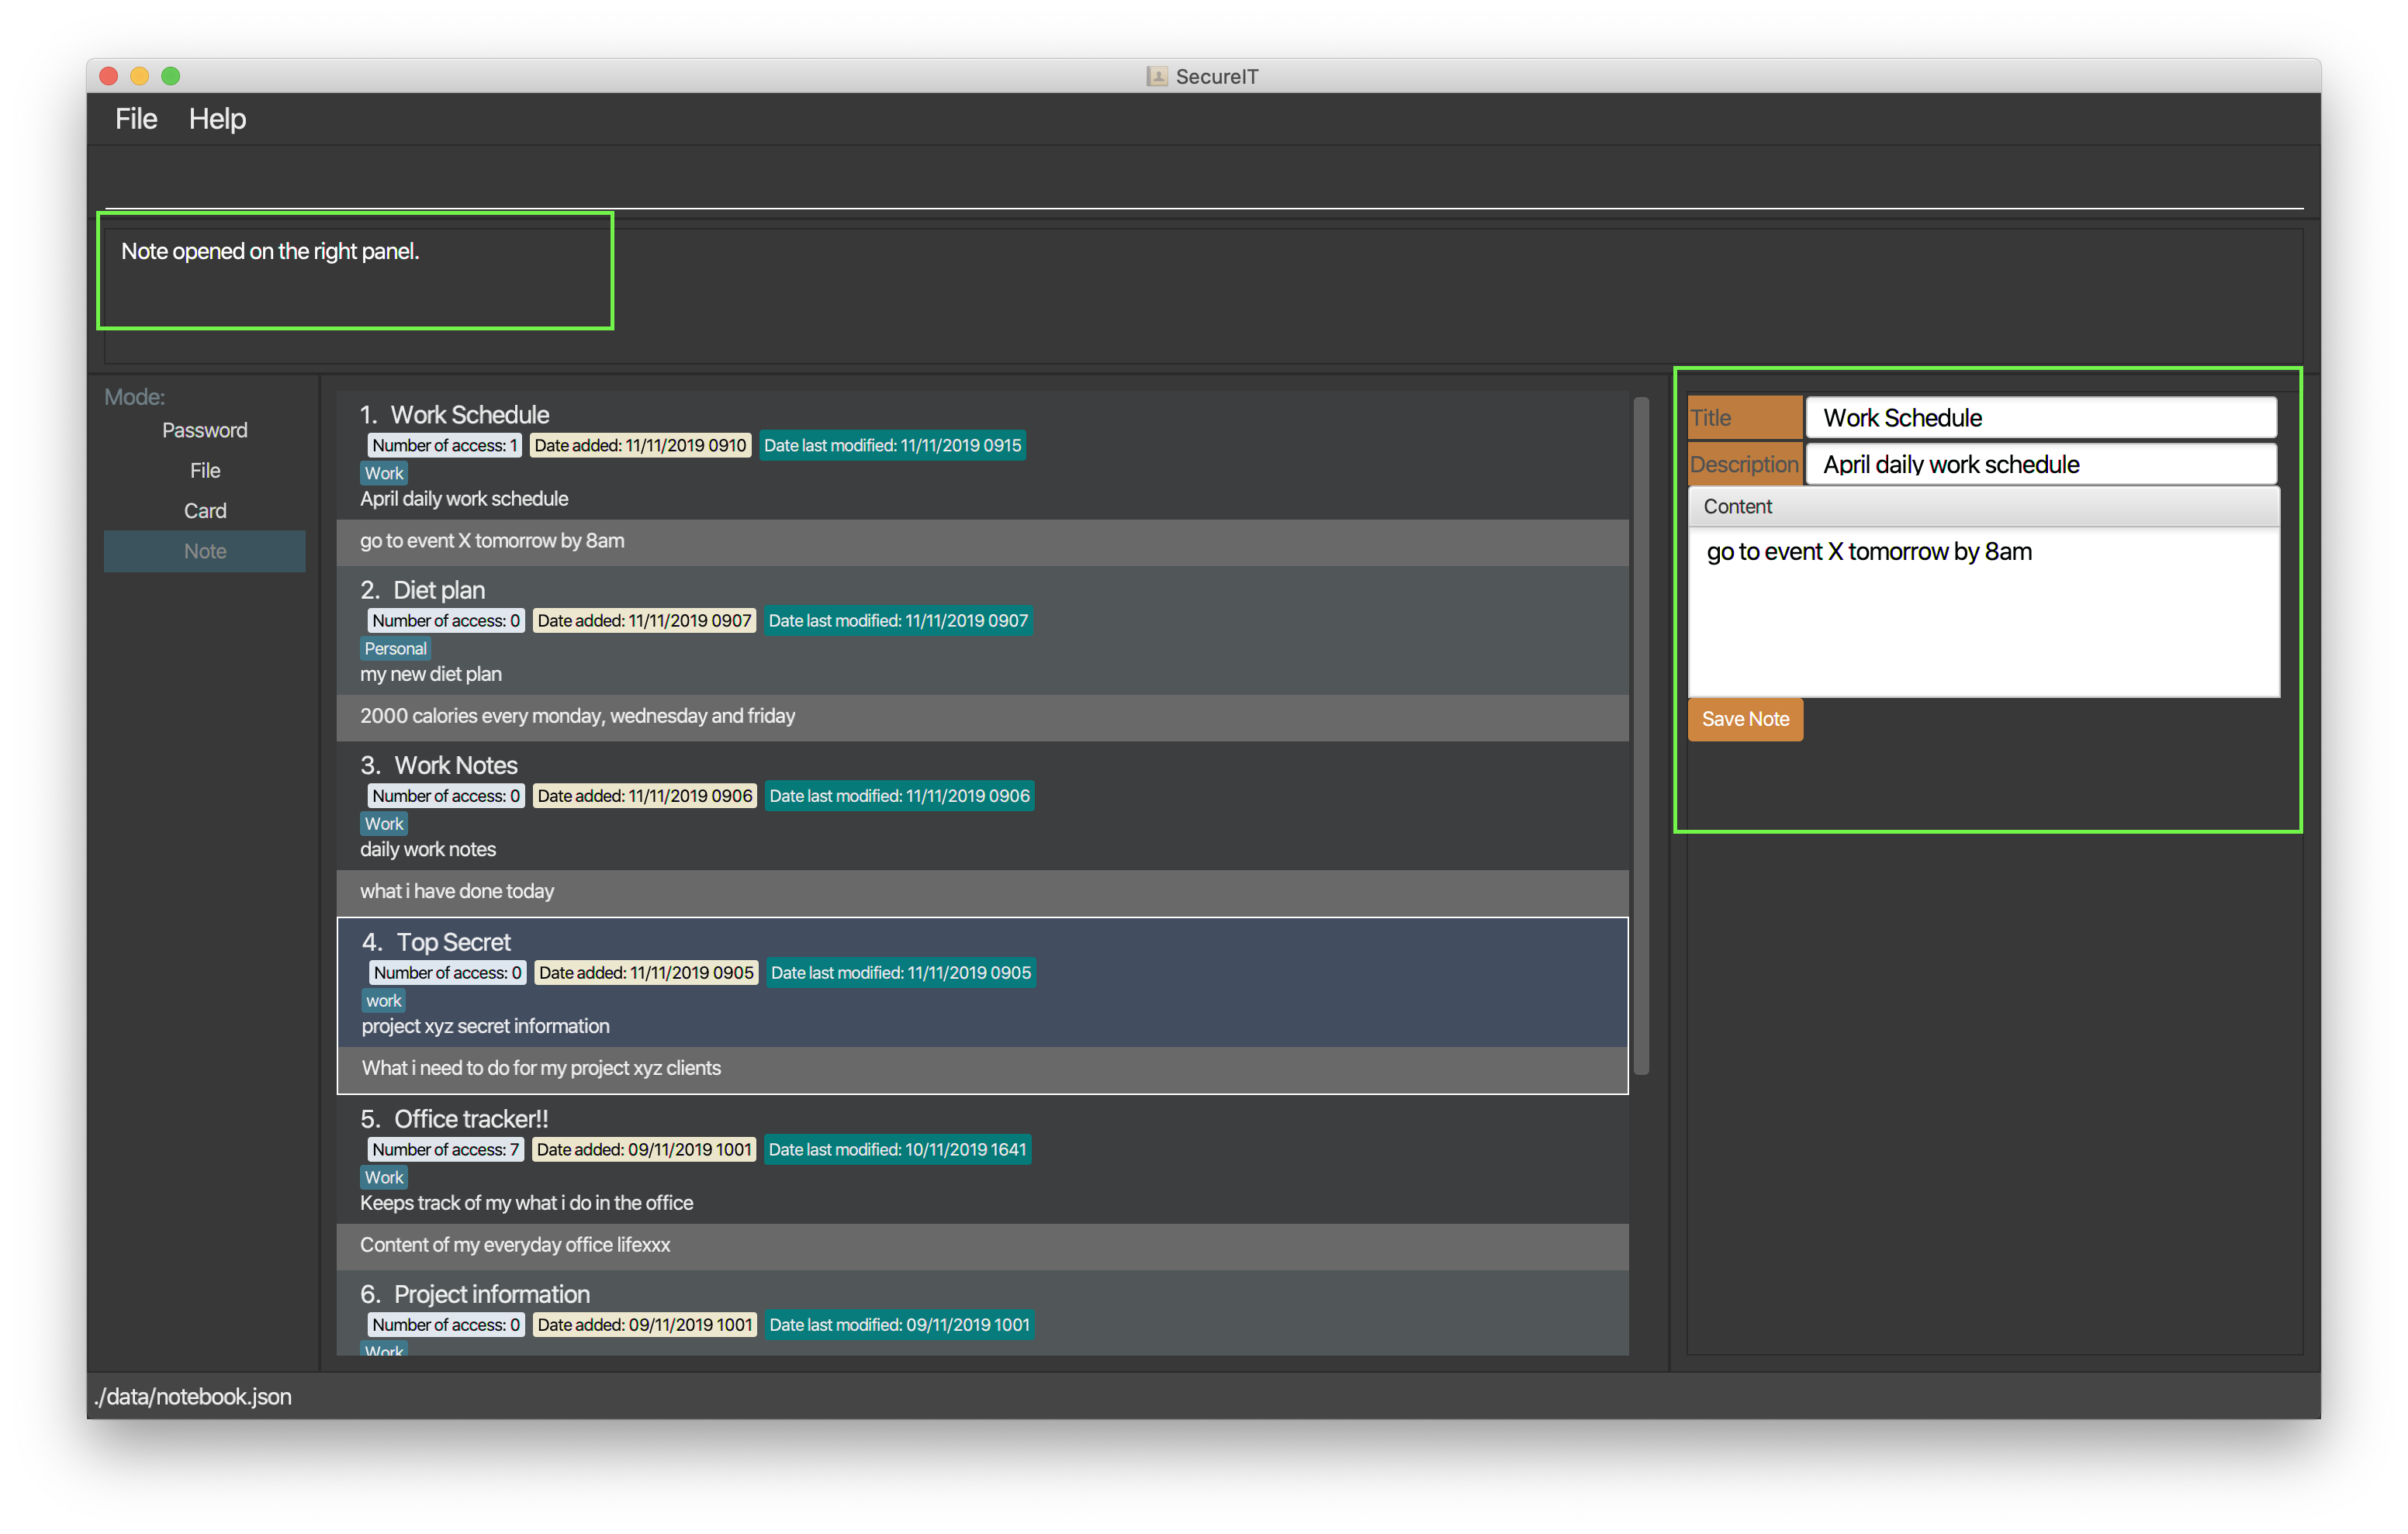
4.4.3. Accessing a note : open
Too much hassle to type out everything in the edit command to make edits to your note?
Want to be able to read and edit your note easily?
The open command is designed for this!
The open command opens your note in a panel on the right for you to read and edit its contents easily.
Format: open INDEX
-
Opening a note updates the number of times the notes is accessed.
-
opencommand is undoable.
Example: open 1
Your note at index 1 will be opened, allowing you to read and edit it easily.
You can click on the Save Note button after editing to save your changes made to the note.
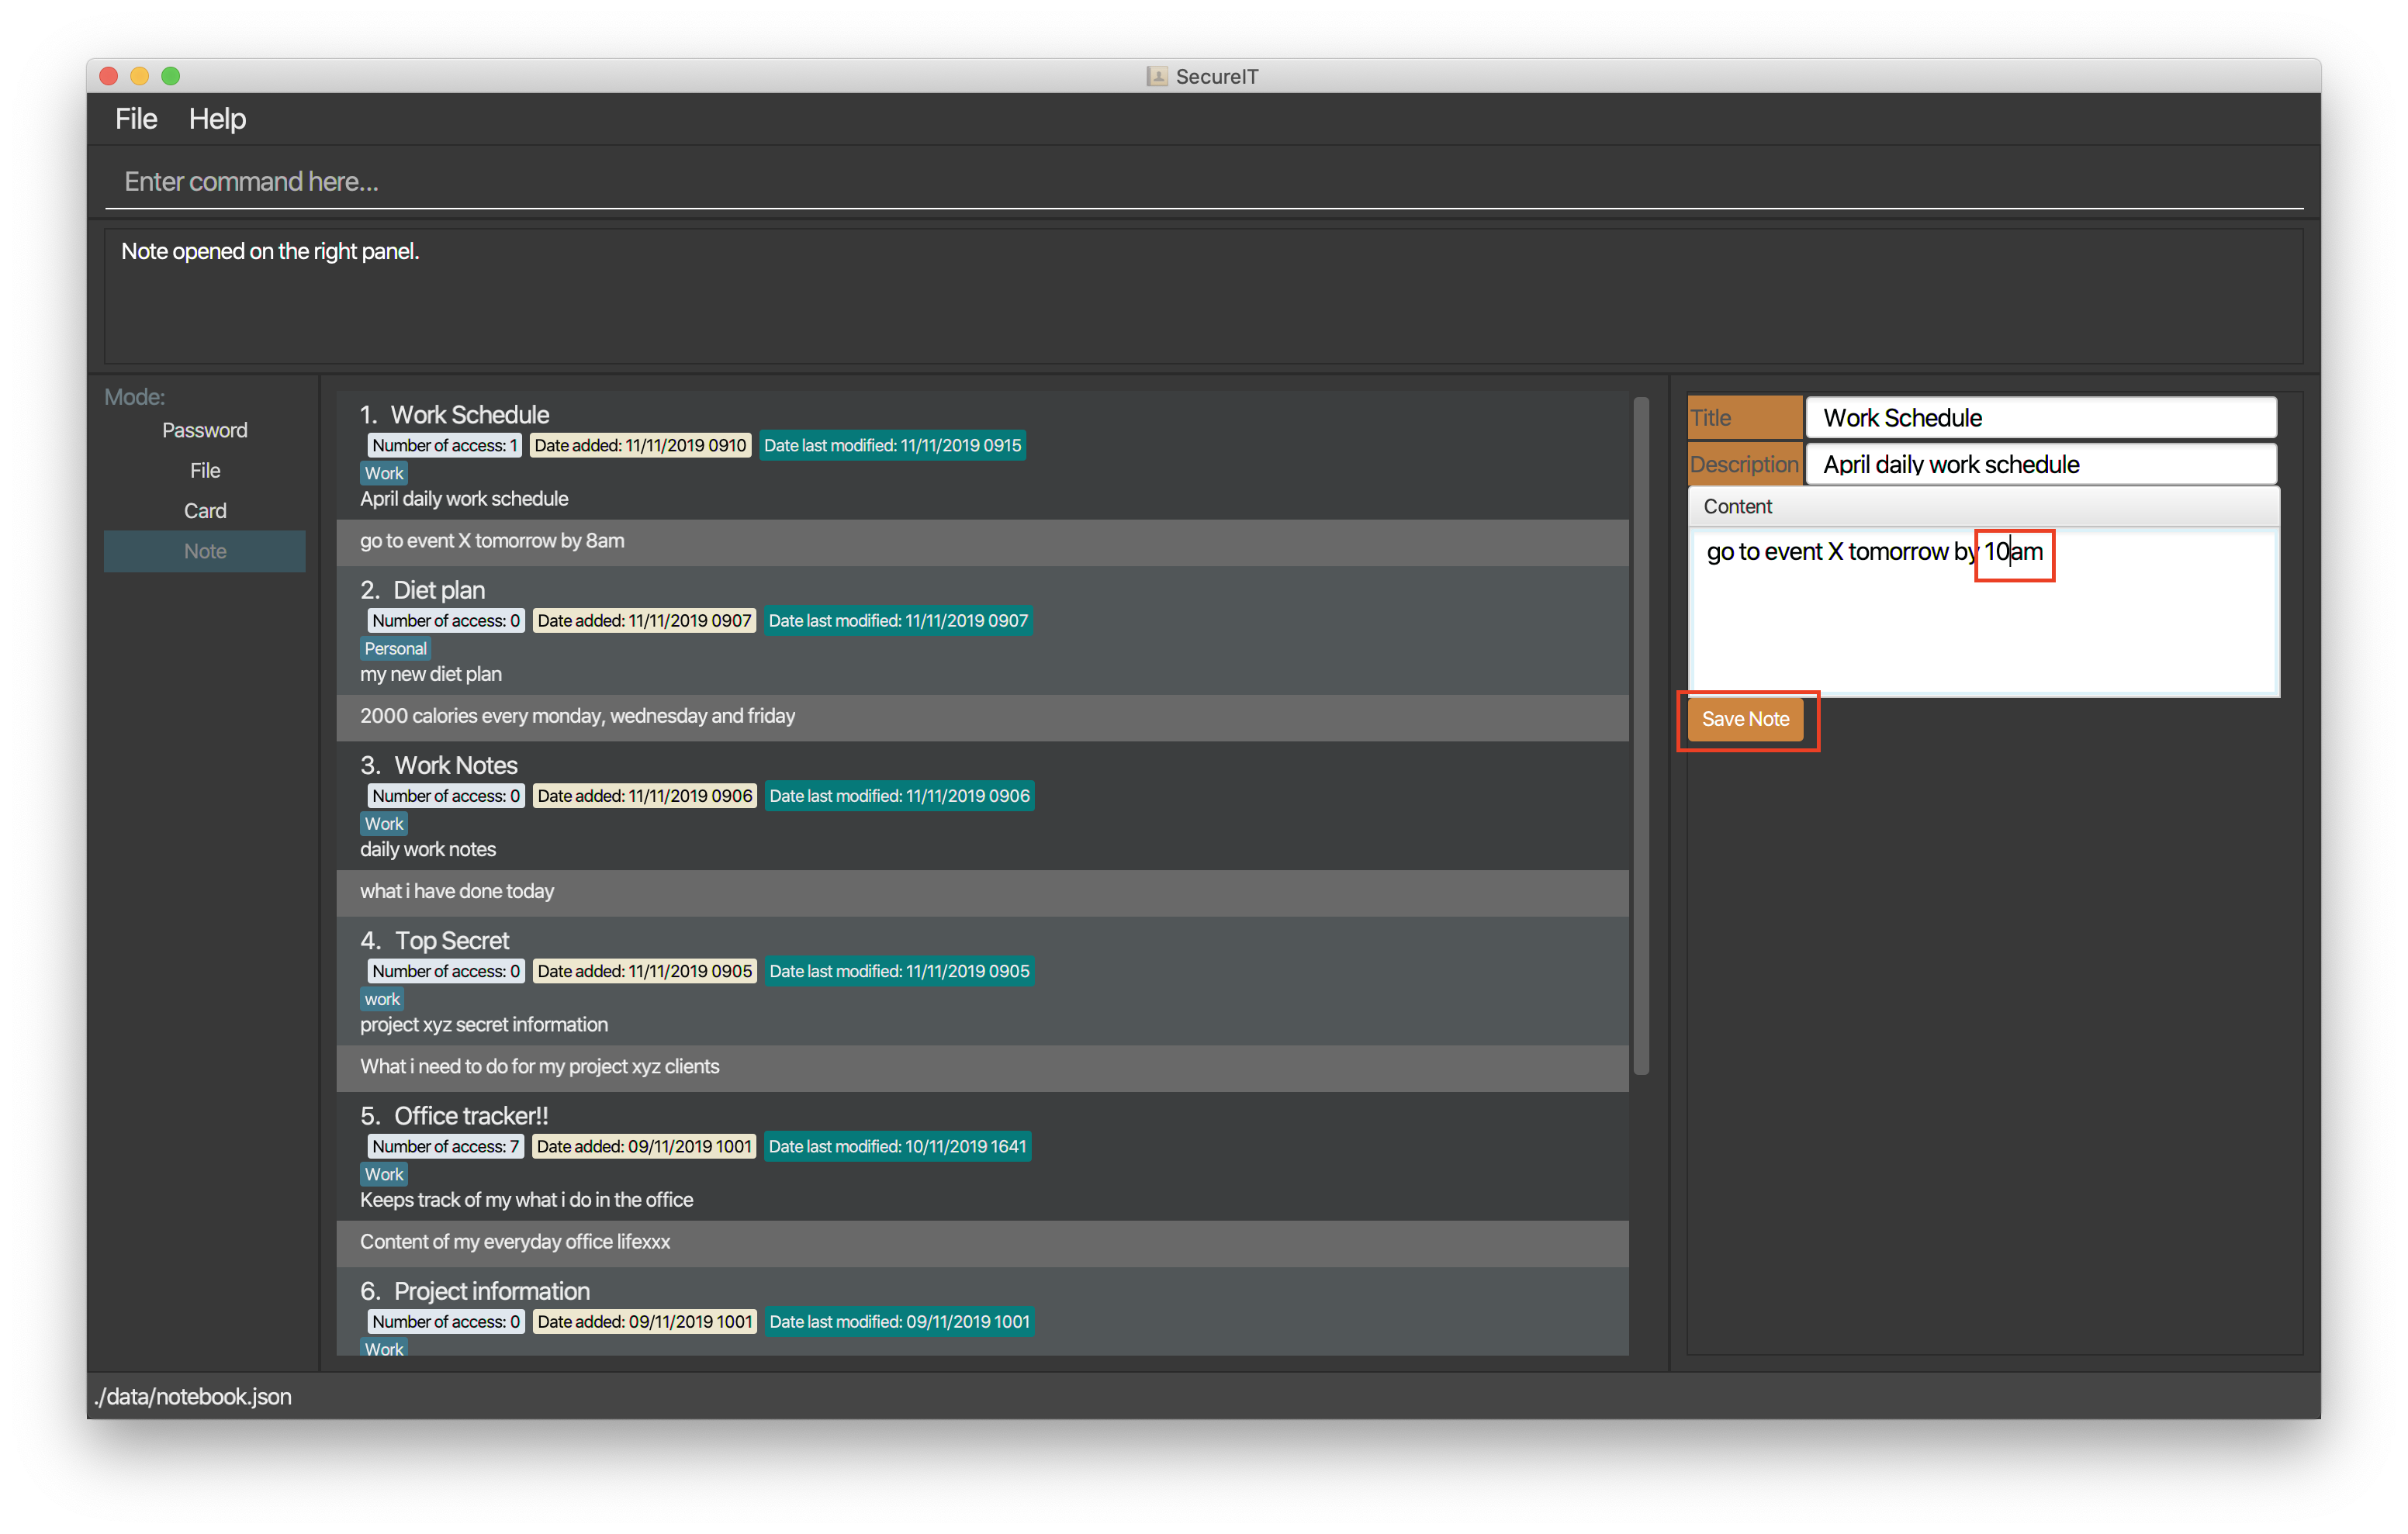
After clicking on the Save Note button, your edits made to the note will be saved!
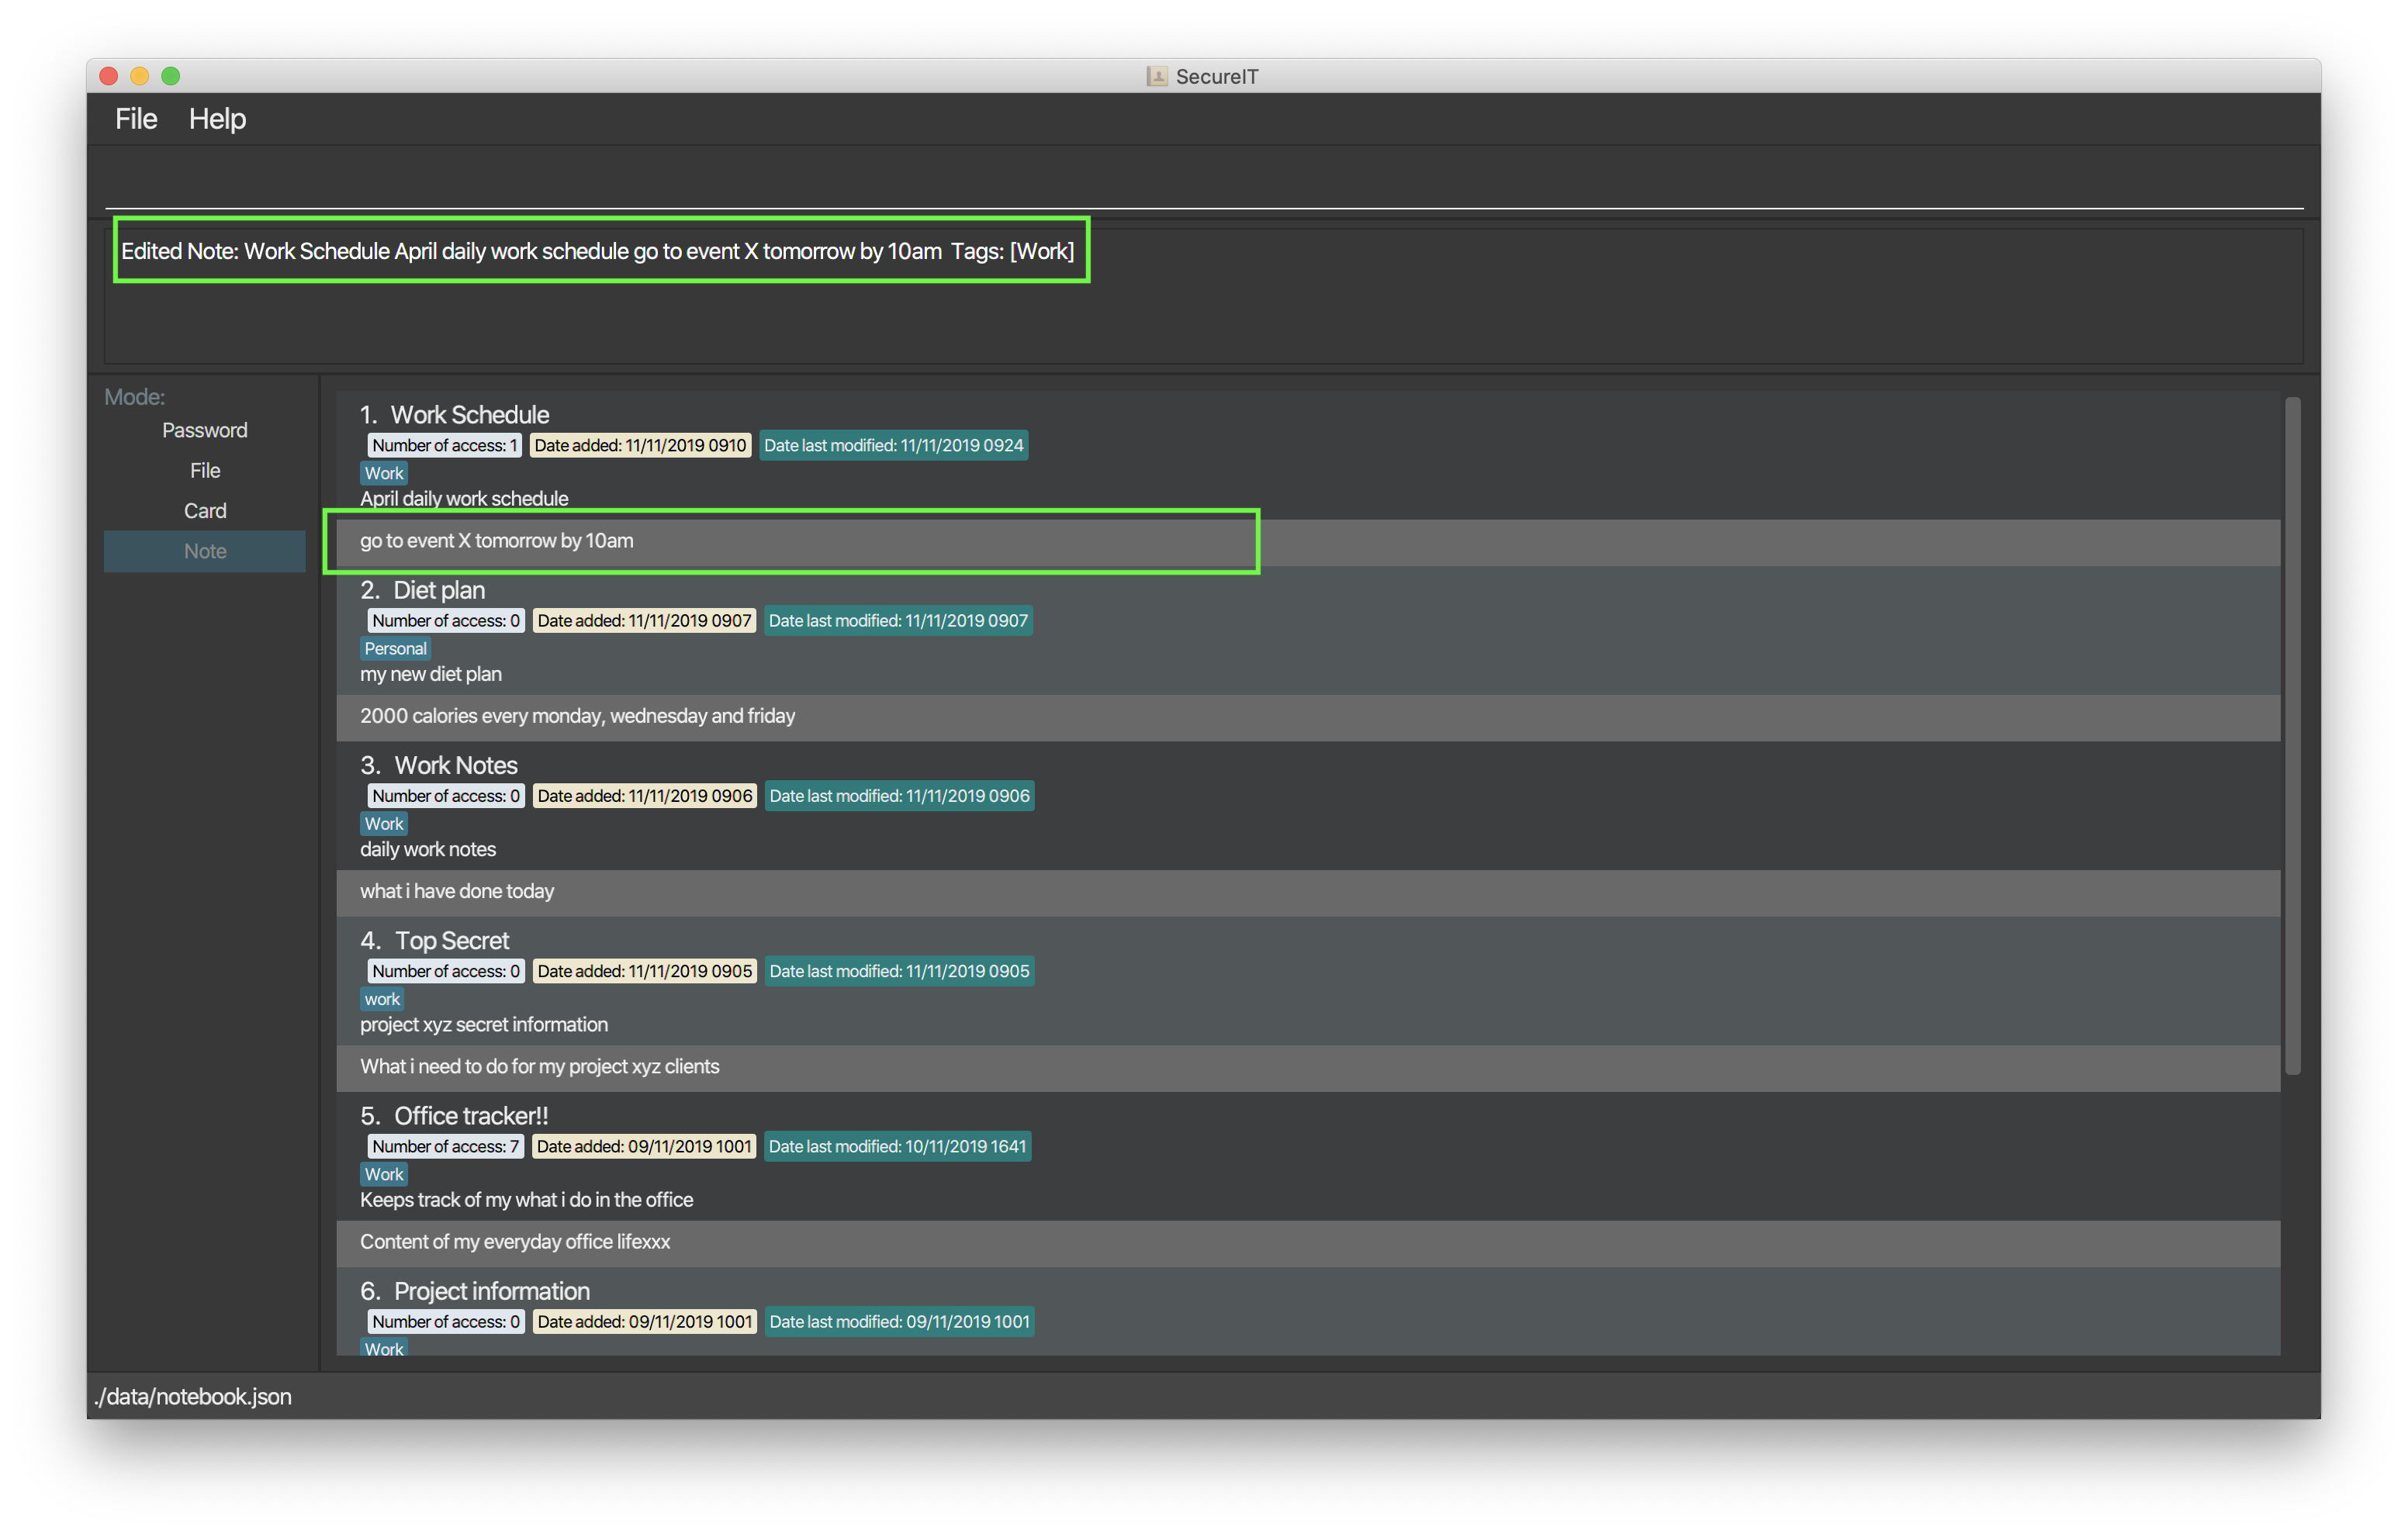
edit command after clicking on the Save Note button.4.4.4. Deleting a note: delete
The note is no longer relevant?
You can delete it!
Format: delete INDEX
Example: delete 1
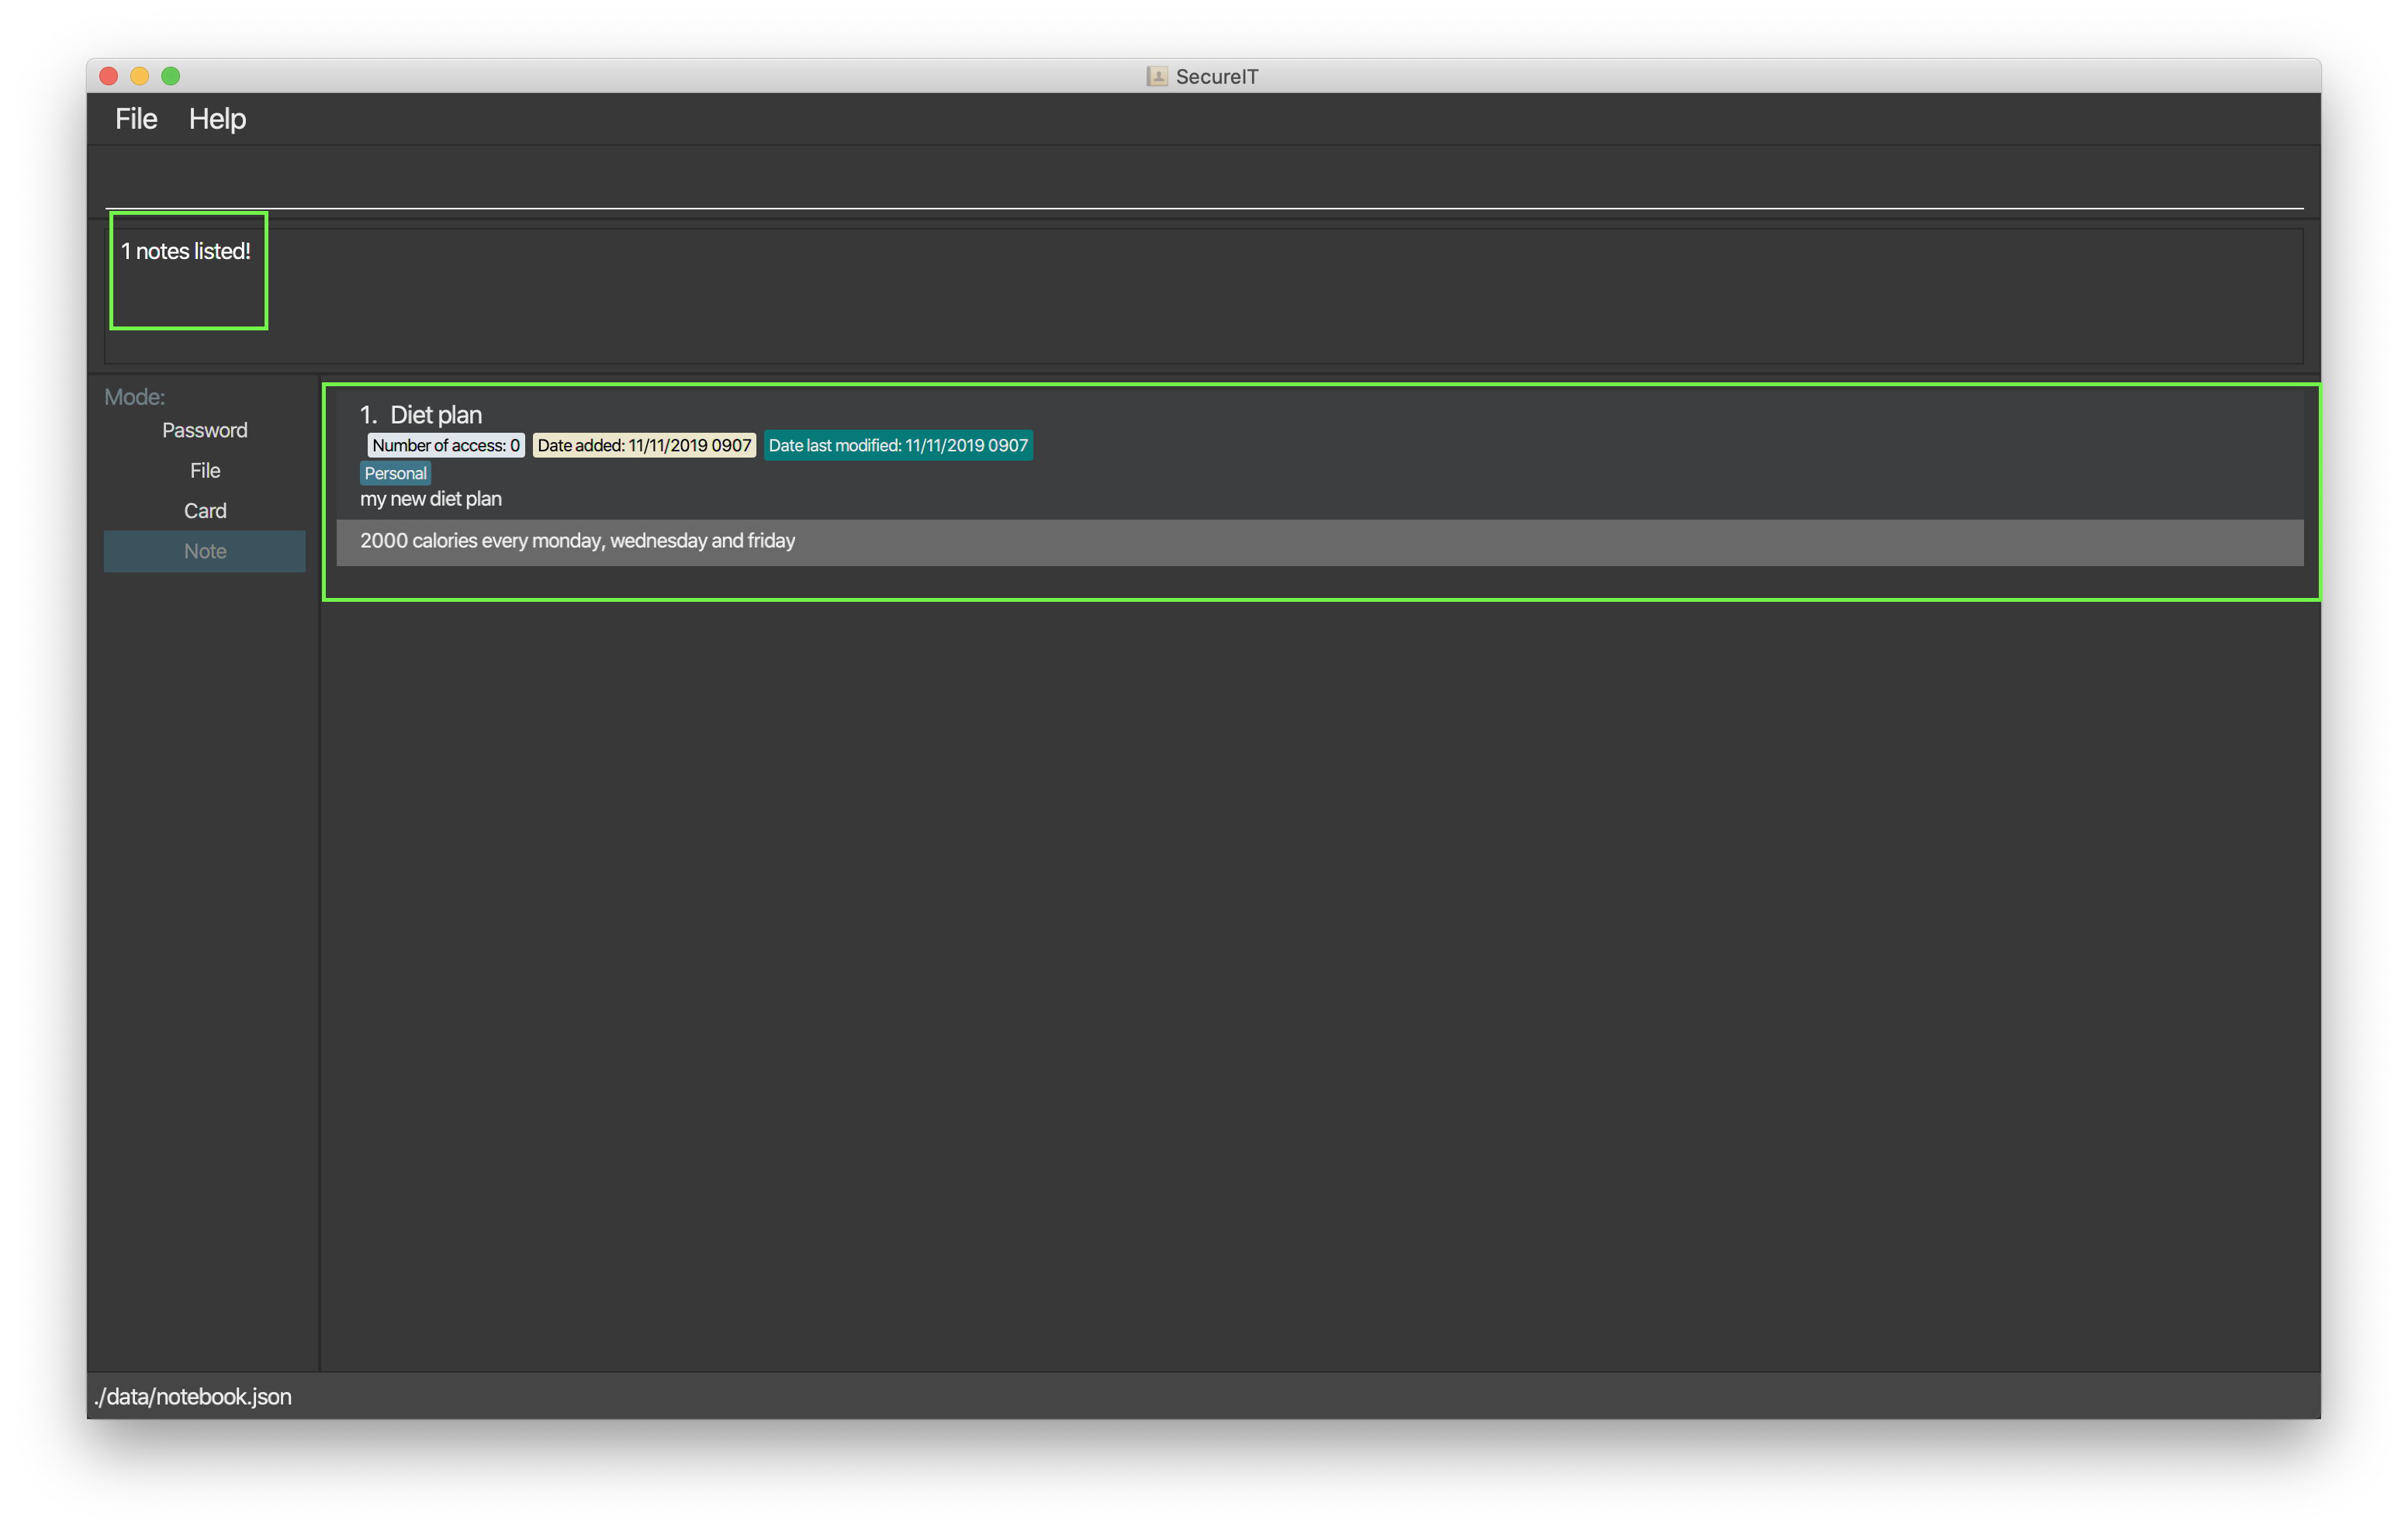
4.4.5. Finding a note: find
Tired of scrolling through all your notes to find the note you are looking for?
Use our find command to look for that note!
Format: find TEXT
Example:`find diet`
Tip
-
Your input TEXT for search is case insensitive. e.g
Personal_diarywill matchpersonal_diary -
Searches title, description and content of all notes and returns those that contains the TEXT.
tag::sortNote[]
4.4.6. Sorting notes: sort
Tired of your note book looking so unorganised? Want to be able to view and access your notes more easily?
You can sort them up using three different conditions to arrange notes most relevant to you at the top of the list!
Available sorting conditions include:
-
DateAdded: Date which the note is added.
-
DateModified: Date which the note is last modified.
-
NumOfAccess: Number of times the note has been accessed through the
opencommand.
Format: sort by/SORTBYCONDITION1 SORTBYCONDITION2
Example: sort by/NumOfAccess DateModified
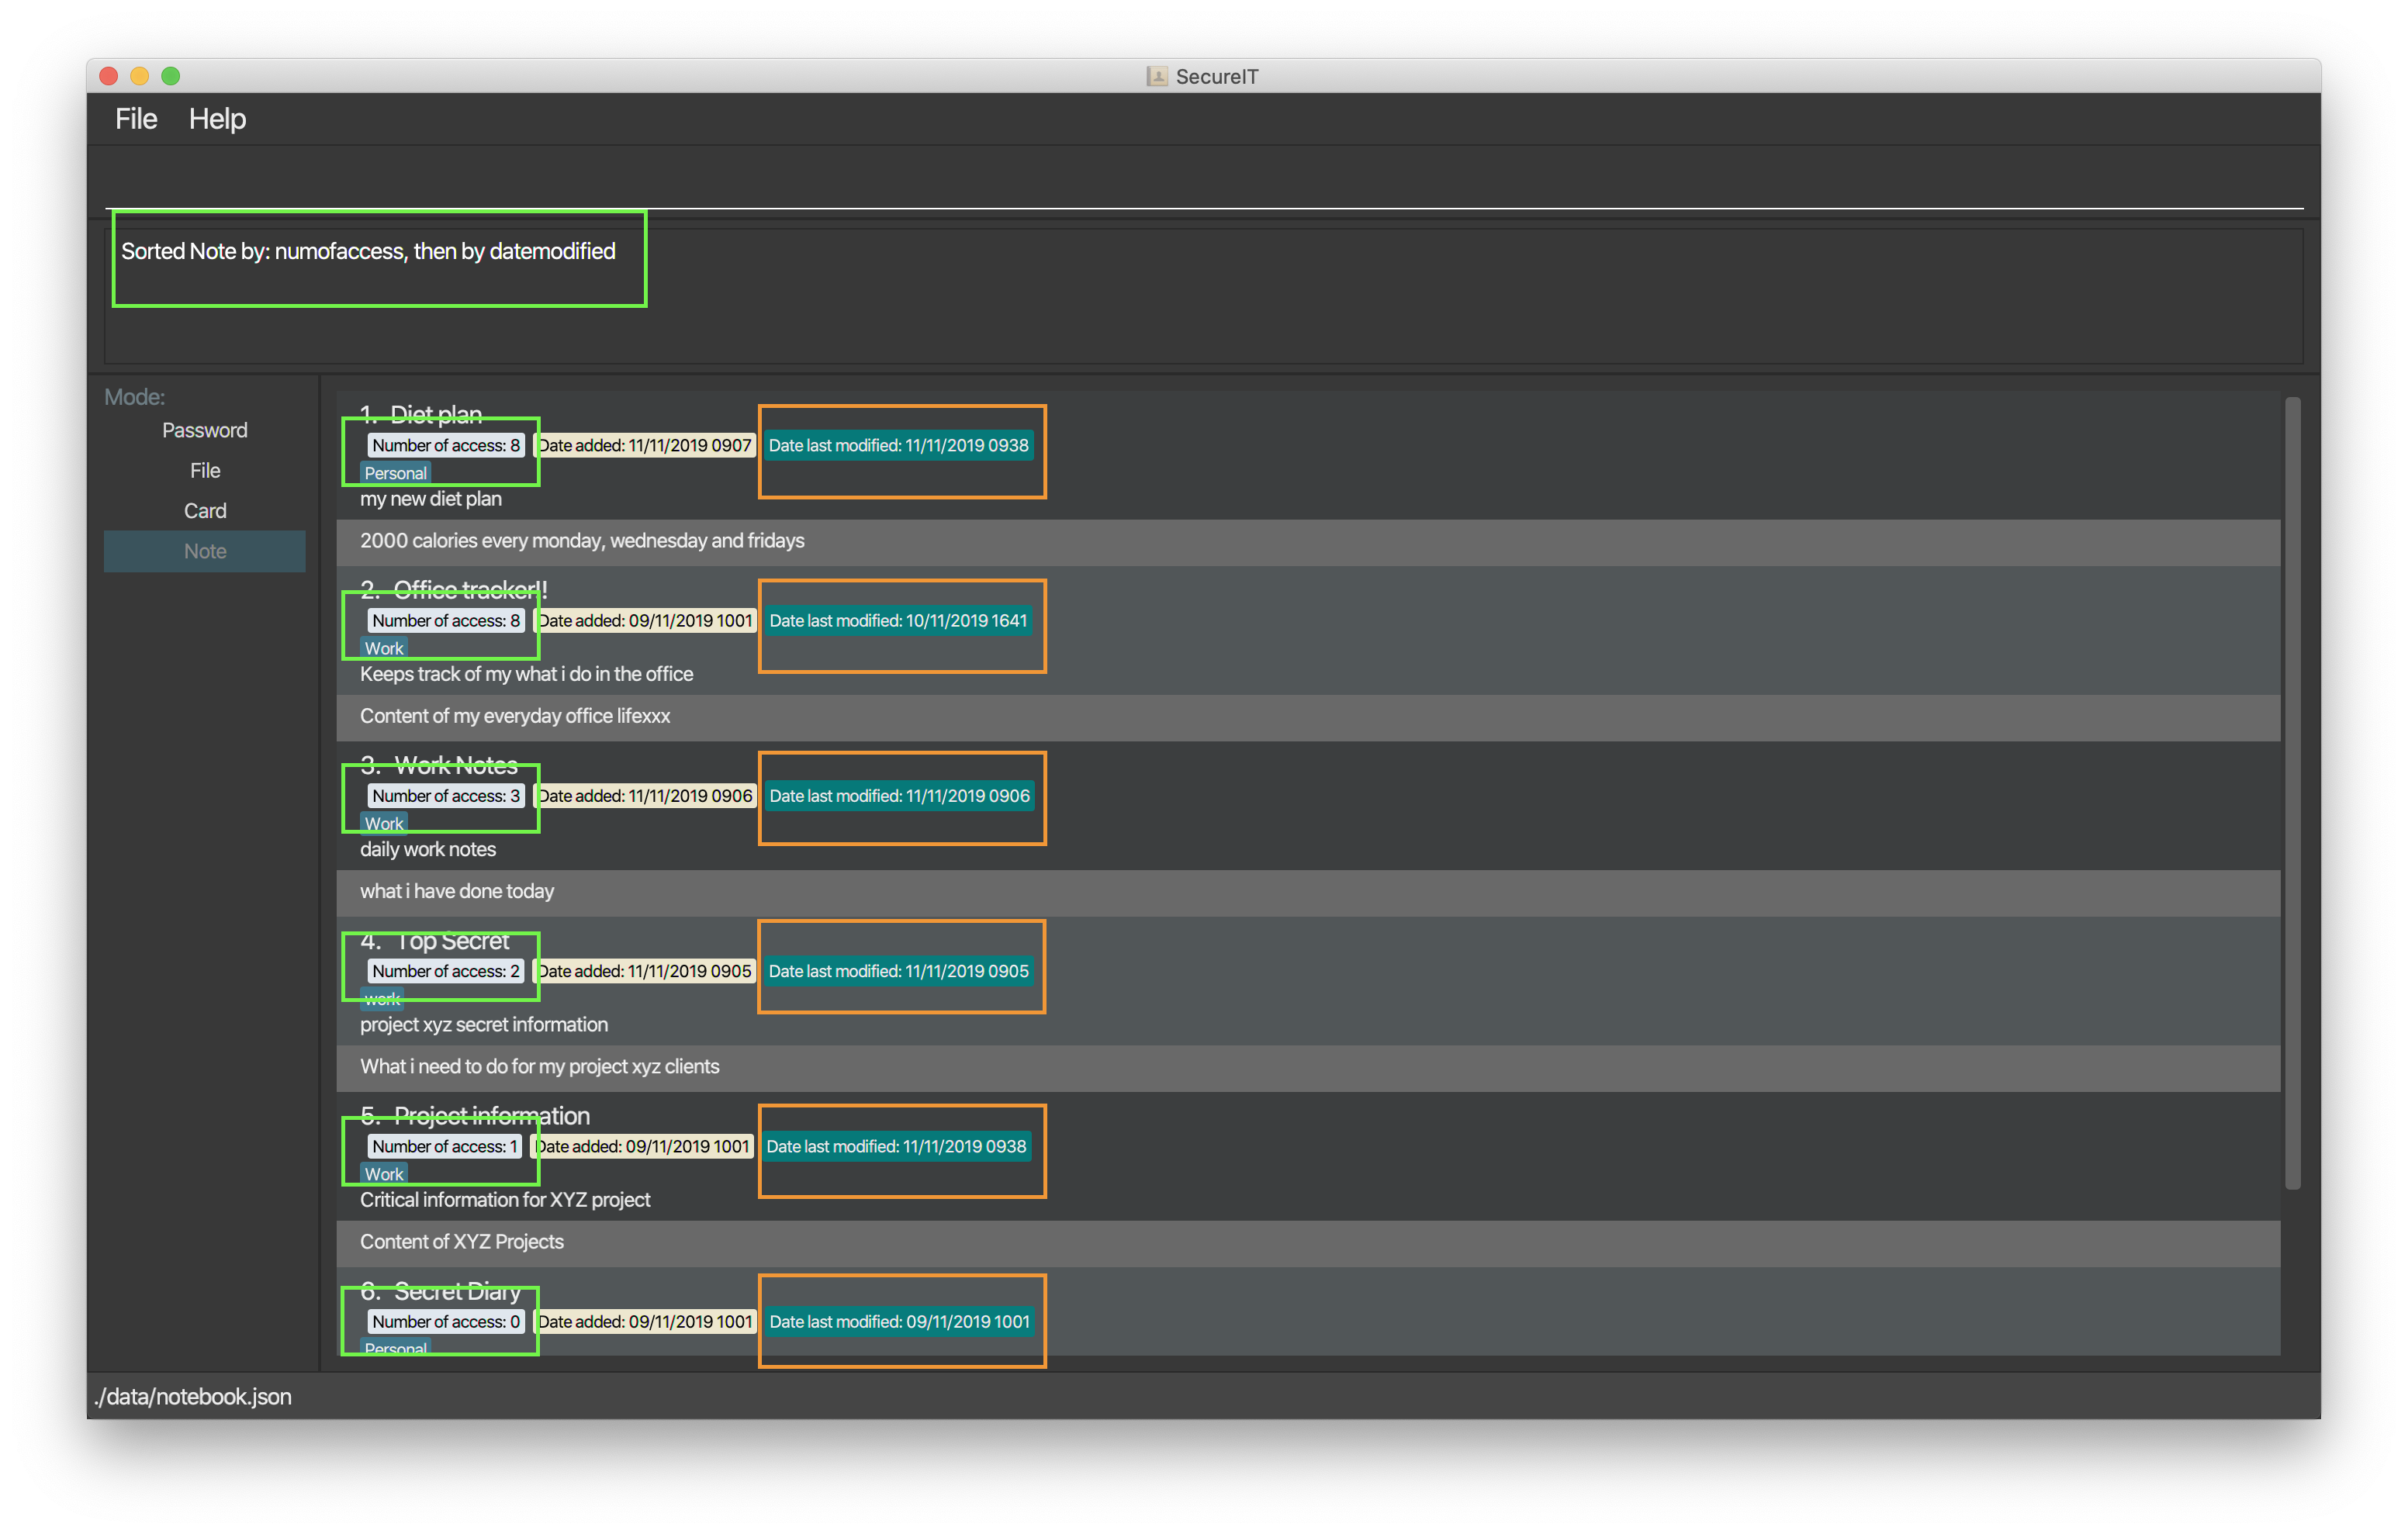
Tip
-
You can sort by one or more conditions separated by a whitespace.
-
The first condition takes the greatest precedence in sorting. For instance, the NumOfAccess condition in the Figure 4 above has greater precedence over DateModified condition in sorting.
Warning
-
At least one SORTBYCONDITION is required following the by/ prefix.
-
SORTBYCONDITION must be either "DateModified", "DateAdded" or "NumOfAccess".
-
SORTBYCONDITION is not case-sensitive.
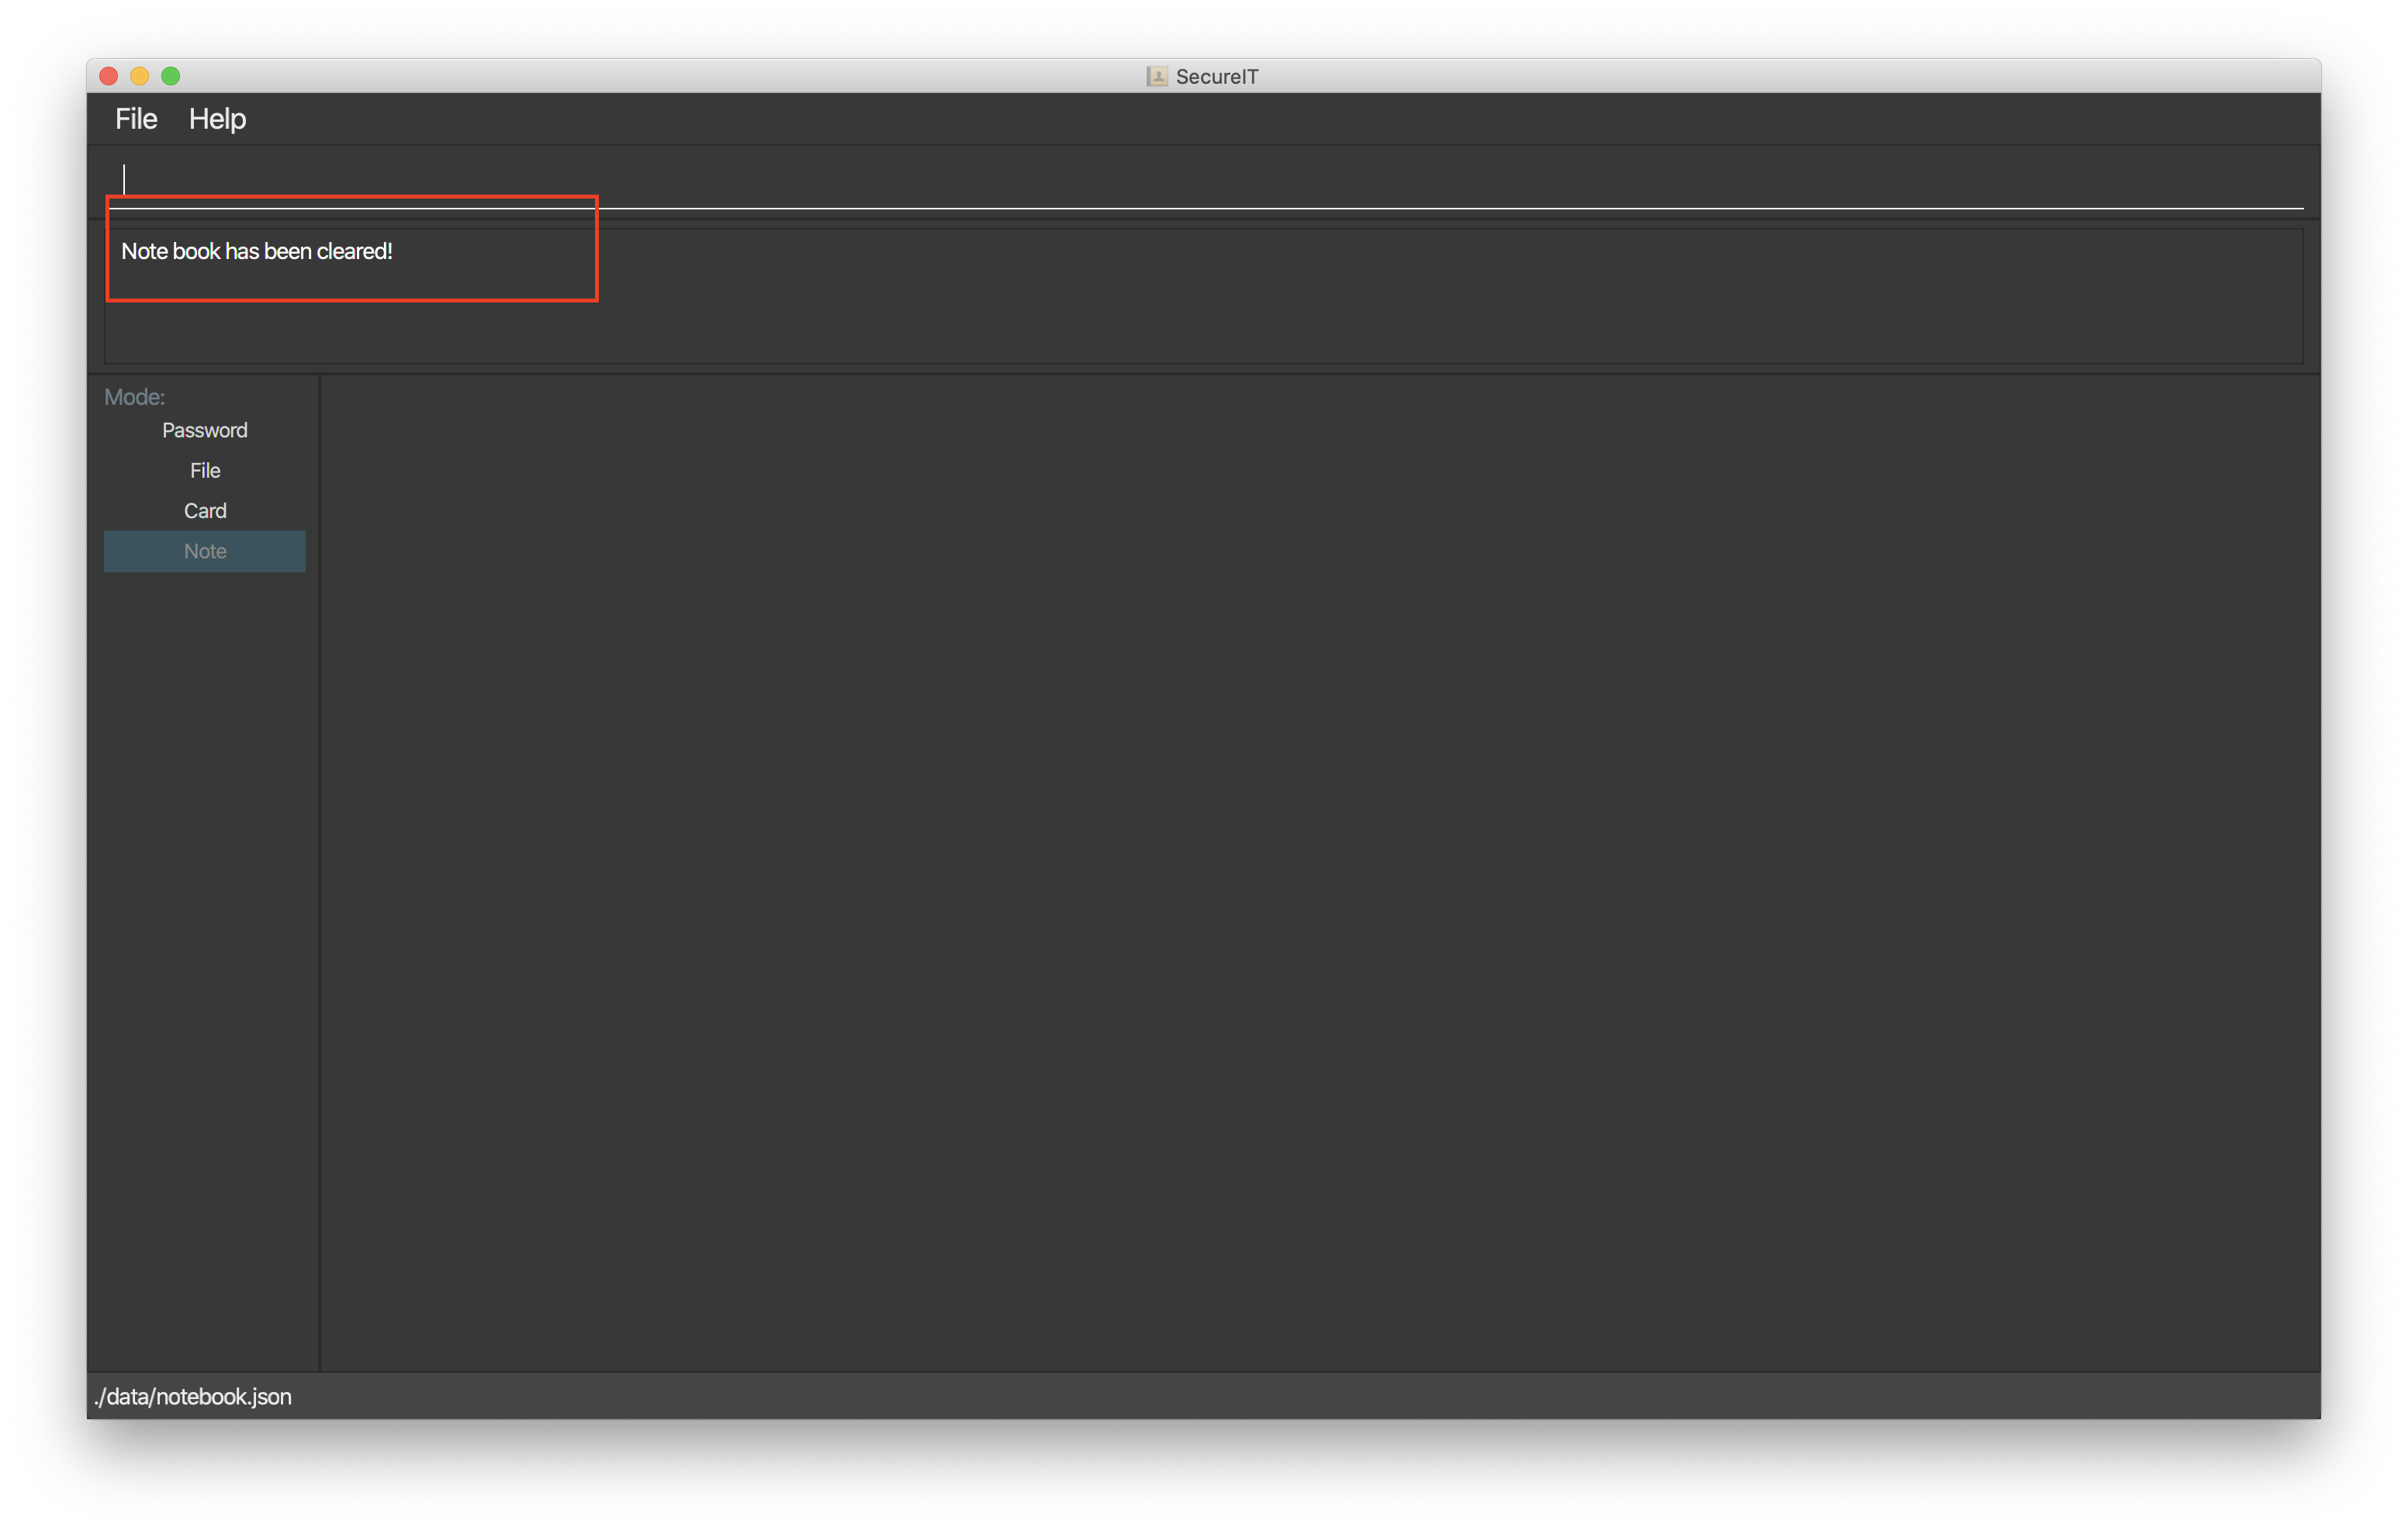
4.4.7. Clearing all entries : clear
Want to delete all the notes in your note book but too much trouble to perform delete for every one of them?
Make use of our clear command!
You can clear all entries from your note book one single command.
Format: clear
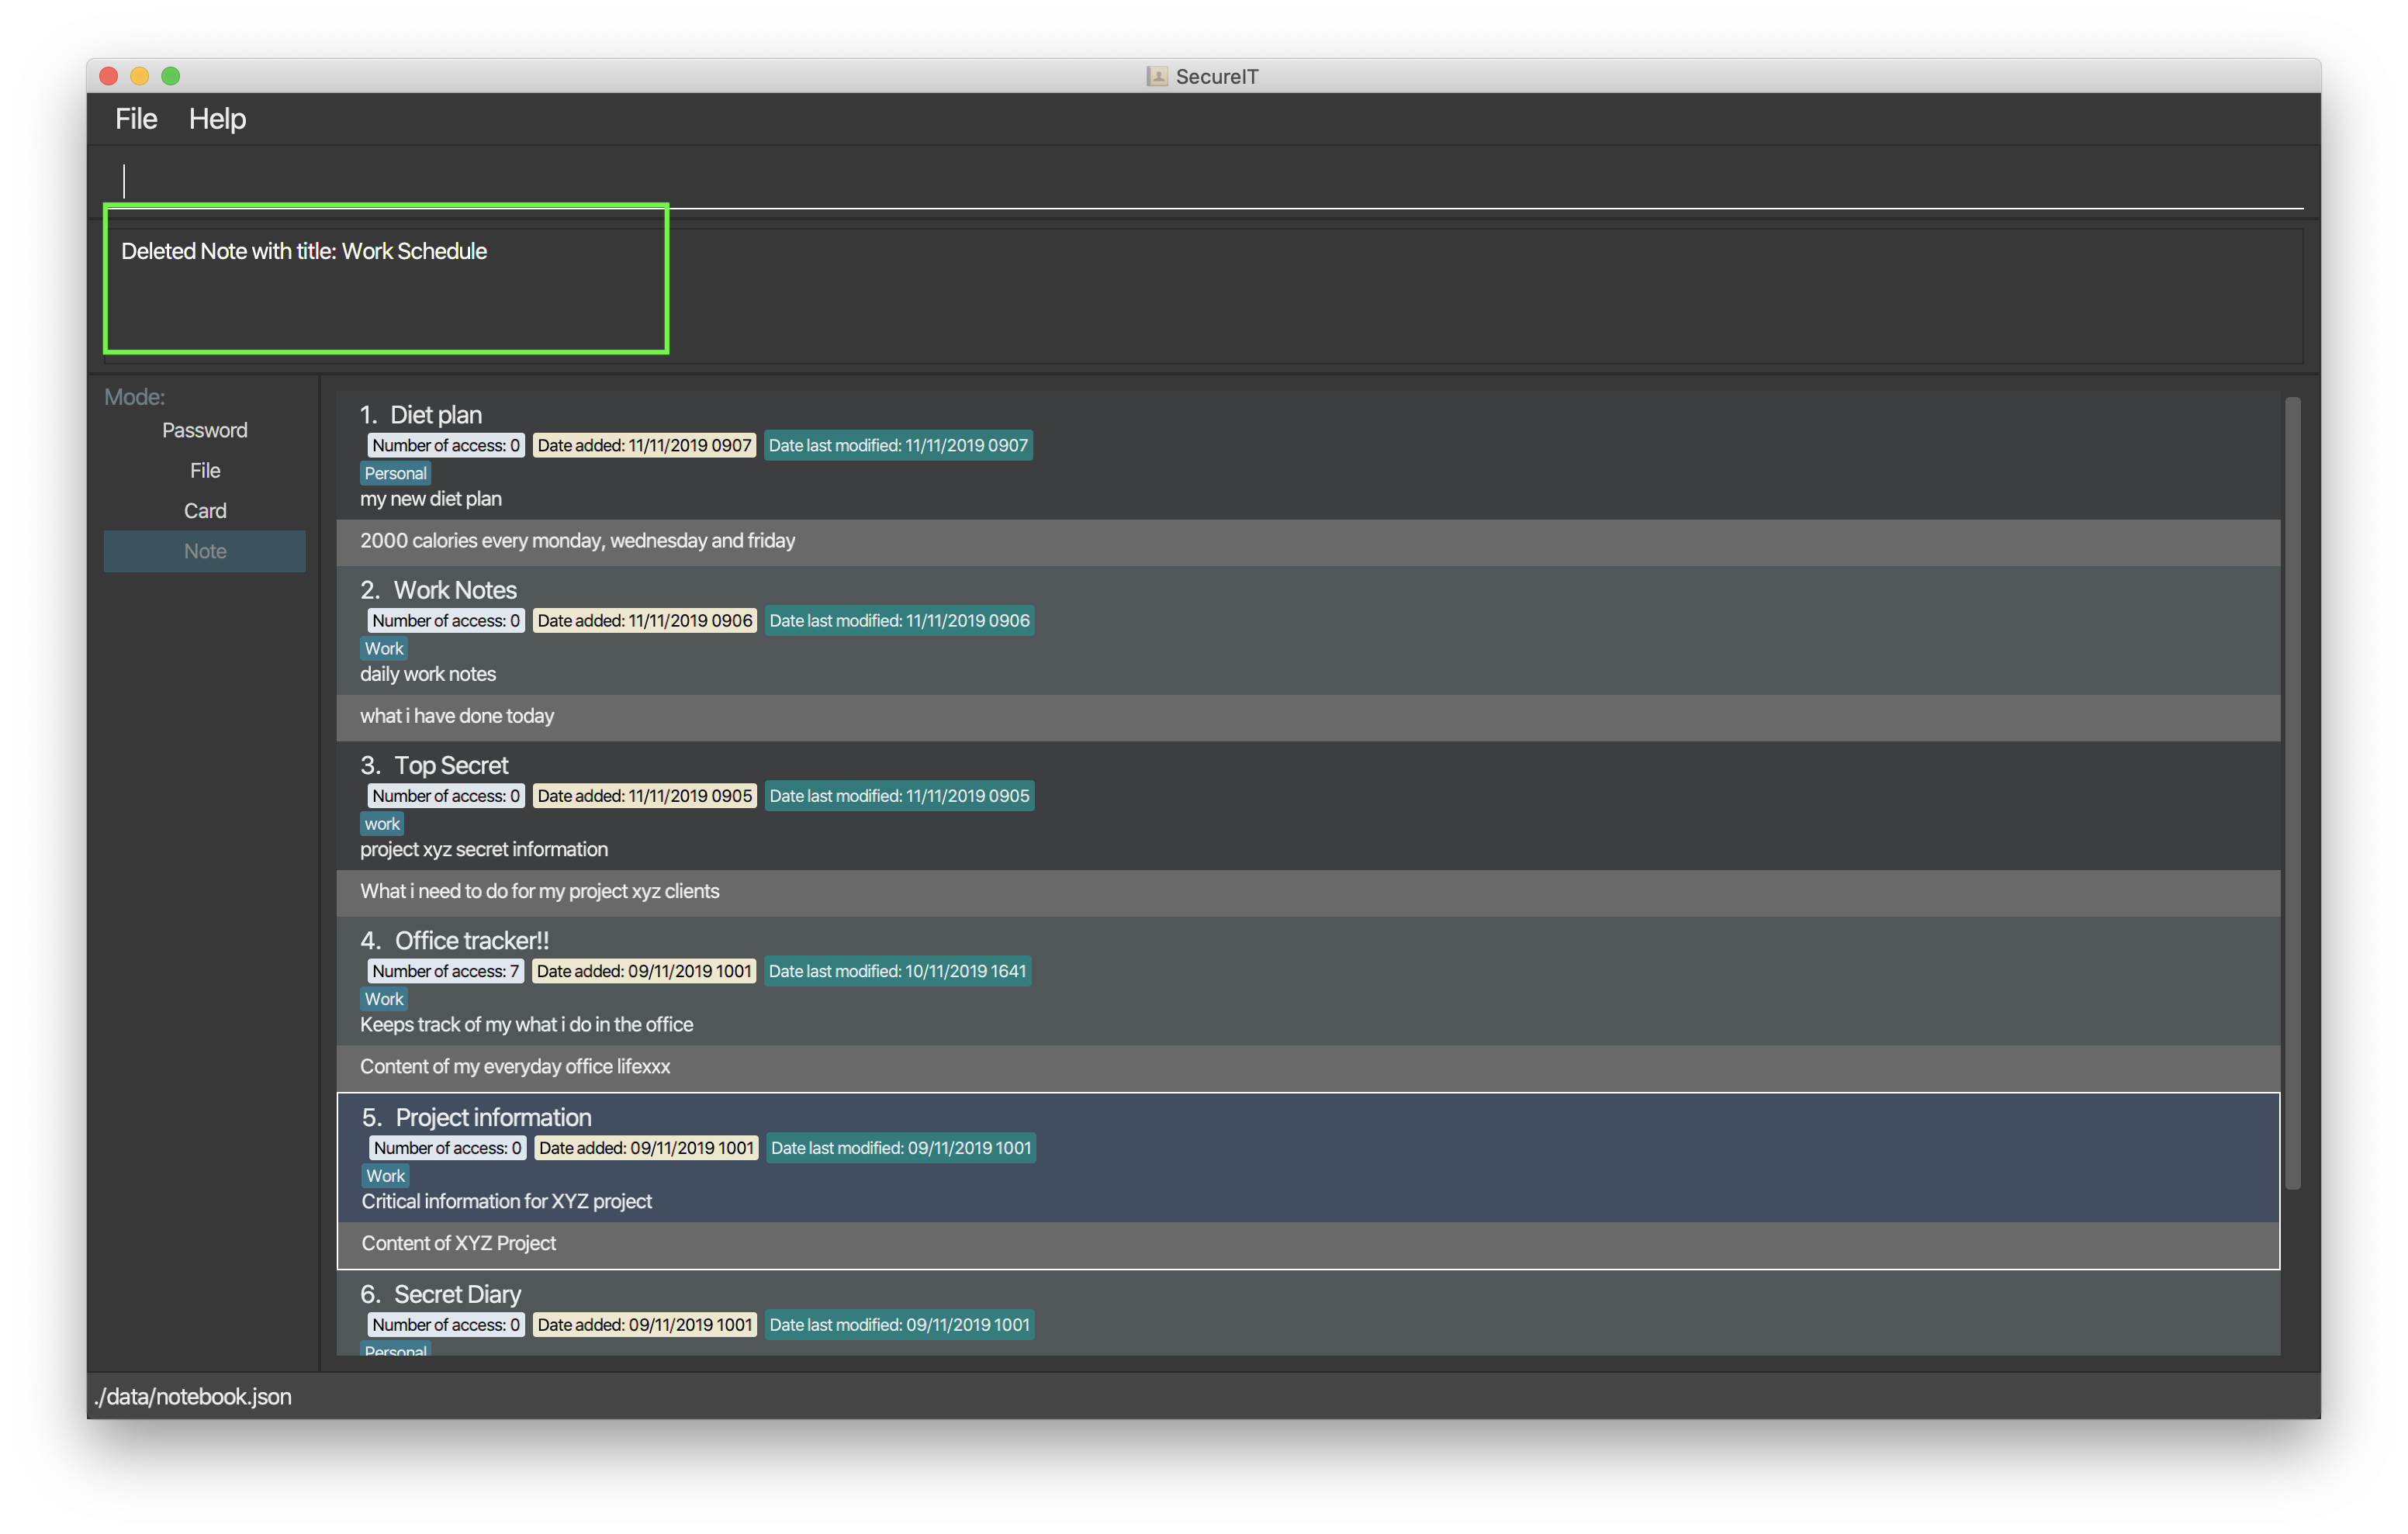
4.4.8. Undo notes action: undo
Made a mistake in the notes feature?
Do not worry because you can undo your mistake!
Using our undo command will not only undo your last undoable command, it will also inform you of exactly what action is being undone.
Format: undo
Example: undo
Here is what it would look like to undo a clear command:
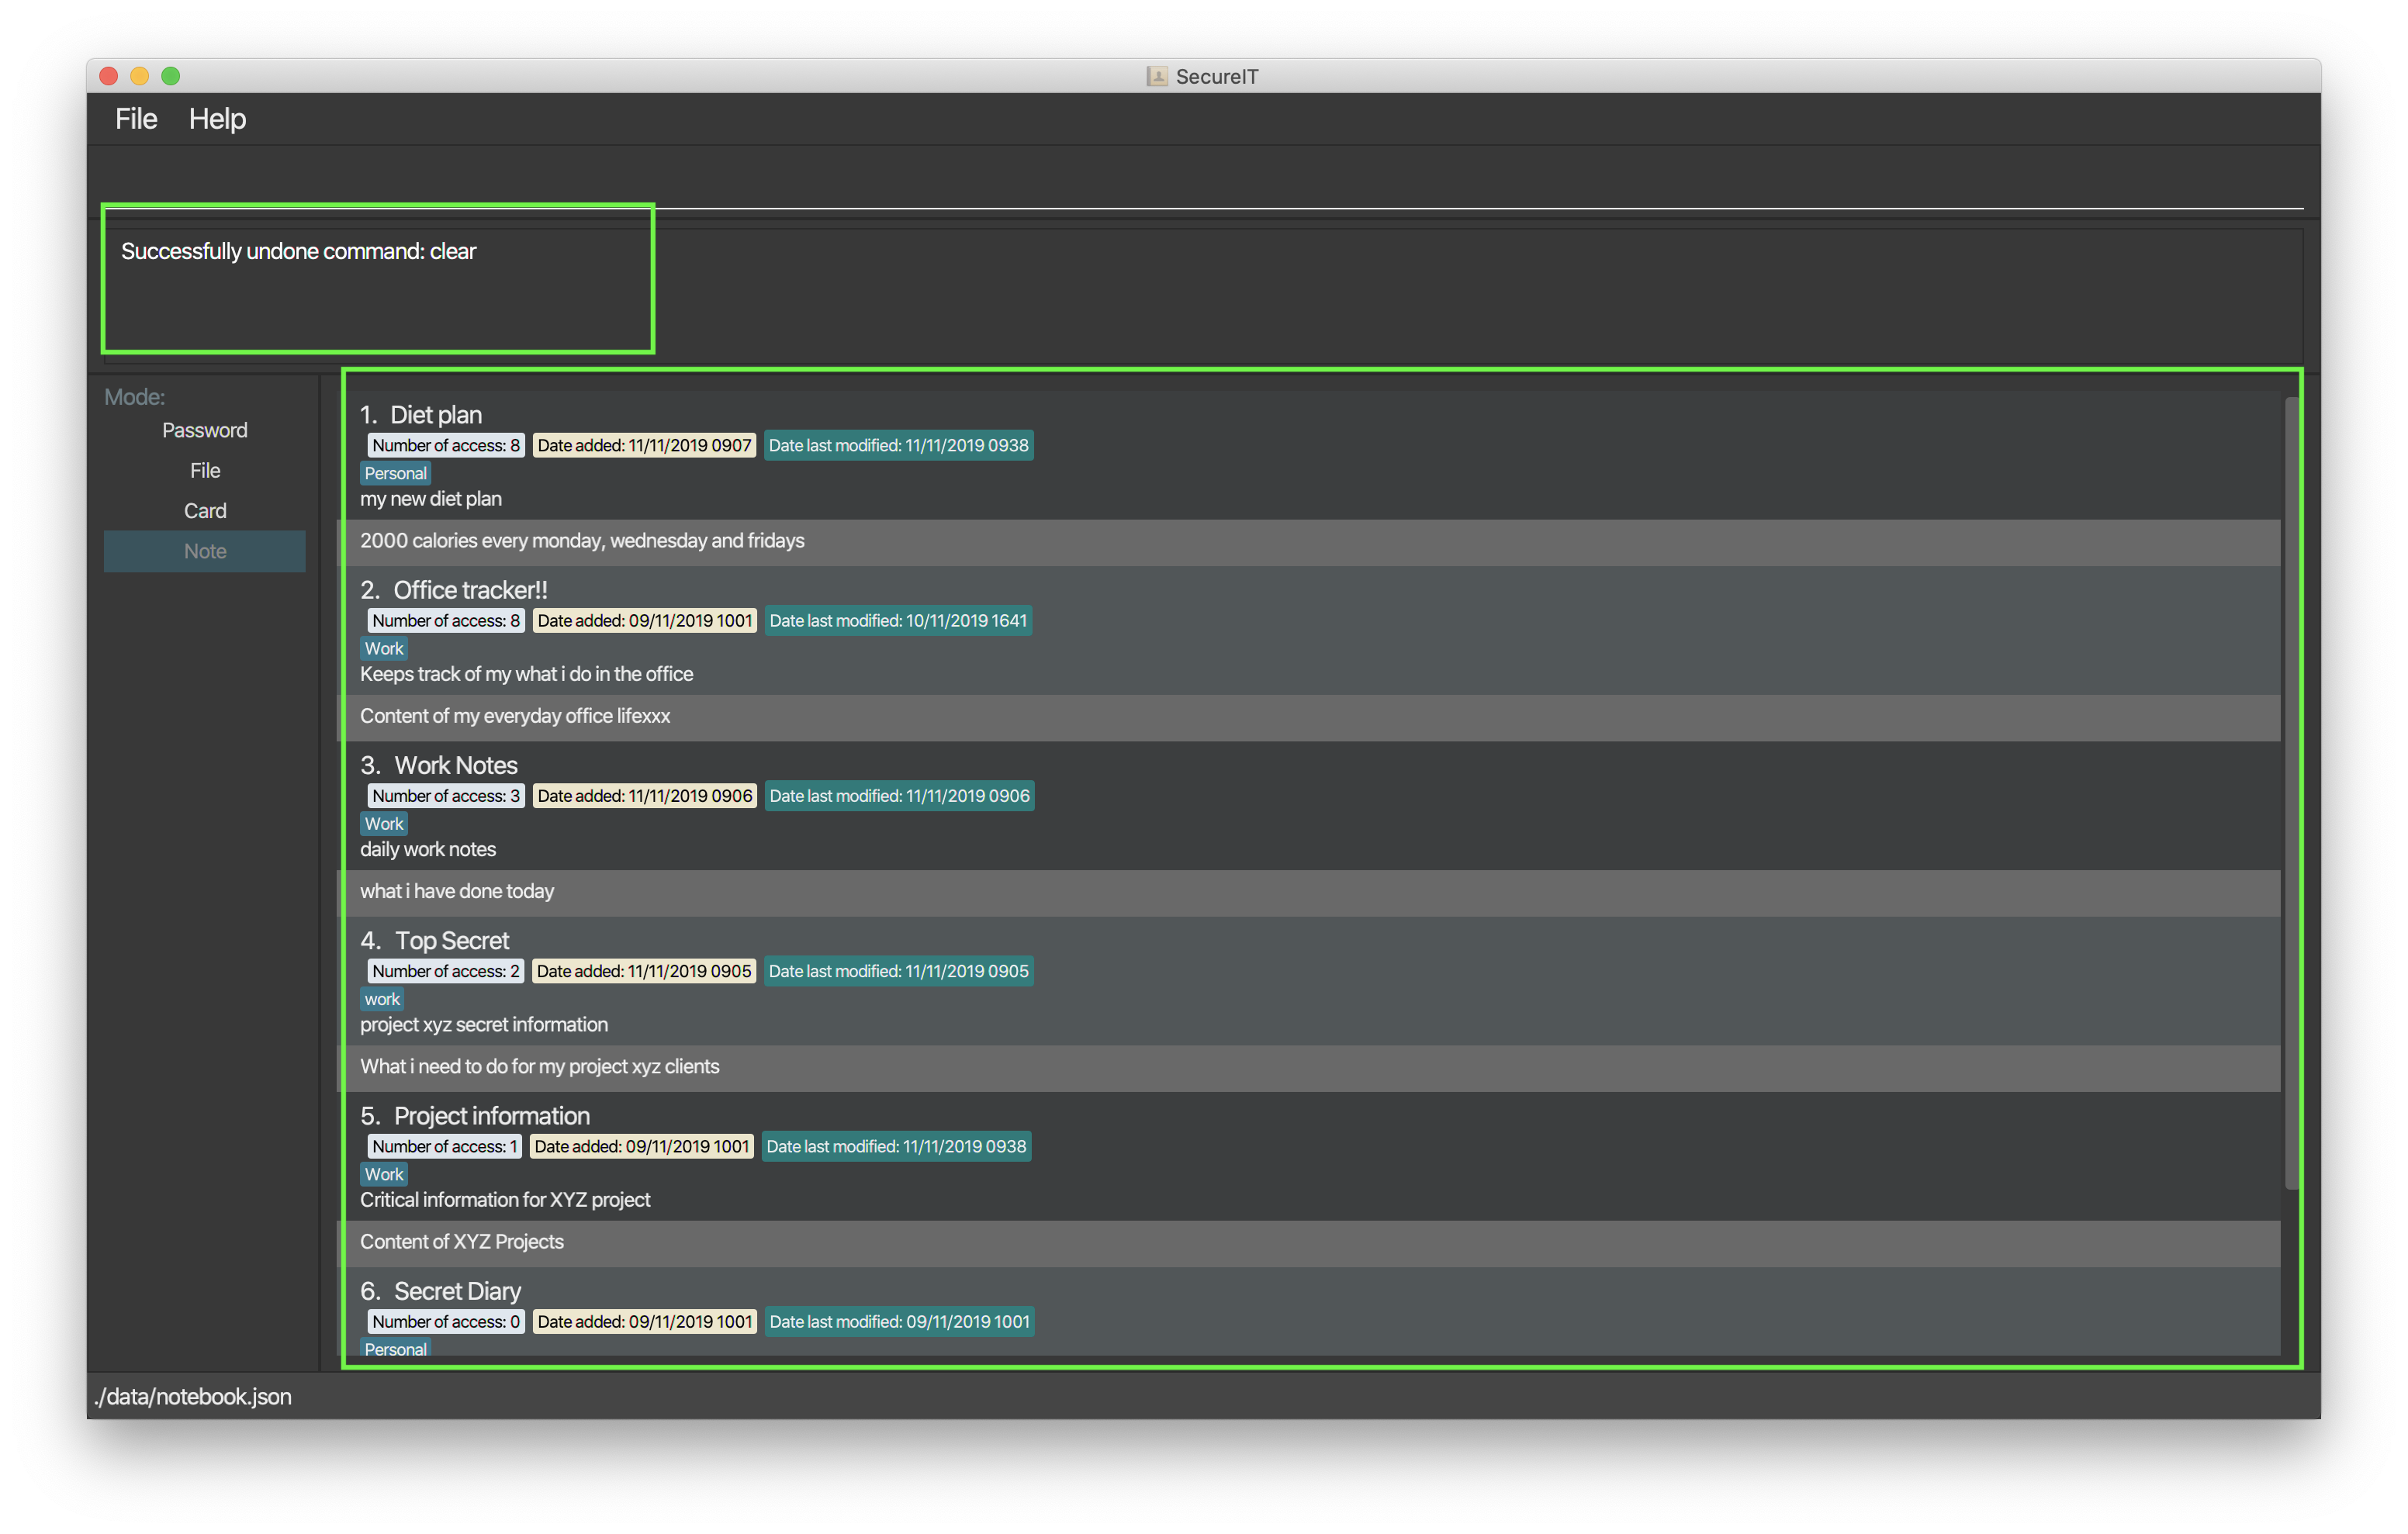
clear command is added back into the note book.-
You can only perform undo on undoable commands. Undoable commands are:
add,edit,delete,clearandopen. -
You can undo as many times as you wish until there are no more commands that can be undone.
-
opencommand is undoable because it changes the number of times the notes is accessed.
4.4.9. Redo notes action: redo
Regret making that undo action?
Once again, do not worry because you can redo your action!
Using the redo feature will not only redo your last undone action, it will also inform you of exactly what action is being redone.
Format: redo
Example: redo
Here is what it would look like to redo a clear command:
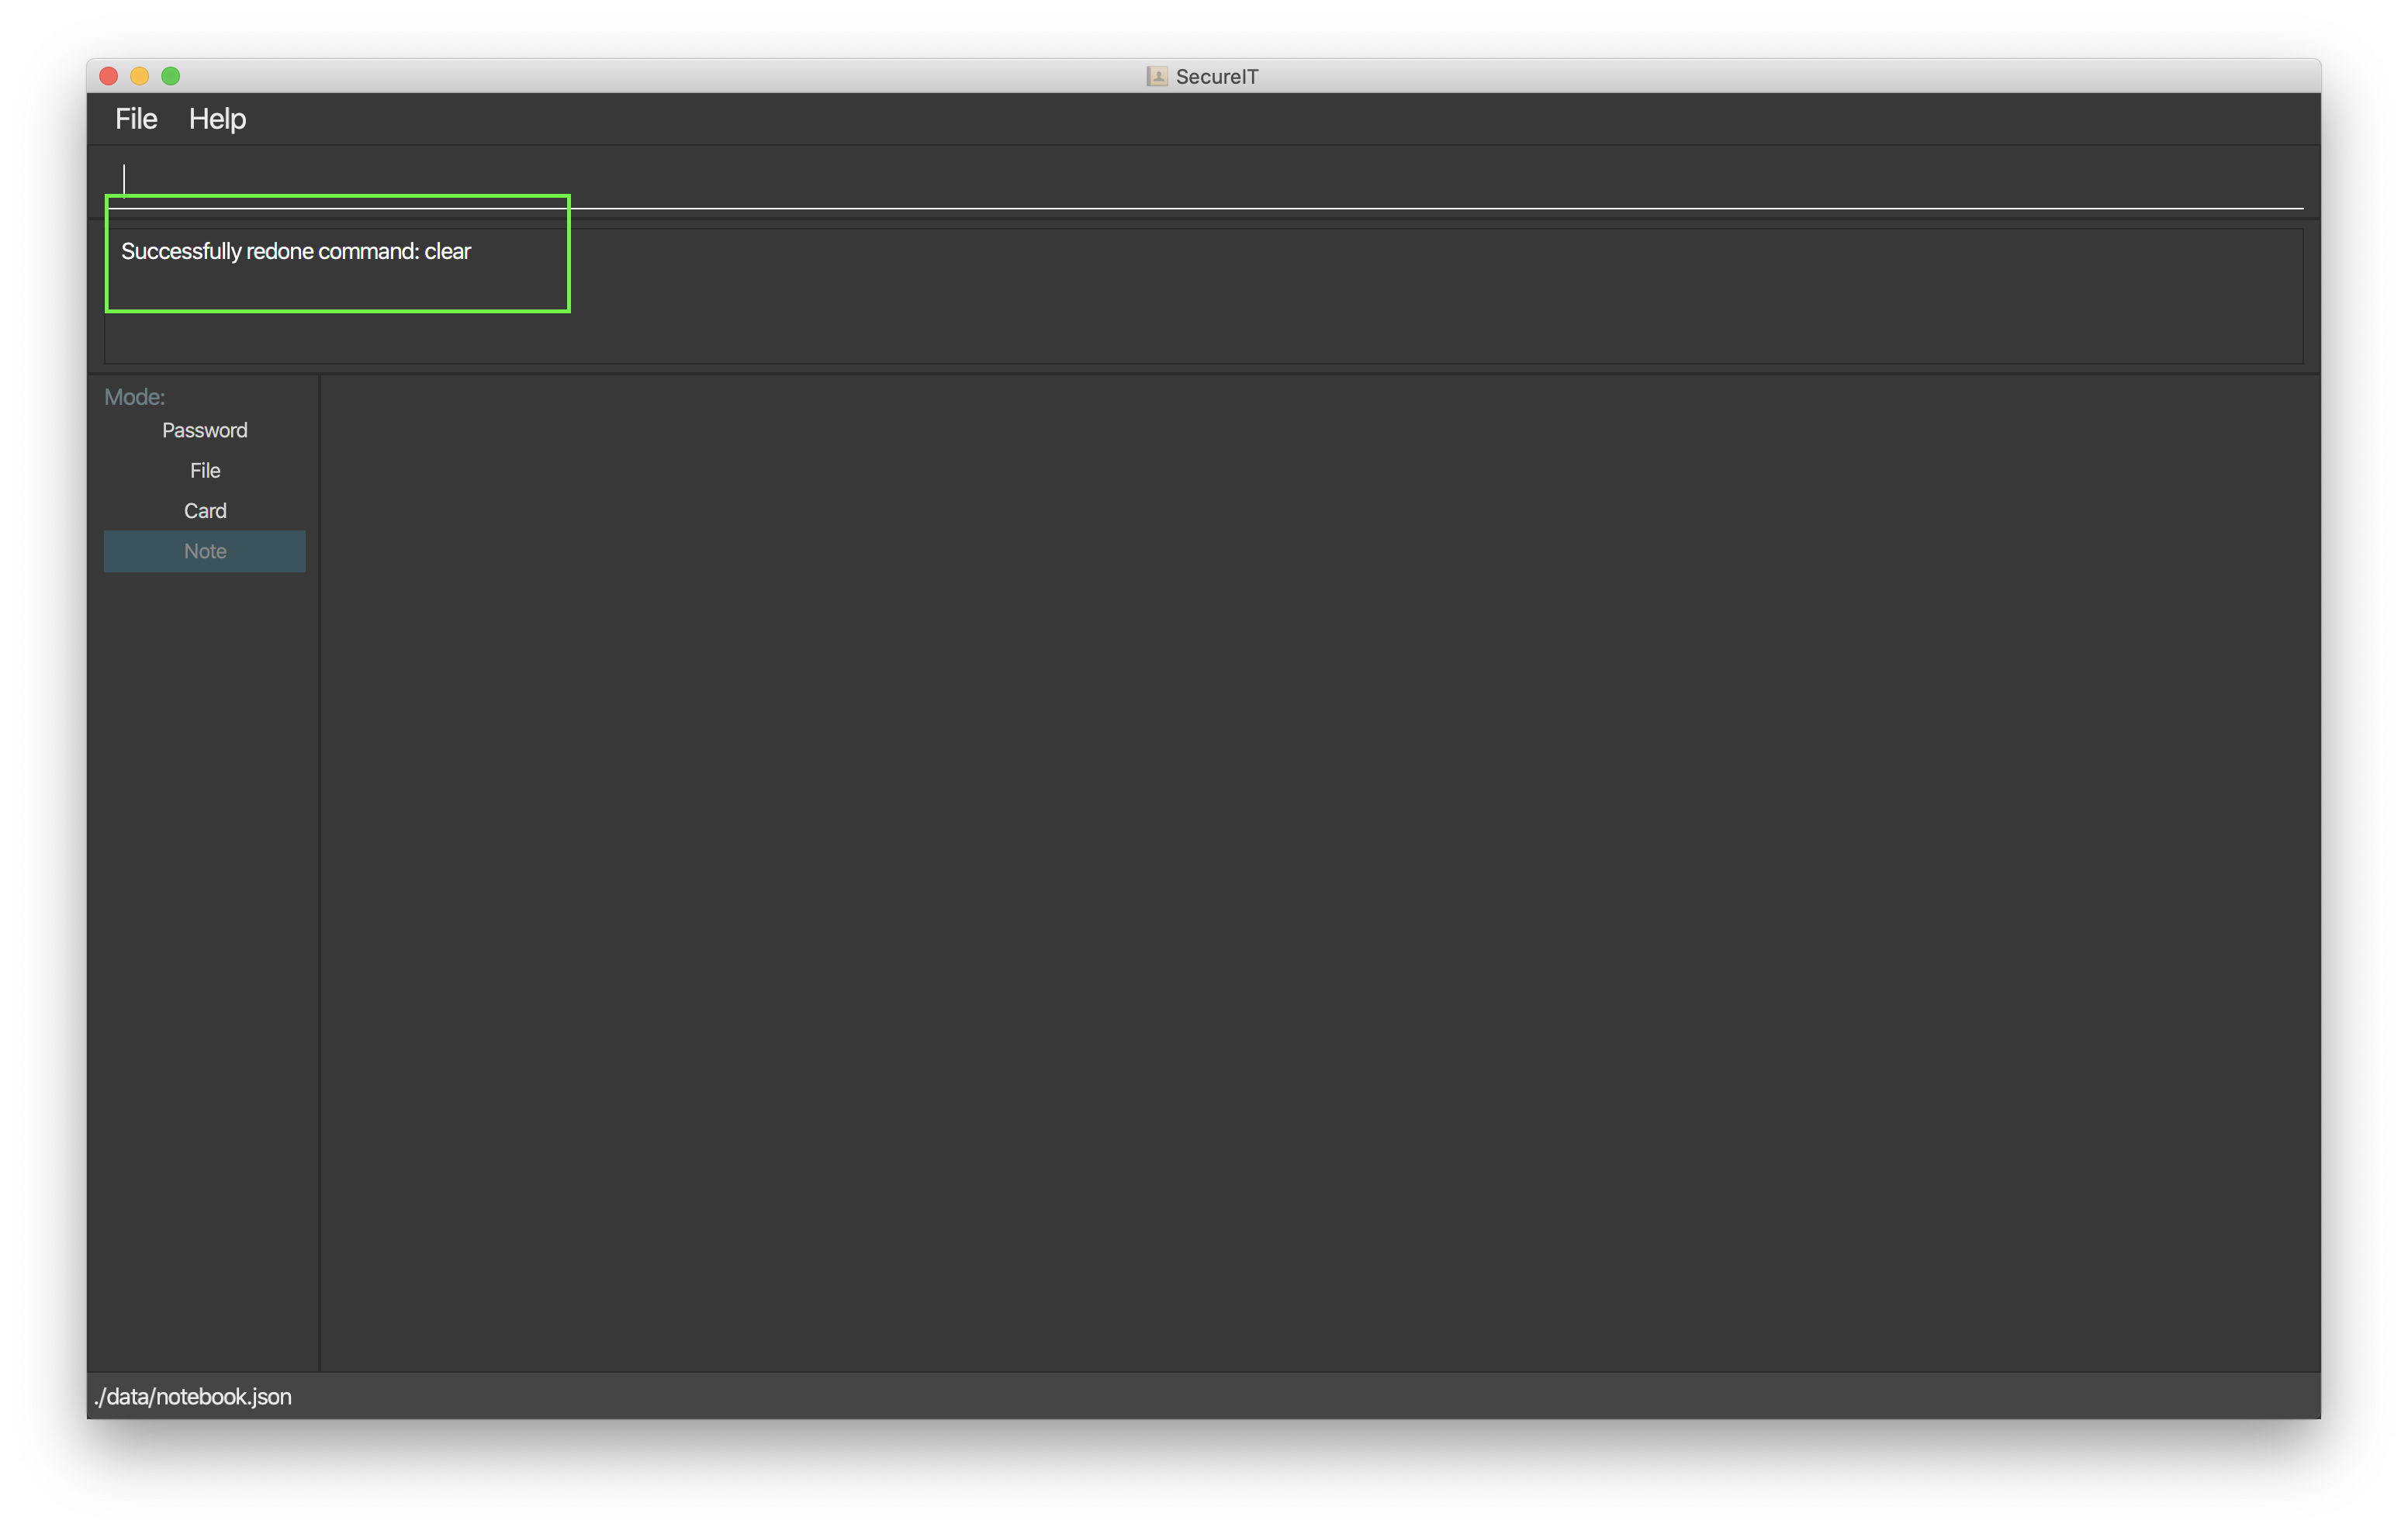
clear command.-
You can only perform redo on a command that has been undone.
-
You can redo as many times as you wish until there are no more commands that can be redone.
-
If you perform a new undoable command, all existing redoable commands will be cleared.
4.5. Exiting the program : exit
Exits the program.
Format: exit
4.6. Saving the data
SecureIT data are saved in the hard disk automatically after any command that changes the data.
There is no need to save manually.
5. CheatSheet of commands
Password
Accessing Password directory: goto password
-
add d/DESCRIPTION u/USERNAME p/PASSWORD [w/WEBSITE] [t/TAG]…: Adds a password to the app. -
read INDEX: Shows the username and password for the specified index specified by you. -
edit INDEX [d/DESCRIPTION] [u/USERNAME] [p/PASSWORD] [w/WEBSITE] [t/TAG]: Edits a password specified by you. -
copy password INDEX: Copies the password value, website or username specified by you. -
delete INDEX: Deletes a password as specified by you. -
find DESCRIPTION: Finds a password description as specified by you. -
generate [length/LENGTH] [lower/TRUE] [upper/TRUE] [num/TRUE] [special/TRUE]: Generates a new random password based on user preference input and copies generated password into user clipboard. -
analyse: Analyses all passwords currently stored and produces a security summary report. -
analyse [strong/INDEX]: Analyses in detail a specified password based on the user specified index.
Card
Accessing Card directory: goto card
-
add d/DESCRIPTION c/CARDNUMBER e/EXPIRY v/CVC [t/TAG]…: Adds a credit/debit card to the app. -
read d/DESCRIPTION v/CVC: Shows the card number, CVC and expiry date as specified by a card’s description. -
read INDEX v/CVC: Shows the card number, CVC and expiry date as specified by a card’s index number. -
copy d/DESCRIPTION v/CVC: Copies the card number as specified by a card’s description. -
copy INDEX v/CVC: Copies the card number as specified by a card’s index number. -
delete DESCRIPTION: Deletes a card as specified by a card’s description. -
delete INDEX: Deletes a card as specified by a card’s index number.
File
Accessing File directory: goto file
-
encrypt FILEPATH [t/TAG]…: Encrypts a local file as specified by its file path. -
decrypt INDEX: Decrypts a local file as specified by the displayed index number. -
add FILENAME [t/TAG]…: Adds an encrypted file as specified by its file path. -
remove INDEX: Removes an encrypted file record as specified by the displayed index number. -
rename INDEX TARGET_FILENAME: Renames an encrypted file as specified by its index number. -
move INDEX TARGET_DIRECTORY: Moves an encrypted file as specified by its index number. -
find KEYWORDS…: Finds matching encrypted files as specified by the search keywords. -
list: Lists all encrypted files managed by SecureIT. -
preview INDEX: Previews an encrypted file as specified by its index number.
Note
Accessing Note directory: goto note
-
open INDEX: Opens the note corresponding to the index. -
delete INDEX: Deletes a note as specified by you. -
edit INDEX ti/TITLE d/DESCRIPTION t/TAG c/CONTENT: Edits a note specified by you. -
find TEXT: Finds notes containing the text specified by the user. -
sort by/SORTBYCONDITION: Sorts notes by the condition specified by you. -
undo: Undo last action on notes. -
redo: Redo last undone action on notes. -
clear: Clears all entries from the note book.
Others
Other commands
-
exit: Exits the program.
6. FAQ
Q: How do I transfer my data to another Computer?
A: Install the app in the other computer and copy all files from the application’s directory to the new computer.