By: SecureIT Since: Aug 2019 Licence: MIT
1. Setting up
Refer to the guide here.
2. Design
2.1. Architecture

The Architecture Diagram given above explains the high-level design of the App. Given below is a quick overview of each component.
-
At app launch: Initializes the components in the correct sequence, and connects them up with each other.
-
At shut down: Shuts down the components and invokes cleanup method where necessary.
Commons represents a collection of classes used by multiple other components.
The following class plays an important role at the architecture level:
-
LogsCenter: Used by many classes to write log messages to the App’s log file.
The rest of the App consists of four components.
Each of the four components
-
Defines its API in an
interfacewith the same name as the Component. -
Exposes its functionality using a
{Component Name}Managerclass.
For example, the Logic component (see the class diagram given below) defines it’s API in the Logic.java interface and exposes its functionality using the LogicManager.java class.
Refer to 2.3 Logic Component to view the Class Diagram of the Logic Component.
How the architecture components interact with each other
The Sequence Diagram below shows how the components interact with each other for the scenario where the user issues the command delete 1.
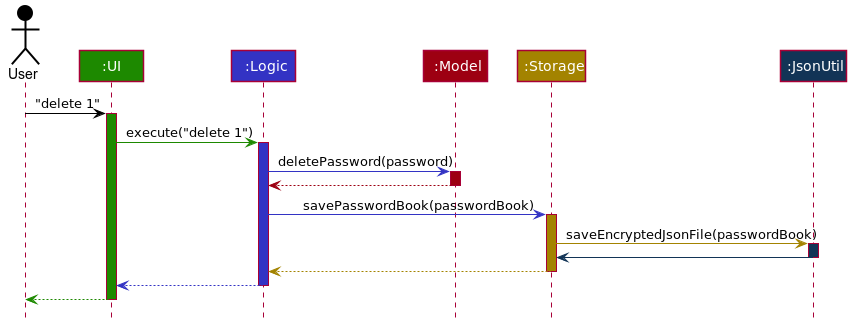
delete 1 commandThe sections below give more details of each component.
2.2. UI component
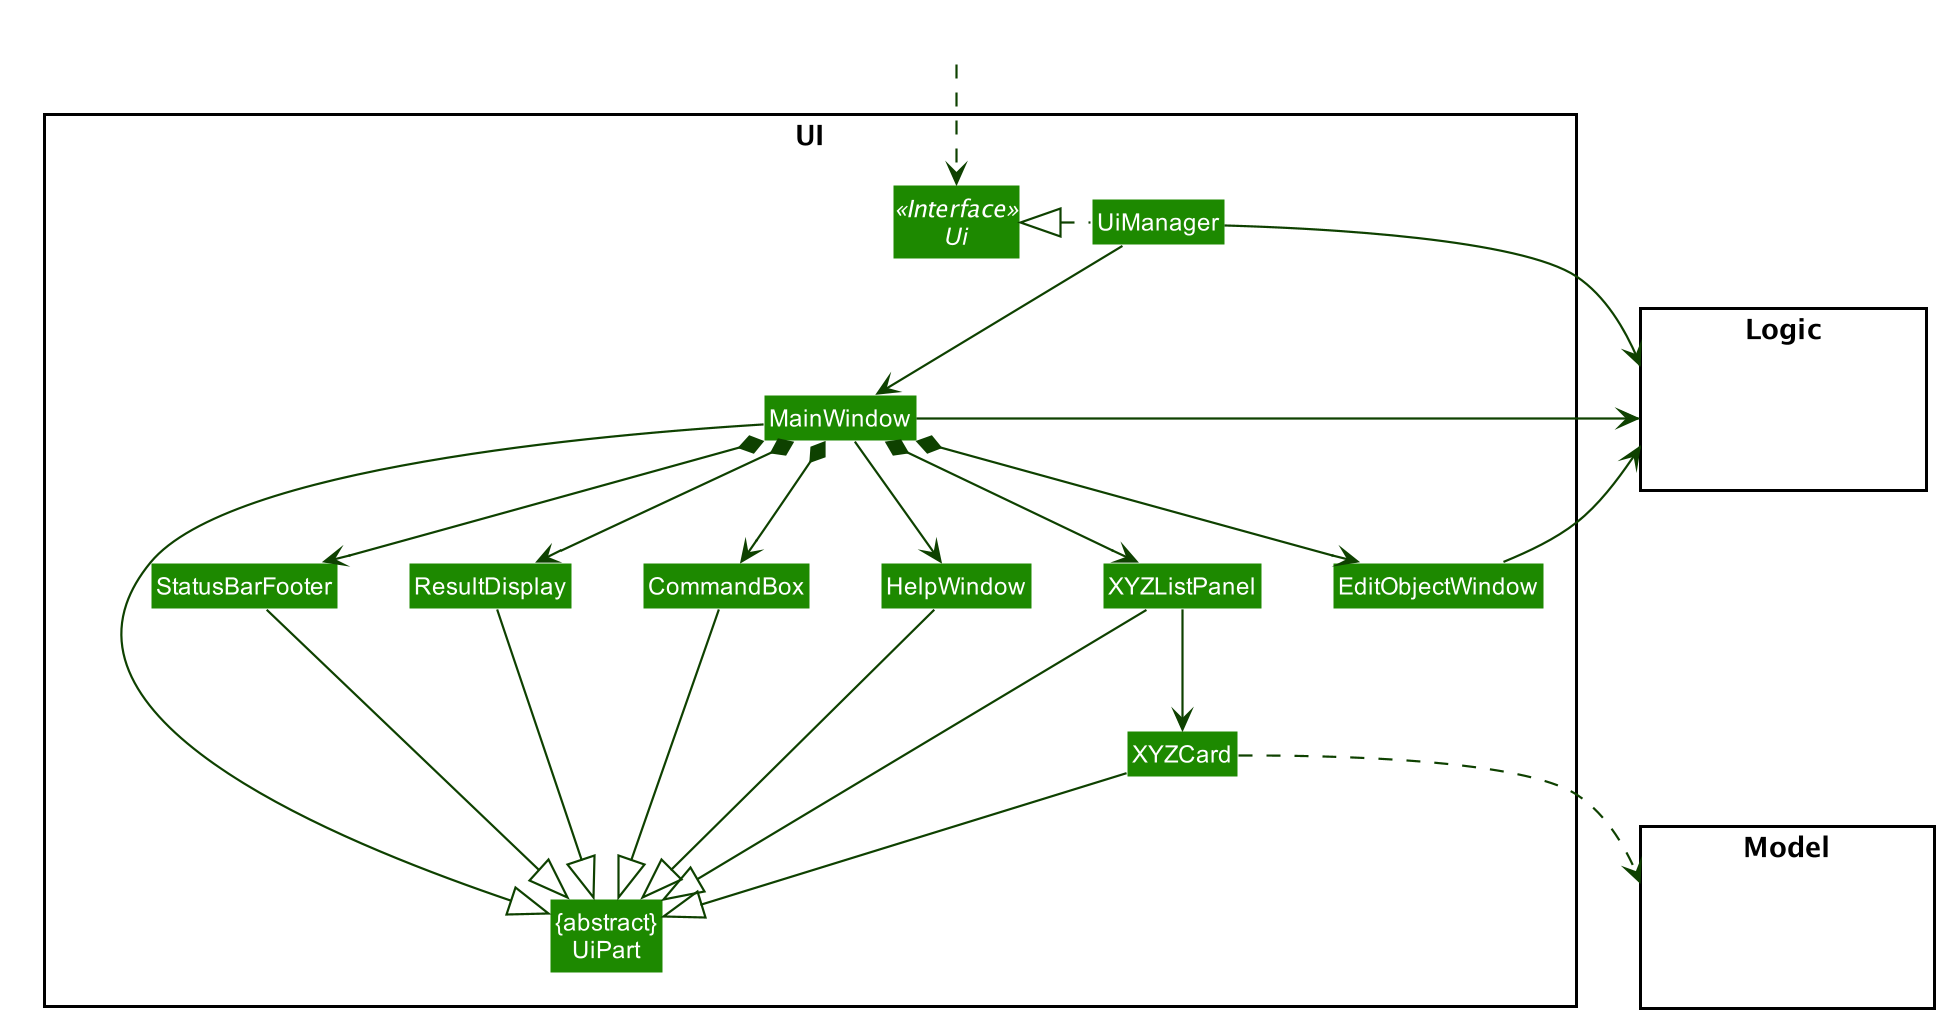
API : Ui.java
The UI consists of a MainWindow that is made up of parts e.g.CommandBox, ResultDisplay, PersonListPanel, StatusBarFooter etc. All these, including the MainWindow, inherit from the abstract UiPart class.
The UI component uses JavaFx UI framework. The layout of these UI parts are defined in matching .fxml files that are in the src/main/resources/view folder. For example, the layout of the MainWindow is specified in MainWindow.fxml
The UI component,
-
Executes user commands using the
Logiccomponent. -
Listens for changes to
Modeldata so that the UI can be updated with the modified data.
2.3. Logic component
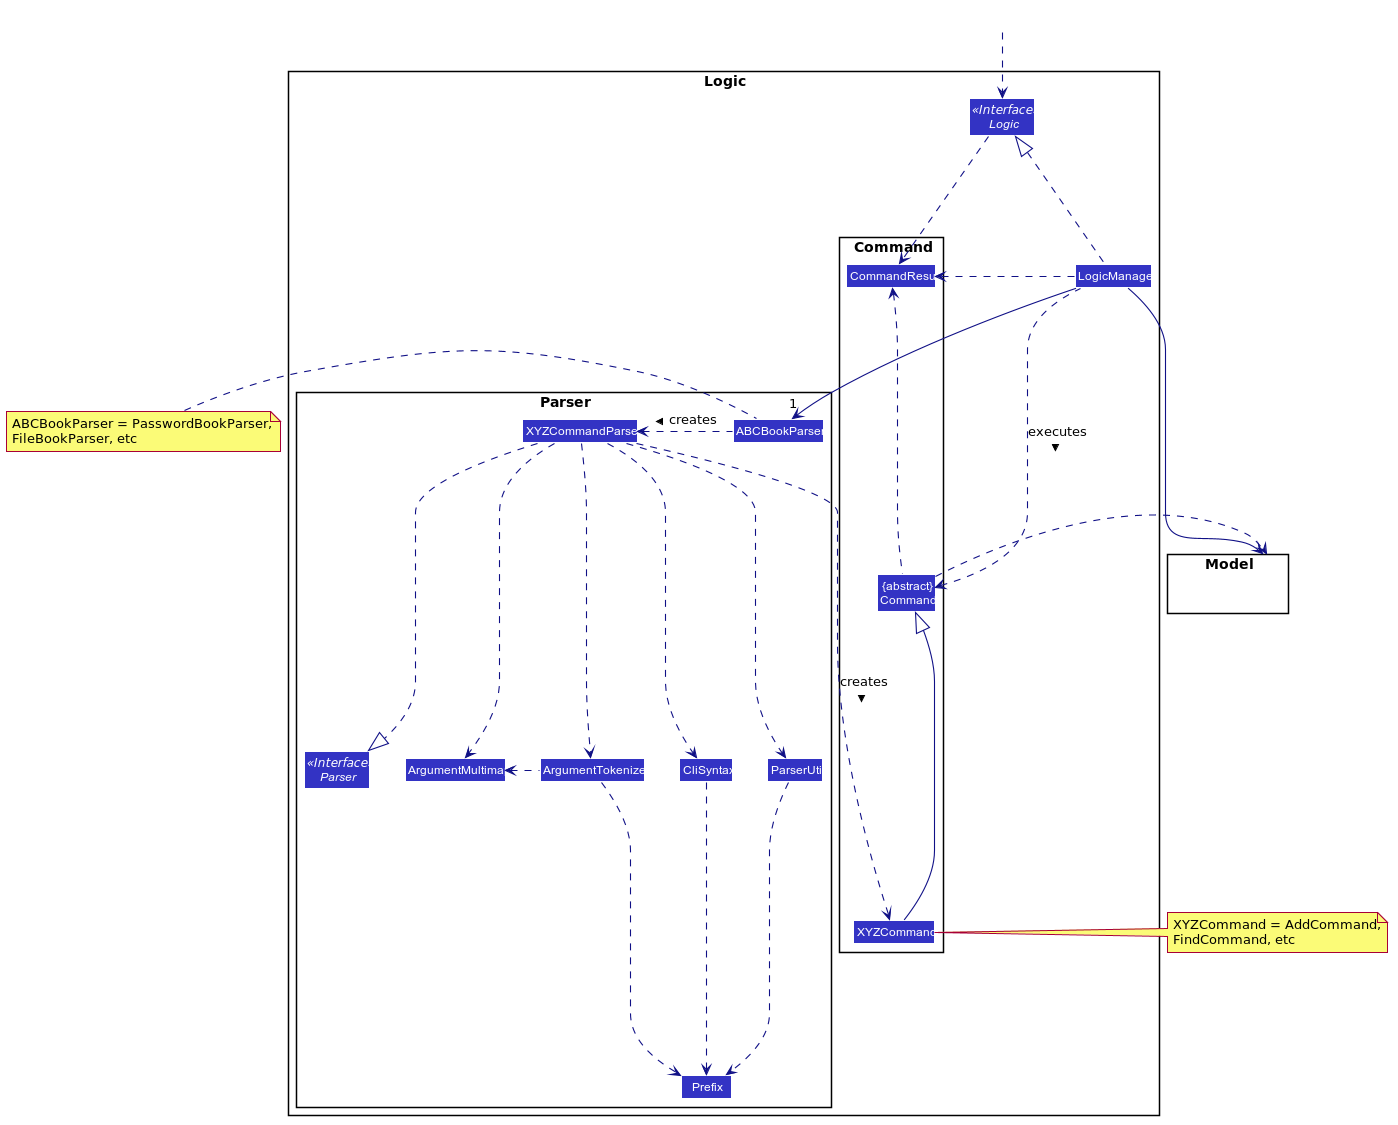
API :
Logic.java
-
Logicuses theABCBookParserclass to parse the user command, depending on the current mode of the App. -
This results in a
Commandobject which is executed by theLogicManager. -
The command execution can affect the
Model(e.g. adding a note). -
The result of the command execution is encapsulated as a
CommandResultobject which is passed back to theUi. -
In addition, the
CommandResultobject can also instruct theUito perform certain actions, such as displaying help to the user.
Given below is the Sequence Diagram for interactions within the Logic component for the execute("delete 1") API call.

delete 1 Command
The lifeline for DeleteNoteCommandParser should end at the destroy marker (X) but due to a limitation of PlantUML, the lifeline reaches the end of diagram.
|
2.4. Model component
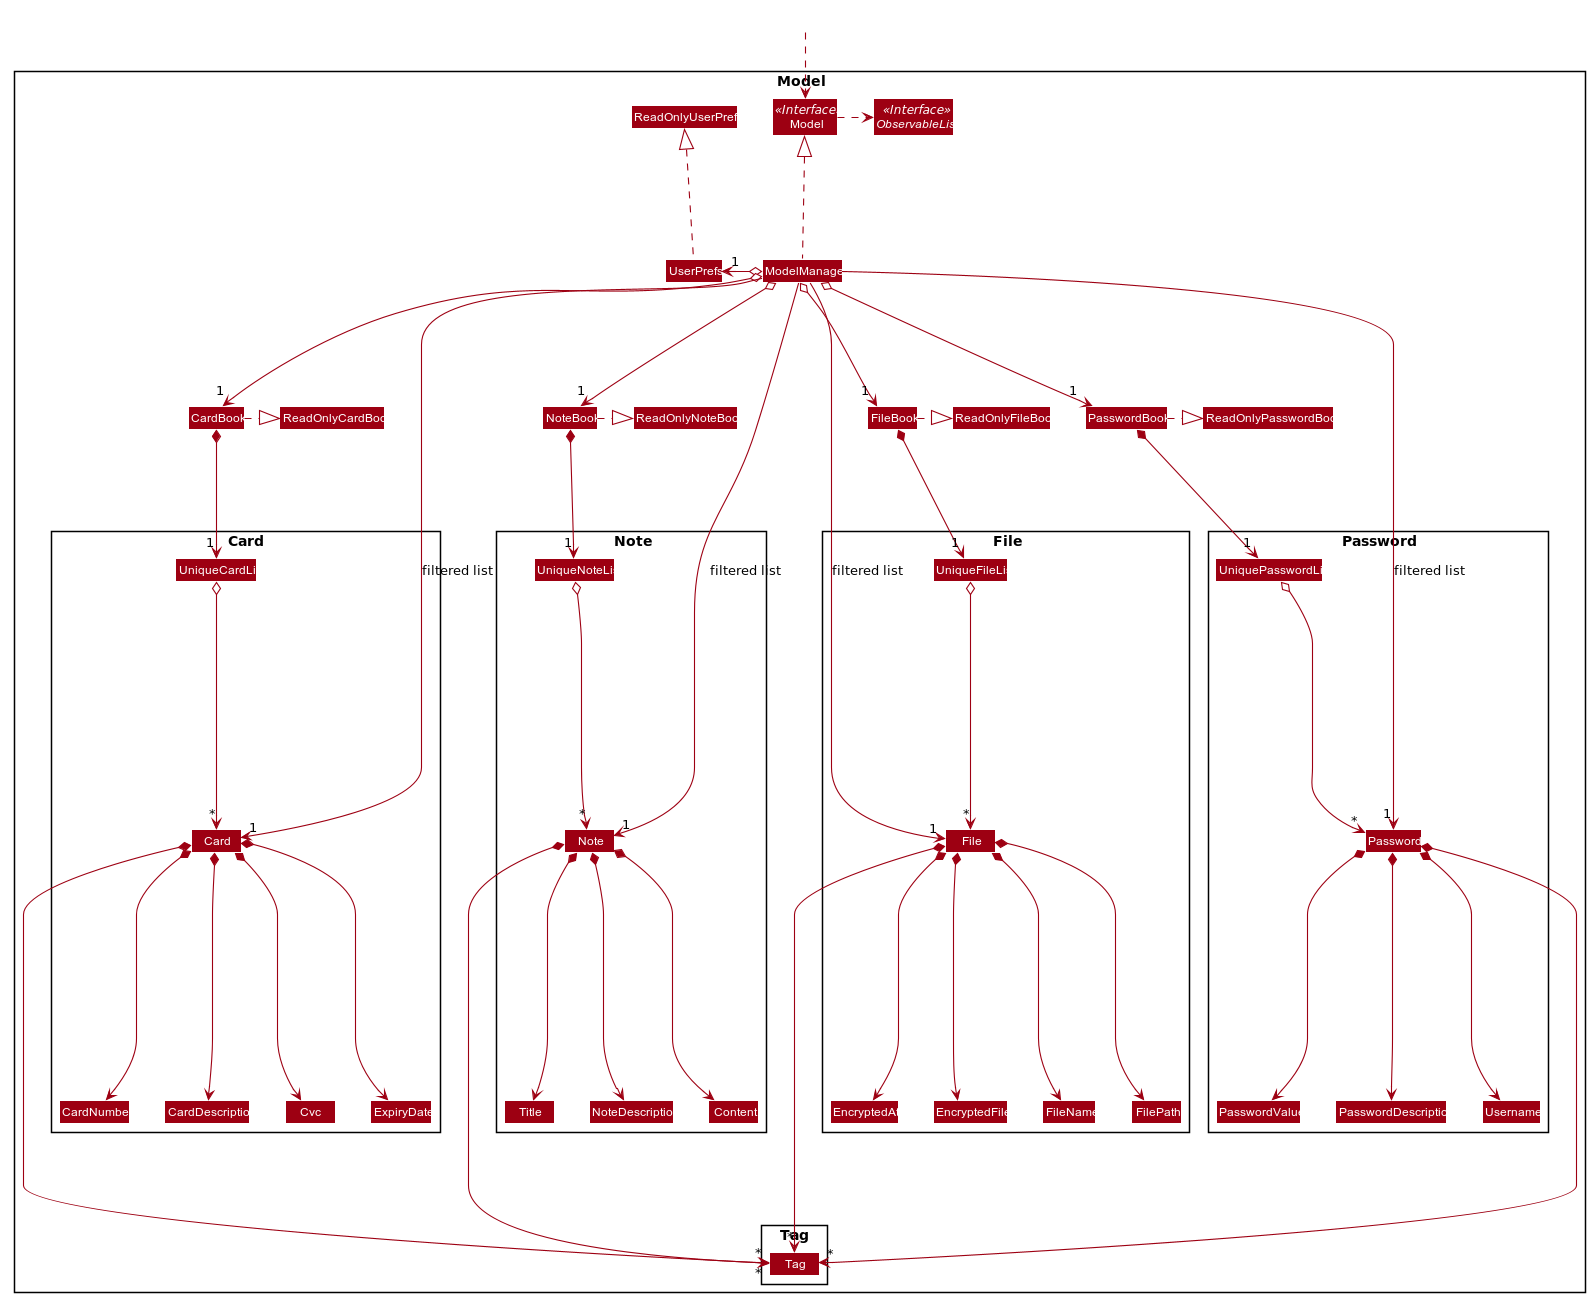
API : Model.java
The Model,
-
stores a
UserPrefobject that represents the user’s preferences. -
stores the CardBook, FileBook, PasswordBook and NoteBook data.
-
exposes unmodifiable
ObservableList<Card>,ObservableList<File>,ObservableList<Password>andObservableList<Note>that can be 'observed' e.g. the UI can be bound to the lists so that the UI automatically updates when the data in the lists change. -
does not depend on any of the other three components.
2.5. Storage component

API : Storage.java
The Storage component,
-
can save
UserPrefobjects in json format and read it back. -
can save the SecureIT data in json format and read it back, including Password Book, File Book, Note Book and Card Book.
2.6. Common classes
Classes used by multiple components are in the seedu.addressbook.commons package.
3. Implementation
This section describes some noteworthy details on how certain features are implemented.
3.1. Password Management
3.1.1. Model
We created the Password model to support the password management feature of our application.
It stores the information of all the passwords created by the user. The class diagram of the Password model is as follows:
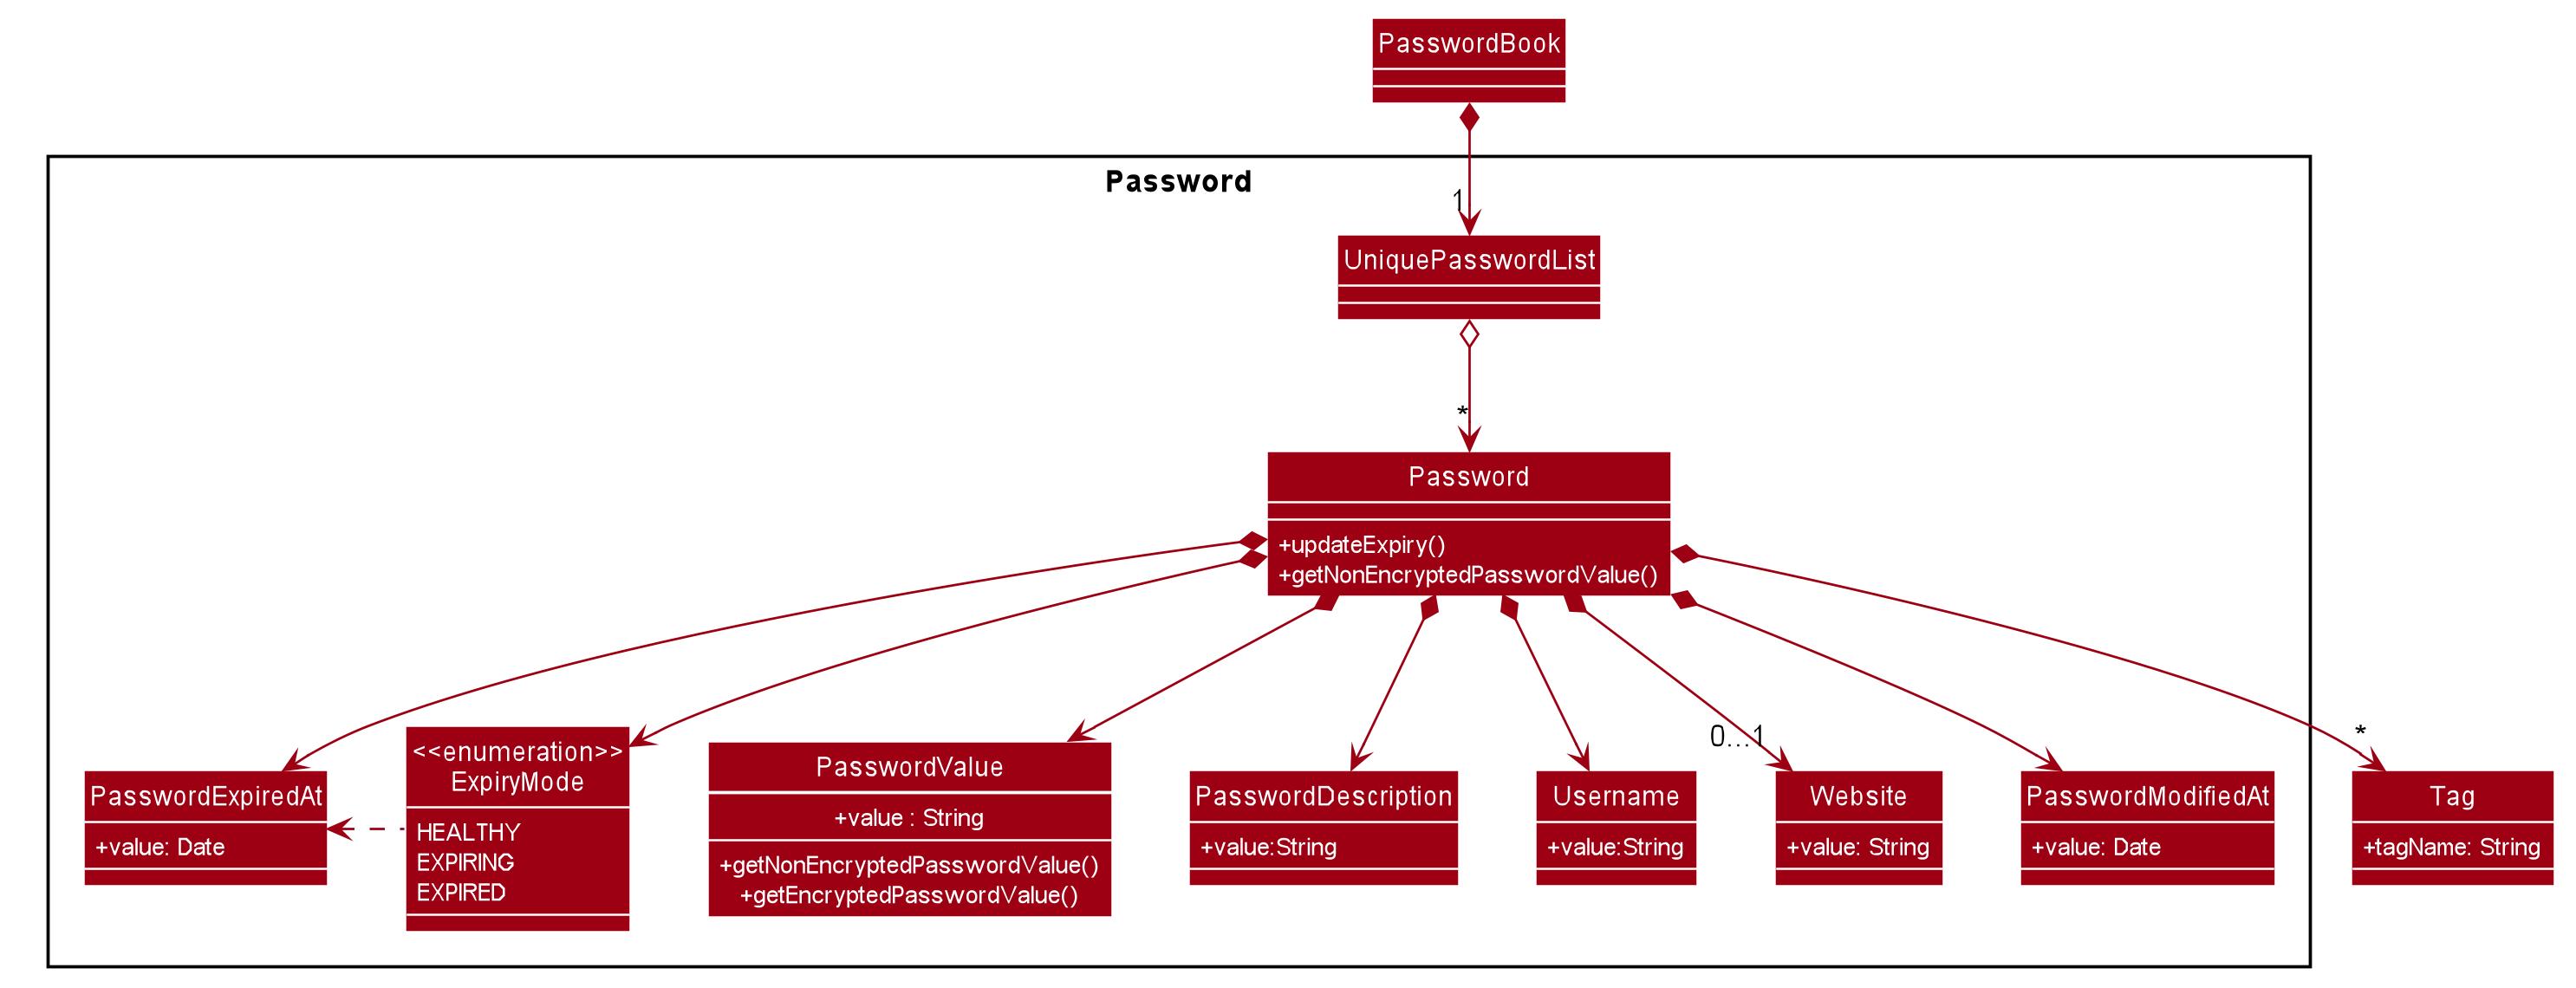
The Password model consists of a Password class which has its attributes implemented as
separate classes to follow Single Responsibility Principle. The attributes are as follows:
Username: The username of the password model
PasswordValue: The actual password value of the password model
PasswordDescription: The description of the password model.
Website: The website where the password is being used for.
PasswordModifiedAt: The date when the password is last modified.
PasswordExpiredAt: The date 1 year after the password is last modified.
ExpiryMode: It has 3 modes: HEALTHY, EXPIRING, EXPIRED, depending on how close the current date is when compared to the expiry date of the password.
The Password objects are stored in a UniquePasswordList in the PasswordBook and the existing model manager is extended to
add the functionality managing passwords into the application. We have adhered to YAGNI design principle by making sure that minimal changes are added.
3.1.2. Design Considerations:
Aspect: Model Manager for Password.
The design considerations would be similar for all other models including File model, Card model, Note model and Password model.
-
Alternative 1 (current choice): The current model manager is extended to handle the filtered lists of all the models.
-
Pros: Adheres to DRY design principle as it extends the functionality of the model manager without repeating code.
-
Cons: It might increase dependencies in the model manager.
-
-
Alternative 2: Create another
Modelinterface and anotherModel Managerclass.-
Pros: Easy to implement.
-
Cons: Does not adhere to DRY design principle, where additional
Model Managerclass are created.
-
We chose alternative 1 as there is already a model manager available and it would be logical to use it instead of creating another class and possibly write repeated code.
3.1.3. Logic
User is allowed to add, read, edit, find, list, delete and copy. Additional PasswordBookParser, Parser and Command
classes are included to support the functionality stated above. The class diagram for all Command classes available for Password model is as follows:

Aspect: Logic Manager for Password model.
The design considerations would be similar for all other models such as the File model, Card model, Note model and Password model.
-
Alternative 1 (current choice): The current logic manager is extended to handle the model parsers. The logic manager checks for the current mode of the system and decides which model parser class to use.
-
Pros: This adheres to the Open-closed principle in SOLID. Same command words can be used in different modes and it does not increase coupling in the application.
-
Cons: Hard to implement. Requires another command to switch modes. Similar command classes will need to be implemented in different model such as
AddPasswordCommand,AddNoteCommand,AddCardCommand. However, all the fields in the command classes are different and separating them into different classes reduces coupling.
-
-
Alternative 2: Extending one parser class to handle all the different commands. Different command will have different
addcommand words.-
Pros: Easy to implement.
-
Cons: User will have to remember different command words for the same
addcommand for different modes, such asaddp,addn,addc. This will impact the user experience and increase coupling as the sameaddcommand is required to perform different tasks.
-
We chose alternative 1 because of its pros. We place emphasis on the user experience of our application. In this implementation users will not have to remember different command words to add the same objects into our application.
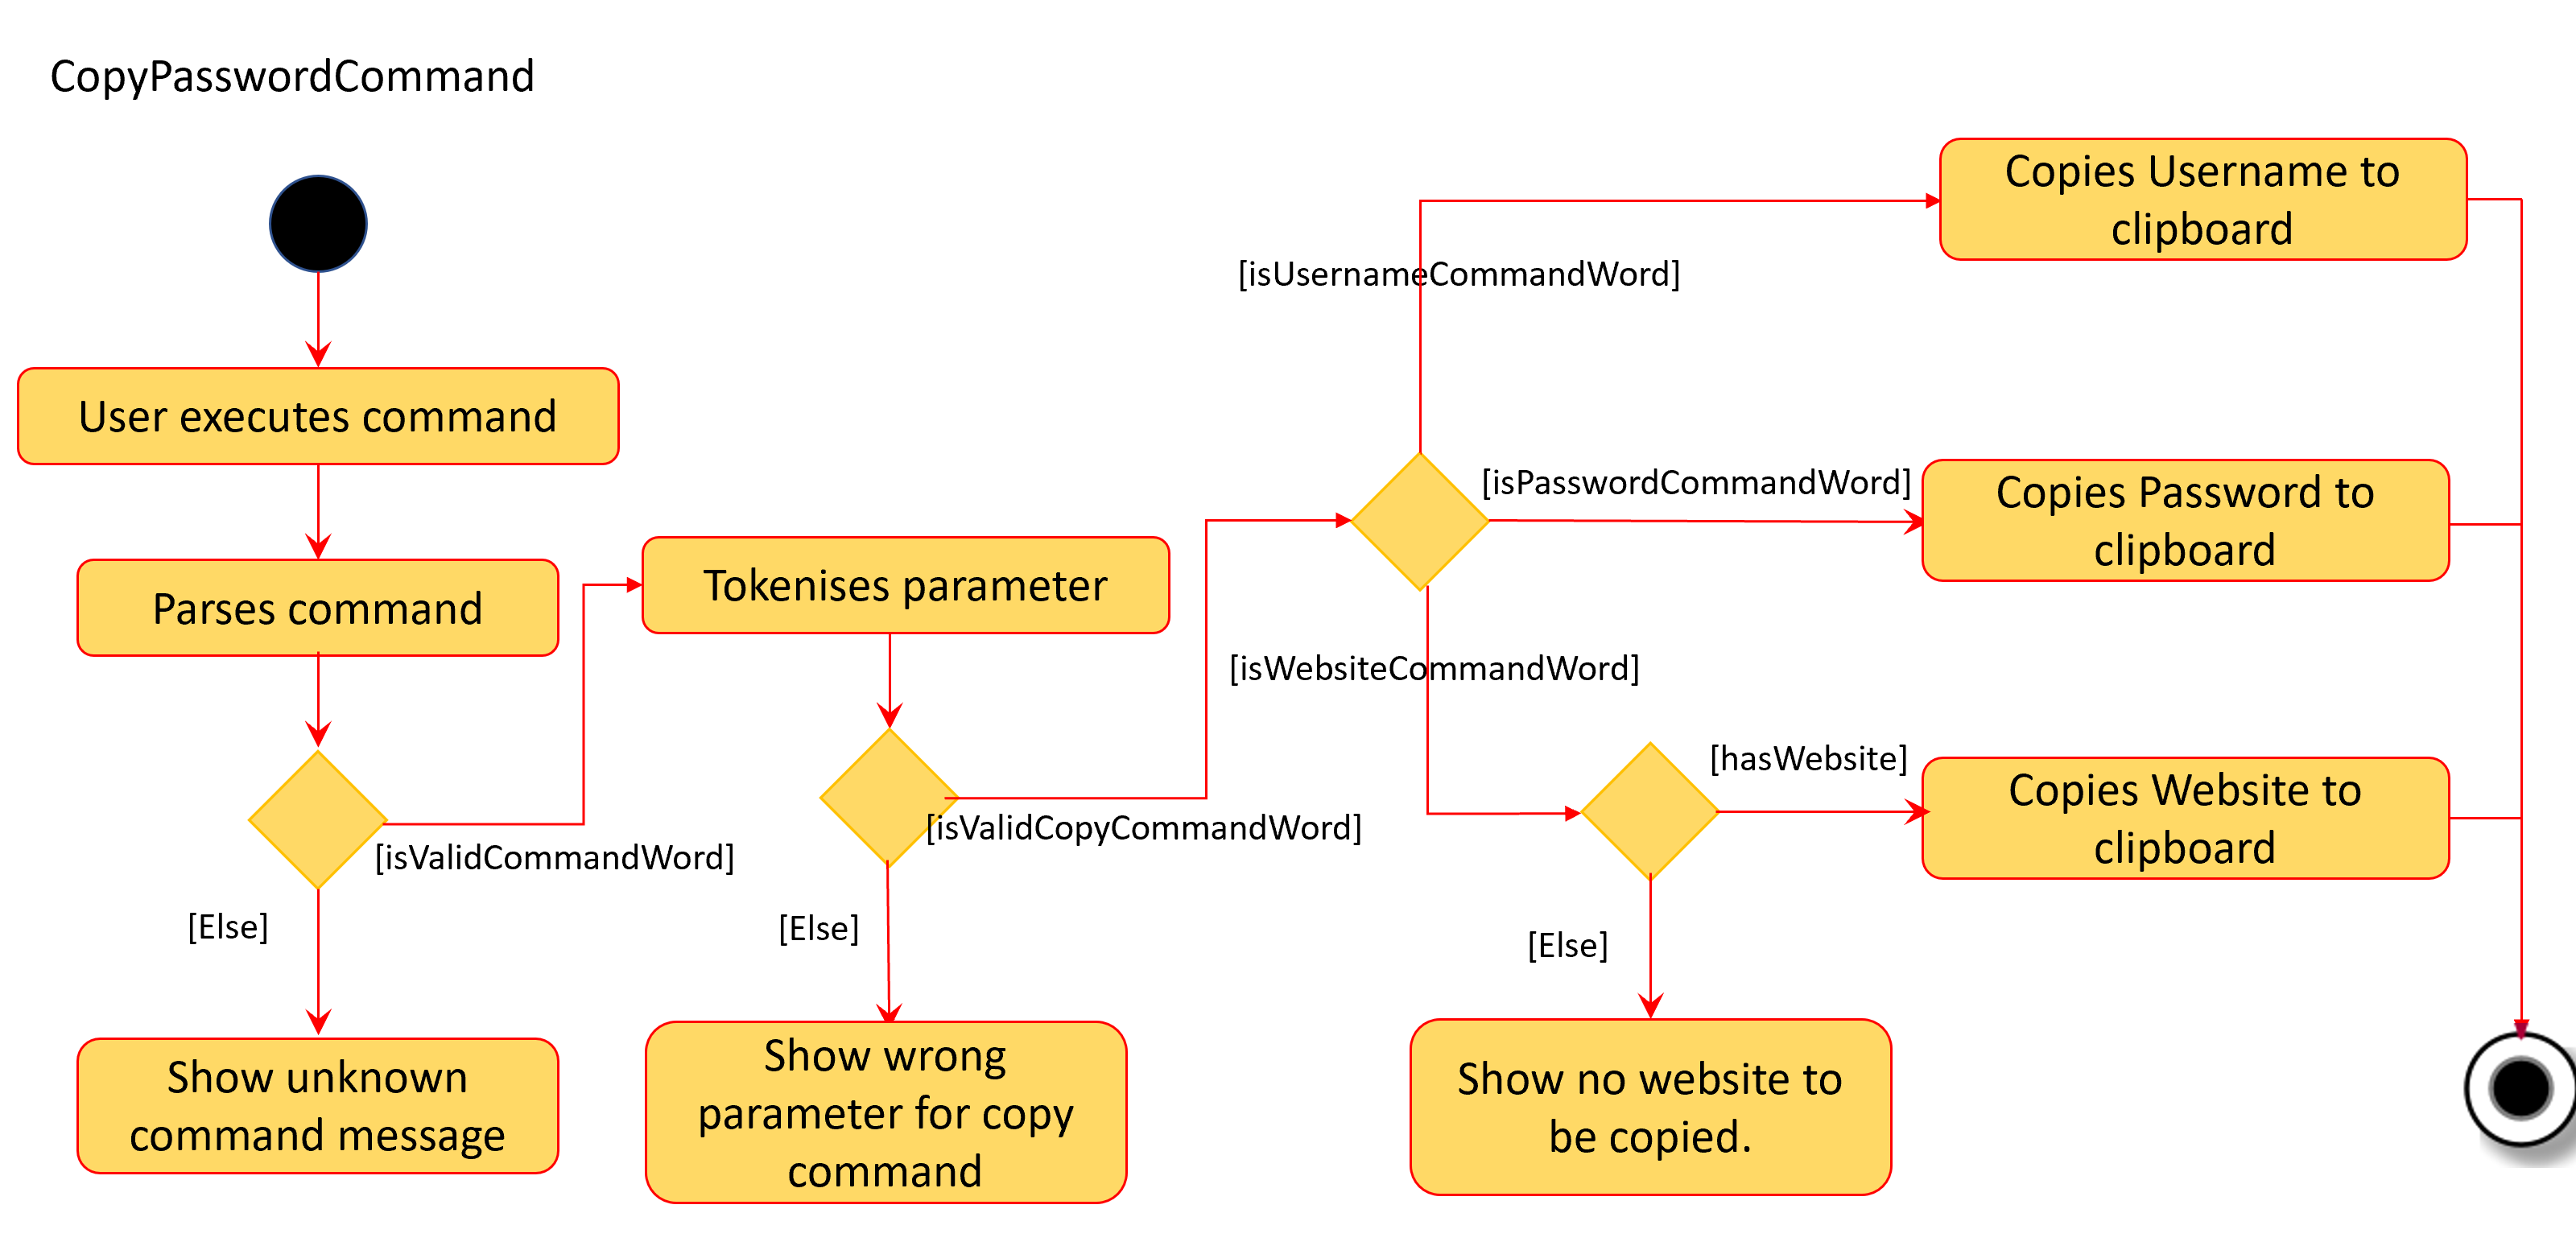
3.1.4. Copy Command:
Current Implementation:
CopyPasswordValueCommand class, CopyWebsiteCommand class and CopyUsernameCommand class extends CopyPasswordCommand class as shown in the earlier figure.
These three classes are implemented together with CopyCommandParser class to create the functionality of copying the required details onto clipboard using CLI.
Since this is a command that would be used frequently, command alias are added to increase the efficiency for the user.
The activity diagram below describes the flow of the CopyPasswordCommand:
The following sequence diagram describes the detailed interactions between any CopyPasswordCommand and the architecture:
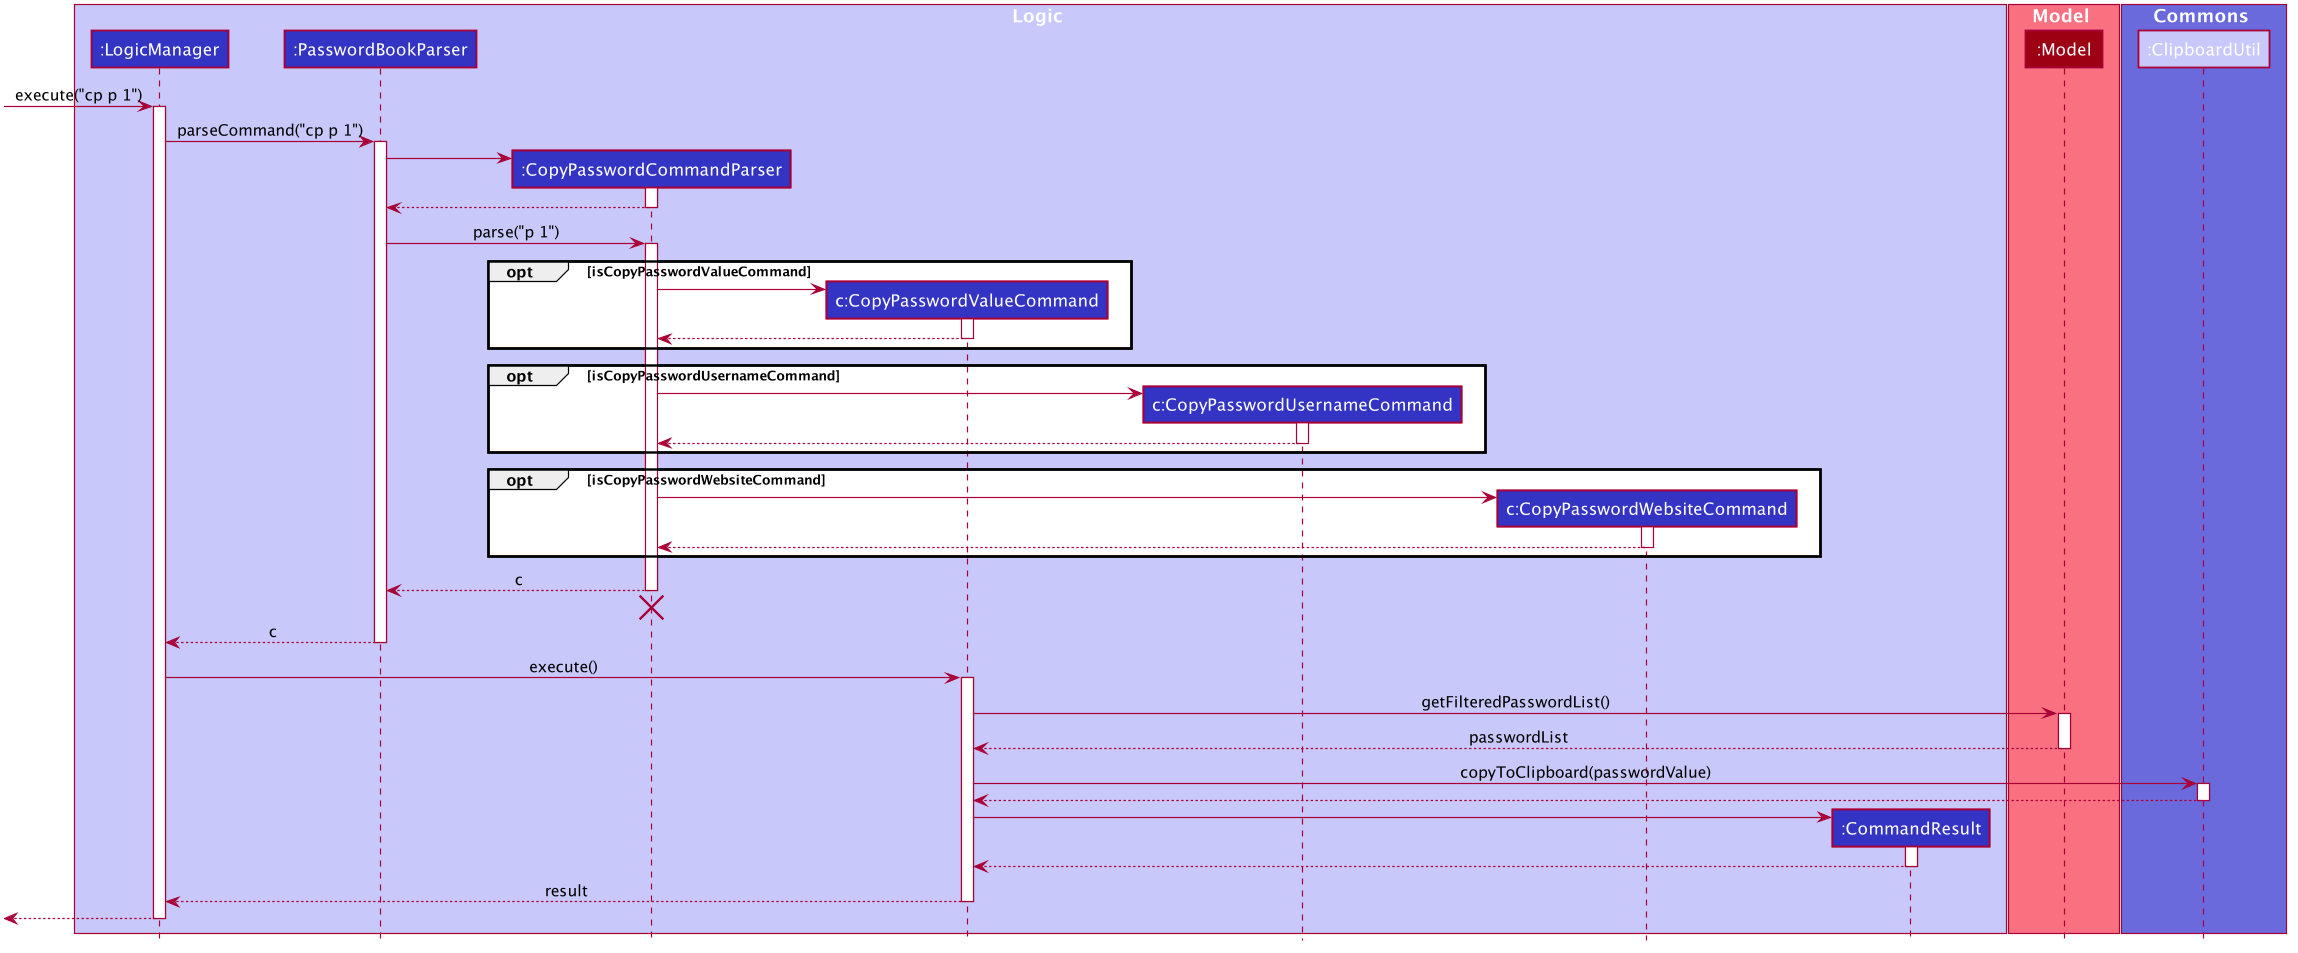
The process of copying a password value is as follows:
1) PasswordBookParser creates CopyPasswordCommandParser and depending on the command word after copy, different copy commands will be created.
2) In this case, the index is a valid index and CopyPasswordValueCommand is created.
3) The Password object is retrieved from the filtered password list using the index and the password value is copied via
ClipboardUtil#copyToClipboard() method
3.1.5. Design Considerations:
Aspect: Implementation of CopyPasswordCommand
-
Alternative 1 (current choice): The
CopyPasswordCommandclass extendsCommandclass.CopyPasswordValueCommandclass,CopyWebsiteCommandclass andCopyUsernameCommandclass extendCopyPasswordCommand.-
Pros: This follows closely to Polymorphism and Inheritance concepts as all three commands share the similar functionality. The common functionality is abstracted out and placed inside the
CopyPasswordCommand. -
Cons: Any further enhancement of the child commands will have to follow Liskov Substitution Principle and it needs to be more restrictive than the parent command.
-
-
Alternative 2:
CopyPasswordValueCommand,CopyWebsiteCommand,CopyUsernameCommandwill extendCommandclass.-
Pros: Easy to implement.
PasswordBookParsercan directly check for the command word instead of splitting into 2 command words. -
Cons: Does not adhere to DRY design principle.
-
We chose alternative 1 because it is more logical and follows the DRY design principle. The cons caused by the further enhancements of child commands will not be considered because of YAGNI design principle.
3.2. Generate Password
This section provides implementation details on the password generation feature.
3.2.1. Overview
The purpose of password generation is to provide users with a hassle-free way to generate random, secure passwords.
By default, the password generation feature will generate a random password that:
-
is 10 letters long
-
contains lower case alphabets, upper case alphabets, numbers, and special characters.
However, users can alternatively choose to customise any of the aforementioned fields as per their needs through their input.
The generation of truly random passwords is made possible through the use of the java.security.SecureRandom API.
It provides a cryptographically strong random number generator (RNG) that will be used in the password generation.
3.2.2. Implementation
The following activity diagram summarises the general steps taken during password generation:
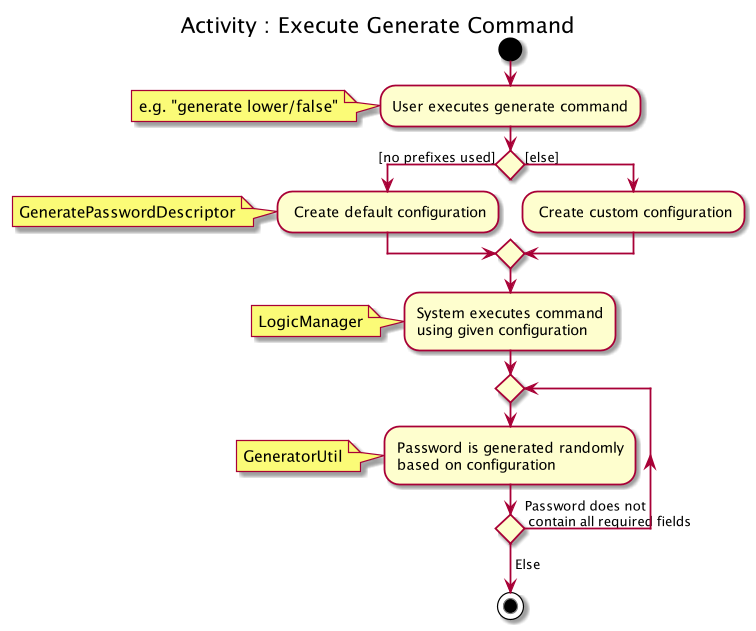
The steps below outline explicity the generation of passwords :
-
The user input is
#parse()by theGeneratePasswordCommandParser. -
Based on the user input, a
GeneratePasswordDescriptoris instantiated.-
If the user input includes optional prefixes to customise configuration, we modify the attributes of the
GeneratePasswordDescriptorthrough various setter methods. -
Else, the default
GeneratePasswordDescriptoris instantiated through the static methodGeneratePasswordDescriptor#getDefaultConfiguration().
-
The GeneratePasswordDescriptor is an object that encapsulates the settings of the configuration used for password generation.
|
-
The
GeneratePasswordCommandis then instantiated with the given configuration. -
Upon
GeneratePasswordCommand#execute(), the static methodGeneratorUtil#generateRandomPassword()is invoked:-
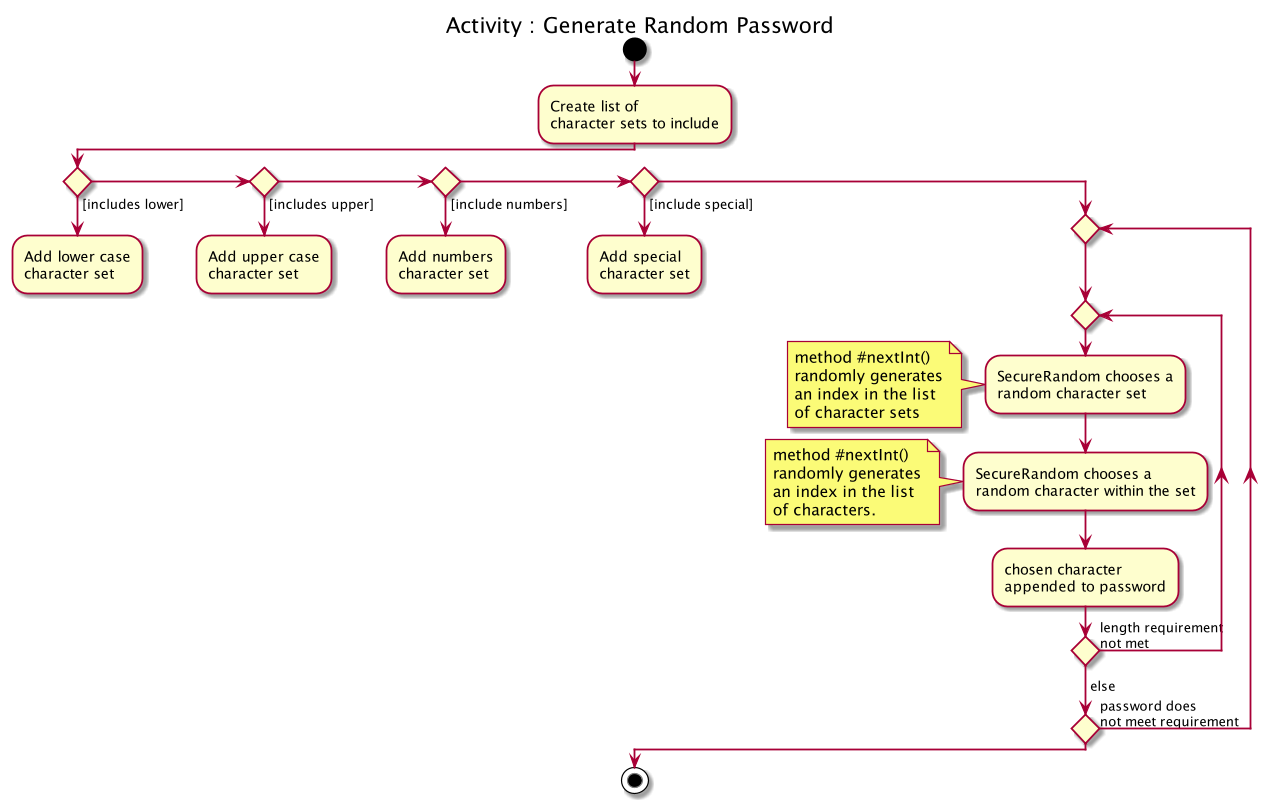
Based on the configuration, the relevant character sets (lower-case alphabets, upper case alphabets, numerals, special characters) are added into a list.
-
The
GeneratorUtilclass uses the methodjava.security.SecureRandom.nextInt()to choose a random characters set, followed by a random character within that set to be included in the new password. -
This process of choosing a character to include in the password is repeated for the length of the password.
-
-
The generated password is then checked to see if it includes all the user requirements (ie. whether it includes all the character sets specified by the user.)
-
This process of generating a password is repeated until the user requirements are met.
The activity diagram below depicts the way in which a password is generated by the method GeneratorUtil#generateRandomPassword():
3.2.3. Design considerations
These are the considerations we came across when implementing the generate feature:
Aspect: How to generate a random password
Alternative 1 (Current choice) |
Alternative 2 How to generate a truly random password |
Randomly choose a character set, followed by a character within the set to include in password: |
Ensuring all user configurations are met by hard coding a pattern in the way character sets are included |
Why did we choose Alternative 1: |
|
3.3. Analyse Password
This section provides implementation details on the analyse password feature.
3.3.1. Overview
The purpose of analysing passwords is to provide users with information on the level of security of their passwords.
The user can either :
-
View a summary table of results of all password by inputting
"analyse"OR -
View a detailed review of a specific password by inputting
"analyse strong/INDEX"
SecureIT analyses 6 core components of every Password, using various Analysers. The following table summarises the functionality of each Analyser:
Analyser: |
Purpose: |
UniqueAnalyser |
Checks that every password is unique. |
StrengthAnalyser |
Checks the complexity of every password. |
SimilarityAnalyser |
Checks that no two accounts share a password that is at least 70% similar. |
DictionaryAnalyser |
Checks that password does not contain any commonly-used passwords. (e.g. "password") |
SequenceAnalyser |
Checks that password does not contain any commonly-used sequences. (e.g. "ABC") |
KeyboardAnalyser |
Checks that password does not contain any commonly-used keyboard patterns. (e.g. "qwerty") |
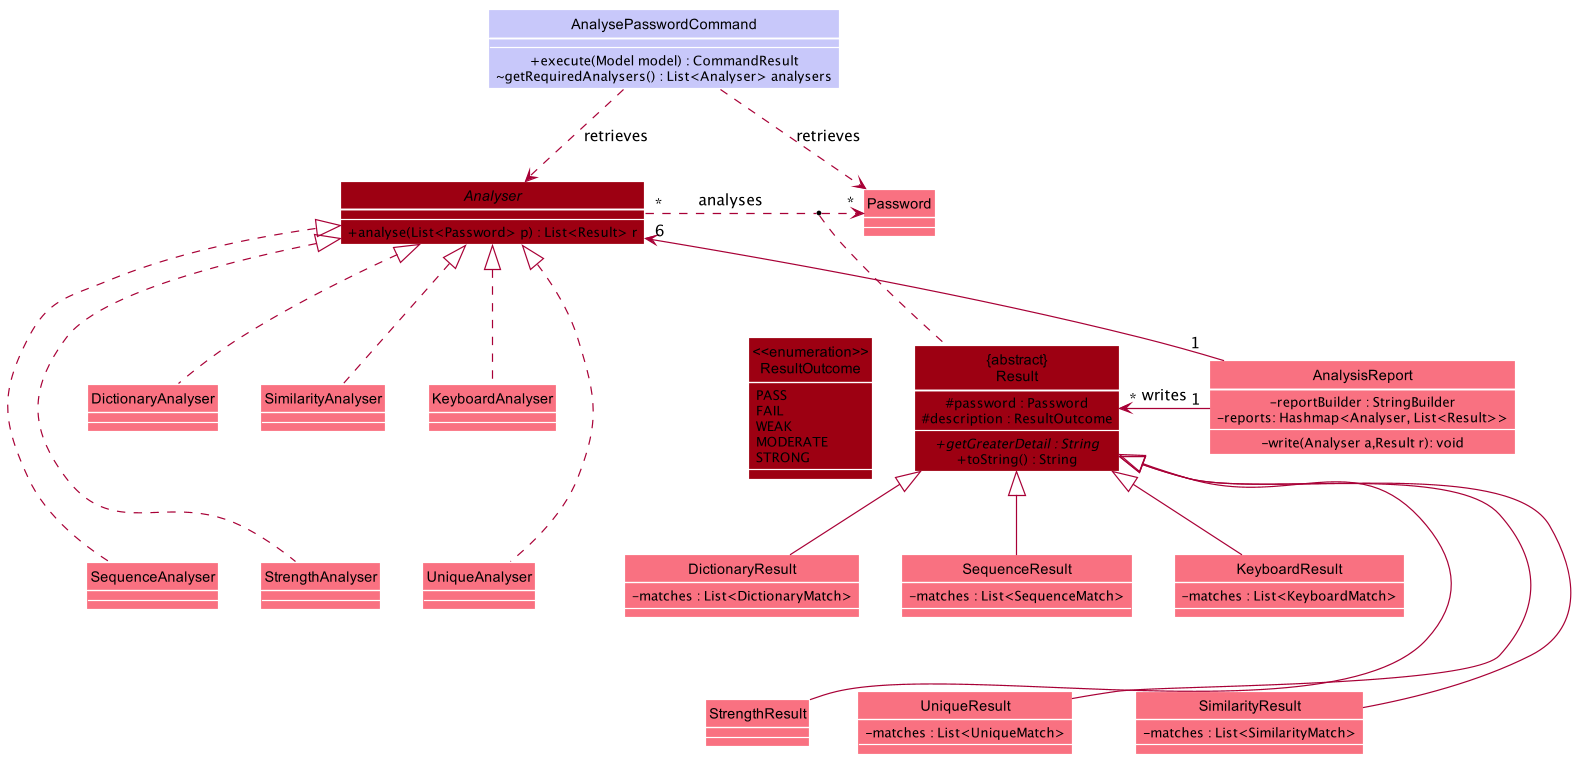
The following class diagram is the current structure of the Analyser component.
In summary,
-
The analysis of passwords is initiated upon
#execute()of theAnalysePasswordCommand. -
Each
Analyseranalyses every password in the password book. -
The analysis of each password produces the respective
Resultfor that password. -
These
Resultsare compiled and written into aAnalysisReport, which is then shown to the user in the form of a summary table. -
Users can opt to view a detailed report for a specific password to get more information on the respective
Result.
3.3.2. Implementation
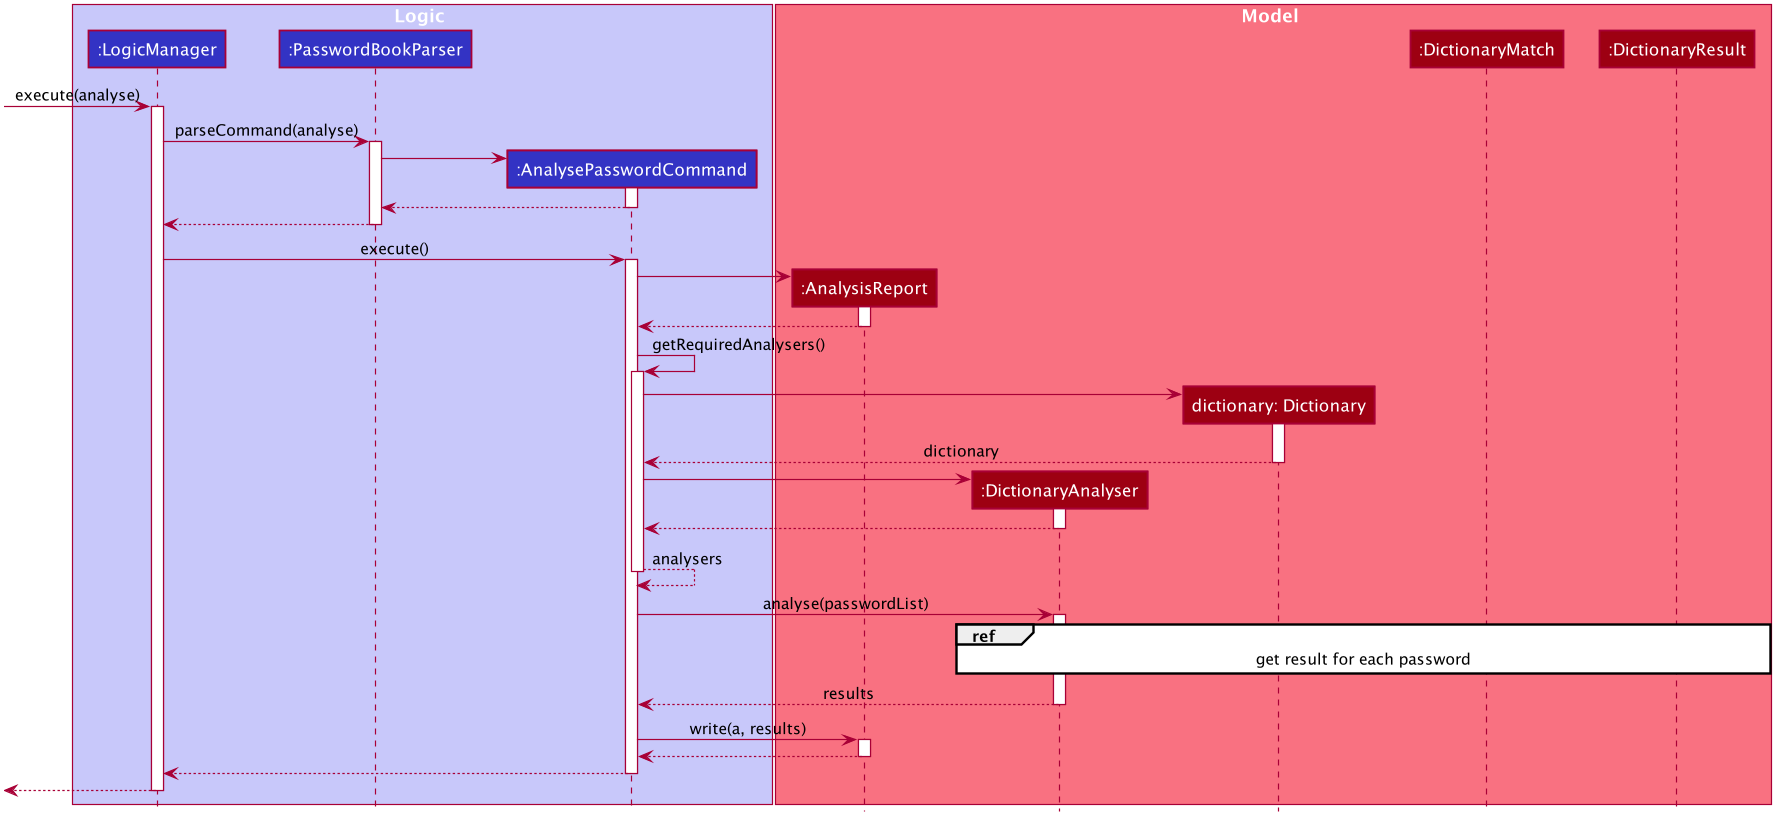
On #execute(), AnalysePasswordCommand retrieves the current list of passwords via Model#getFilteredPasswordList().
It also retrieves the required analysers via #getRequiredAnalysers().
Each Analyser has it’s own implementation of #analyse(), which will subsequently be invoked by the AnalysePasswordCommand given the current list of passwords.
The following sequence diagram breaks down the general flows of events stated above, and in the context of a DictionaryAnalyser:
For the following sequence diagram, the other Analysers are instantiated in a similar fashion in #getRequiredAnalsyers() and hence omitted to the make the diagram less congested.
|
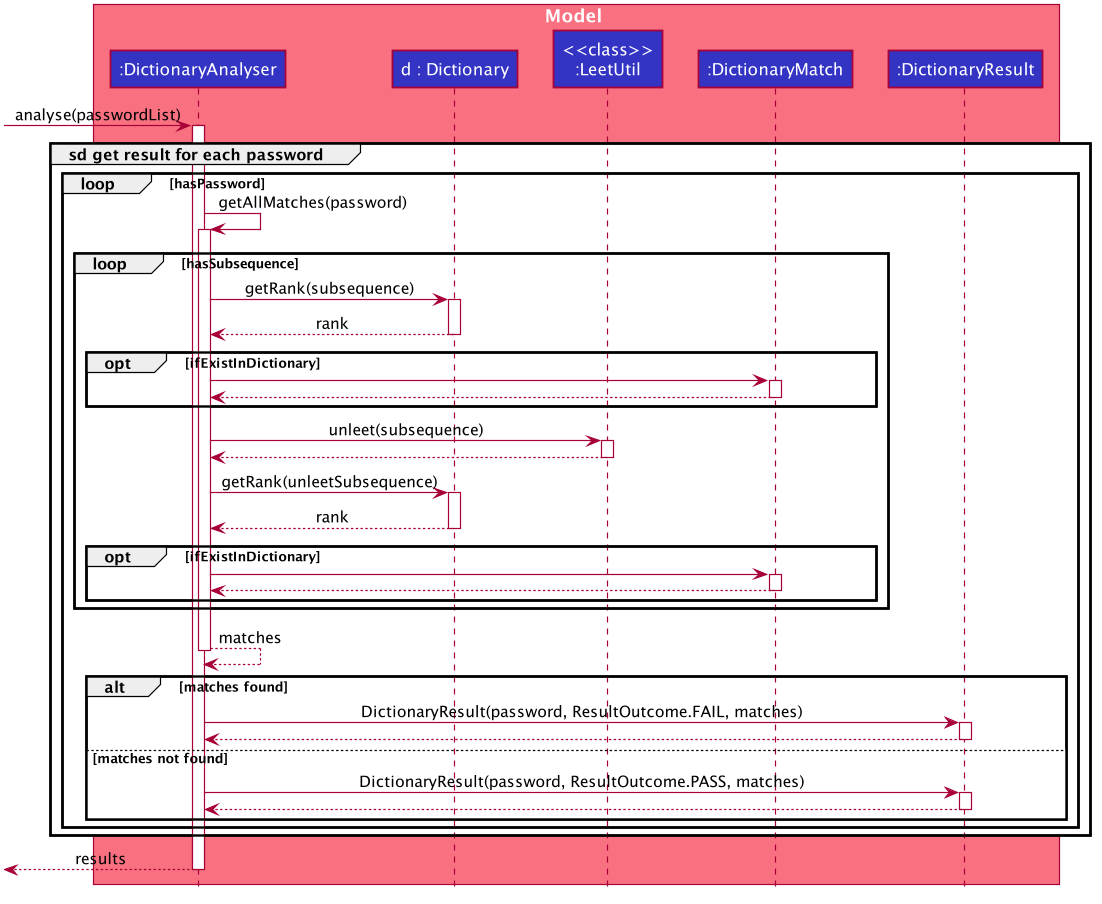
In the following discussion, we will be reviewing how Results are produced for each password, in the context of the DictionaryAnalyser.
In the case of the DictionaryAnalyser#analyse(), every password is checked to see if it contains any subsequence that is listed as a commonly used password in the instantiated Dictionary. This is done in the internal method #getAllMatches() within #analyse().
The Dictionary is an object that maps commonly used passwords to their ranking in terms of how commonly used they are. (e.g. "123456" is mapped to rank 1 in the Dictionary because it is the most commonly used password)
|
If there exists a subsequence that tests positive when looked up against the Dictionary , a DictionaryMatch is created to note down the details of the subsequence.
As long as a DictionaryMatch is found, then the password has failed the analysis. A DictionaryResult with the attribute ResultOutcome.FAIL will be created for that password. This process is repeated for every password. Following, the list of DictionaryResult are returned to be compiled and written by the AnalysisReport.
It is also worth mentioning that DictionaryAnalyser is capable of identifying commonly used passwords even in leet-ed variations (e.g. p@5sw0rd).
This is made possible because of the method #LeetUtil.translateLeet(), which is a recursive algorithm designed to return all possible un-leet variations, given a leet-ed password.
The following sequence diagram depicts the flow of events mentioned above:
3.3.3. Design Considerations
Aspect: How analyse/analyse strong executes
| Alternative 1 (Current choice) | Alternative 2 |
|---|---|
Always analyse the entire list of Password objects for every "analyse" command,
even if the list of Passwords was unchanged. |
Save in memory the result produced by the Analyser objects, and update result upon modification of
list of Passwords. |
Why did we choose Alternative 1: |
|
3.4. General Data Encryption
3.4.1. Initialization and Validation
We encrypt all the data files of SecureIT with a master password set by the user. The initialization and validation of the master password are handled by TestStorage.
The following diagram shows how the master password is initialized when the user uses the app for the first time and validated for subsequent uses of the app.
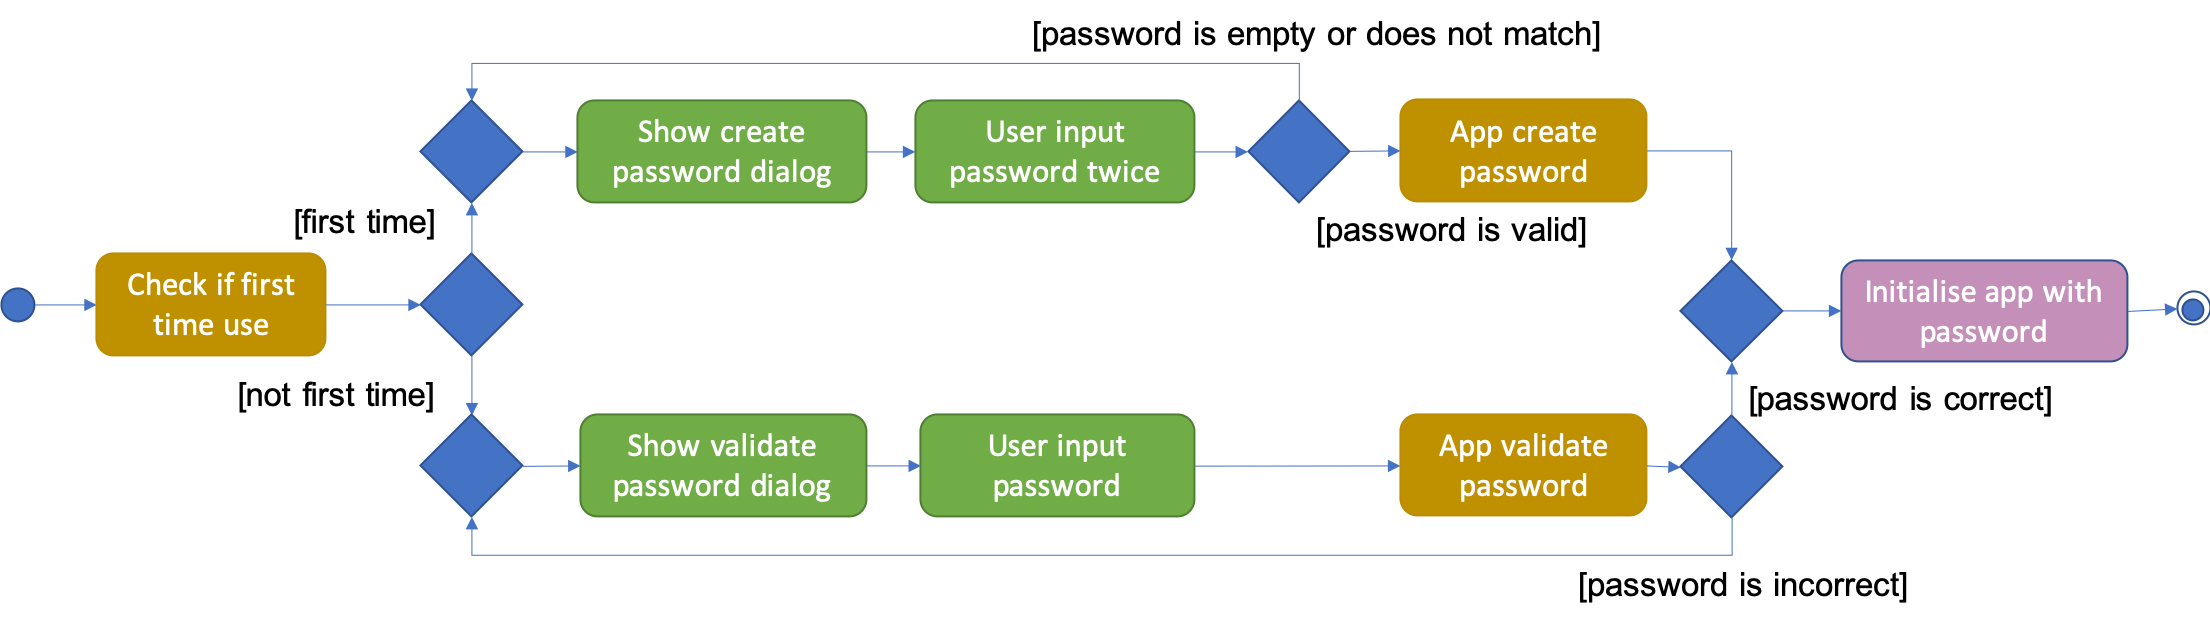
Note that to protect users' data, the main components of the app (Storage, Ui, Logic, Model) can only be initialised with a correct master password.
Also, the app does not store the master password itself. Instead, during initialization, the app encrypts a magic word using the password and stores it in the file system. For validation, the app tries to decrypt the stored magic word using the password given and checks if the original word is obtained. If the password given is correct, the original magic word should be obtained.
3.4.2. Encryption Method
The following sequence diagram explains how the EncryptionUtil class encrypts an input byte array using a password.
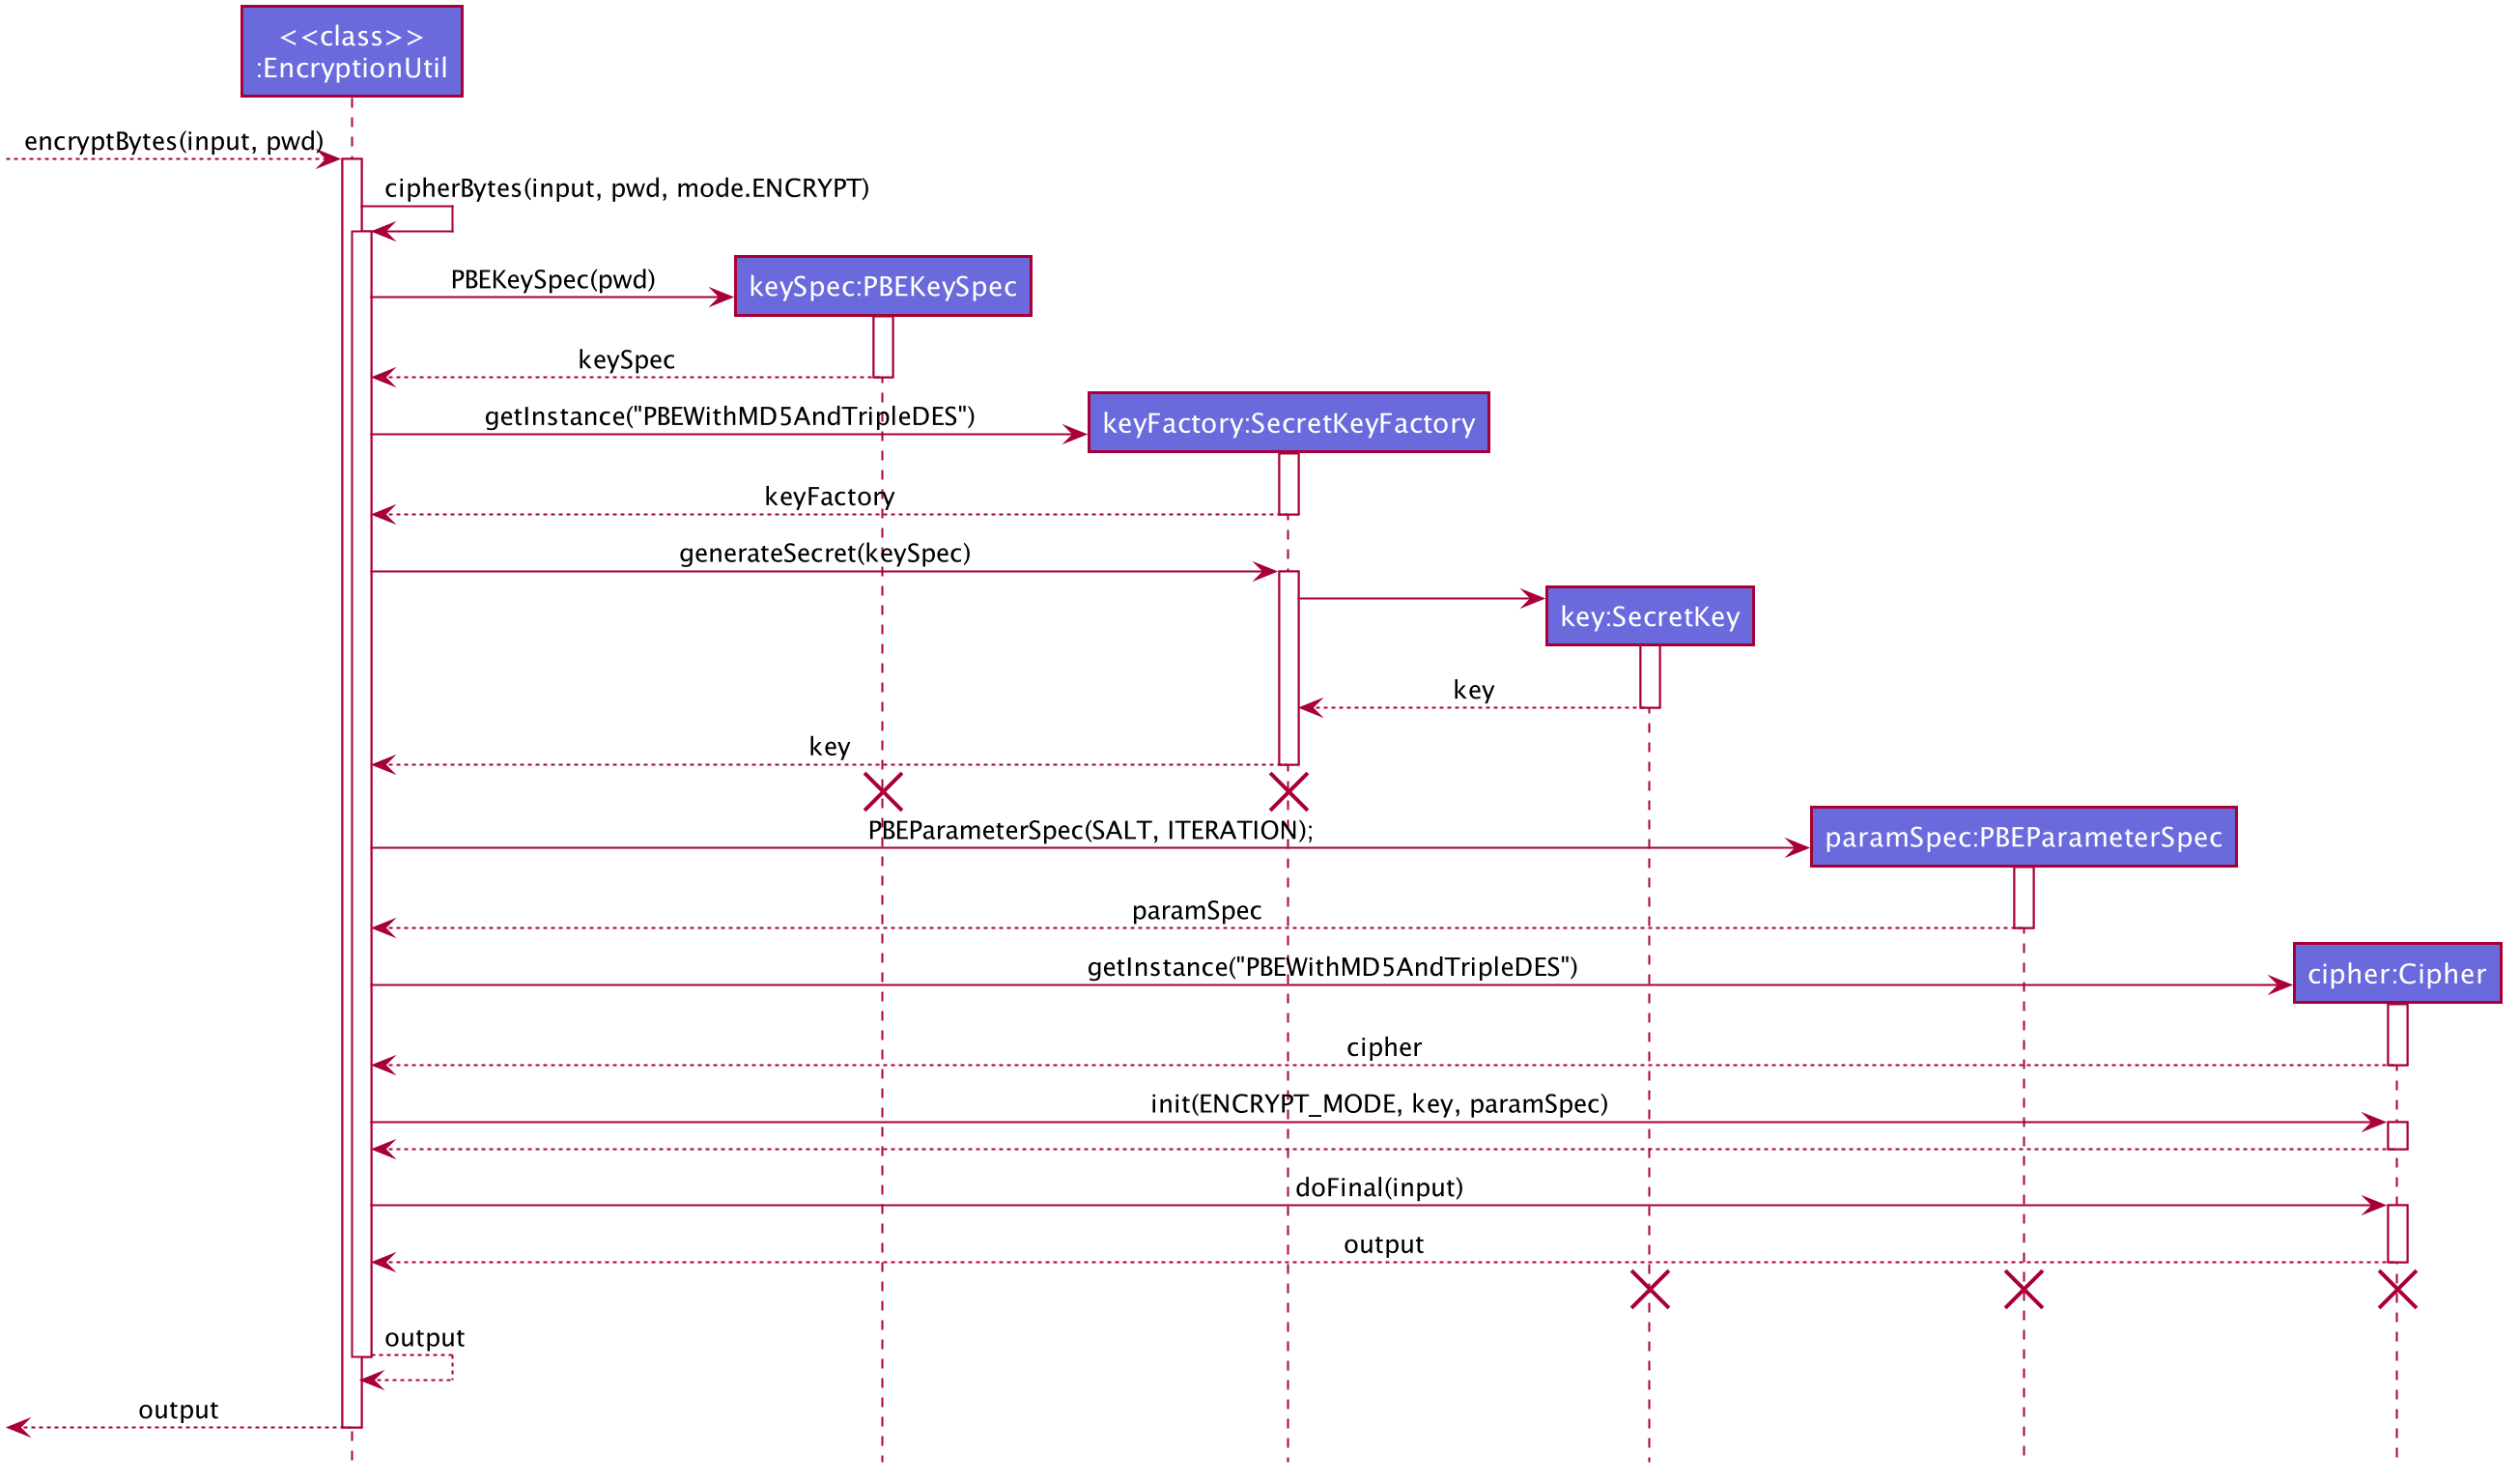
The process of encrypting a byte array is outlined as follows:
Step 1. A key (SecretKey key) is generated from the password string (pwd) and a specified encryption method (PBEWithMD5AndTripleDES) via a utility class (SecretKeyFactory).
Step 2. A set of parameter specification (PBEParameterSpec paramSpec) is generated with hardcoded parameters (SALT, ITERATION). Hardcoded parameters ensure that the same password can always be correctly validated at different times.
Step 3. A Cipher class is constructed with the same encryption method specified above (PBEWithMD5AndTripleDES) and initialised with the key and the set of parameter specifications.
Step 4. The doFinal method conducts the actual encryption on the input array and returns the encrypted byte array.
The decryption process is similar to the encryption process, except that the ENCRYPT_MODE is changed to DECRYPT_MODE. The same password is necessary to decrypt an encrypted byte array to its original content.
3.5. Cards Feature
3.5.1. Expiry Validations
When a user tries to add a card, there are various checks to ensure that the expiry entered is valid. As the name suggests, expiry validations are implemented within Expiry. Additionally, it implements the following operations:
-
ExpiryDate#isValidDate(String test)— Checks the string against the provided regex to make sure it is a match. -
ExpiryDate#isValidExpiryDate(String test)— Checks to ensure that it has not past the given expiry date. -
ExpiryUtil#getMonthToExp(String expiry)— Returns the number of months left until the given expiry.
ExpiryDate#isValidExpiryDate(String test) is implemented using ExpiryUtil#getMonthToExp(String expiry) to ensure that the number of months left is positive.
The other operations are used in ParserUtil#parseExpiryDate(String expiryDate) to ensure that user input passes these validations, before allowing the card to be added to the list. Upon startup of the app, the repopulation of data also checks against these validations to ensure that there are no illegal values stored in the list.
Given below is an example usage scenario and how the validations behave at each step. The following sequence diagram shows how the expiry validations work.
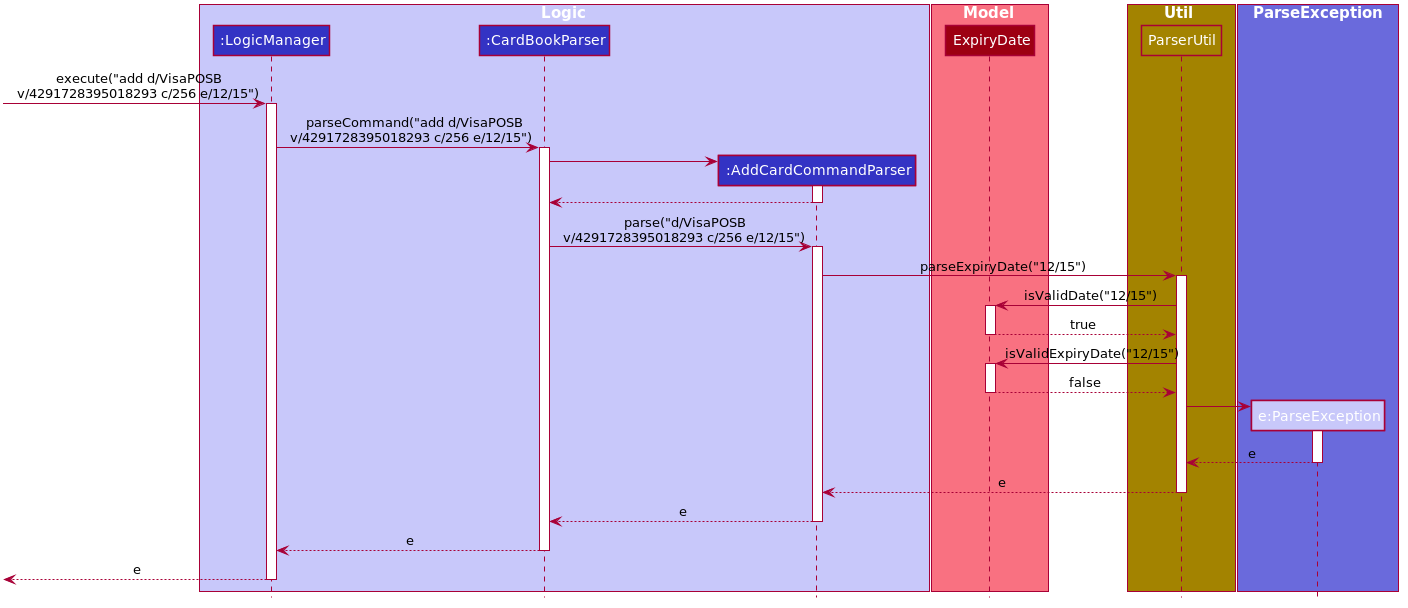
Step 1. The user executes add d/VisaPOSB v/4291728395018293 c/256 e/12/15 command to add a new card named 'VisaPOSB' in the card book. The CardBookParser#parseCommand(String userInput) calls AddCardCommandParser#parse(String args) and the command parser tries to breakdown the string in to various parameters.
Step 2. The AddCardCommandParser calls ParserUtil#parseExpiryDate(String expiryDate), which first calls ExpiryDate#isValidDate(String test) to check its validity, which returns true.
Step 3. The ParserUtil#parseExpiryDate(String expiry) then calls ExpiryDate#isValidExpiryDate(String test), which calls ExpiryUtil#getMonthToExp(String expiry). However, -47 is returned and the condition in ExpiryDate#isValidExpiryDate returns false.
Step 4. A ParseException is thrown from ParserUtil#parseExpiryDate(String expiryDate) and the error message is shown on the result box.
3.5.2. Expiry Notification
The expiry notification is facilitated by ExpiryDisplay. It exists as an attribute within MainWindow and obtains the required expiring cards list from LogicManager. This is internally stored as expiringCards. Additionally, it implements the following operations:
-
LogicManager#getExpiringCardList()— Returns the list of expiring cards. -
ExpiringCard#of(Card card)— Creates an ExpiringCard given card details. -
ExpiryDisplay#hasCards()— Returns true if there are expiring cards. -
MainWindow#handleExpiry()— Pops up a notification if there are expiring cards upon startup of the app.
The following sequence diagram shows how the expiry notification shows up.

Step 1. The user opens the app and a new MainWindow is created. The logic in MainWindow` calls LogicManager#getExpiringCardList() to obtain a list of expiring cards.
Step 2. MainWindow creates a new instance of ExpiryDisplay using the list of expiring cards.
Step 3. The UiManager calls MainWindow#handleExpiry(), and the MainWindow checks if there are expiring cards with ExpiryDisplay#hasCards().
Step 4. The call returns true and MainWindow checks if the notification is showing with the call ExpiryDisplay#isShowing().
Step 5. This call returns false and MainWindow does a final call ExpiryDisplay#show() to render the expiry notification.
3.6. File Management
SecureIT does not store users' encrypted files directly. Instead, it reads the files' data, carries out the encryption, and replaces the original files with encrypted ones in users' file system. Meanwhile, it also maintains records of files that it encrypts, represented by EncryptedFile class, in an internal data structure, FileBook.
The following diagram illustrates how the record of an encrypted file is represented internally.
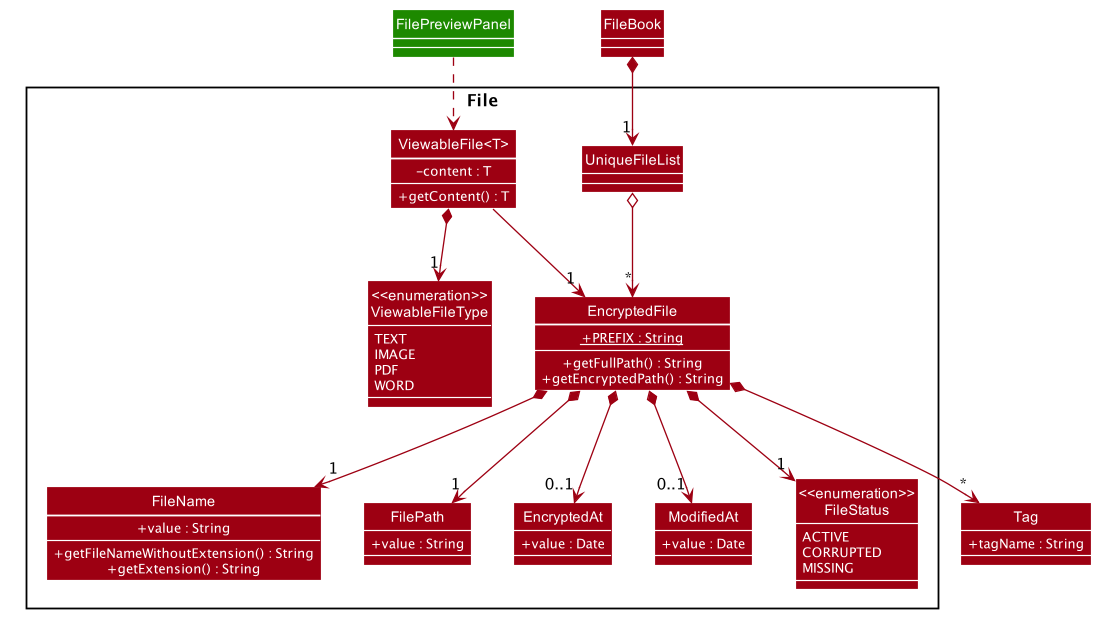
The FileBook, managed by the app’s ModelManager, keeps a UniqueFileList. The list encapsulates an internal mechanism to prevent file duplication. Each entry in the list represents a record of an encrypted file.
An EncryptedFile must have the following attributes: a FileName, a FilePath, and a FileStatus. While the first two attributes allow the app to locate the file, the file status provides users with an indication of the current state of the file. It defaults to ACTIVE for newly encrypted/added files.
Two timestamps, EncryptedAt and ModifiedAt, provide users with more details about the file. These two attributes may not always be available. For example, encrypted files added with add command do not contain this information.
Lastly, while a ViewableFile contains the file’s content for preview. It is a generic class which is extendable to accommodate even more file types in future. The FilePreviewPanel, which is a UI component, depends on ViewableFile to render the preview.
3.6.1. Logic
The user can perform the following operations: encrypt, decrypt, add, remove, move, rename, and preview. There are two differences between the commands of the file manager and those of the address book. First, some file commands require a password for execution. Second, most file commands involve interaction with the external file system.
The solution to the first difference is a FileCommandParser class which is similar to the Parser class, but it packages the password within the commands during parsing. It is illustrated in the class diagram below:
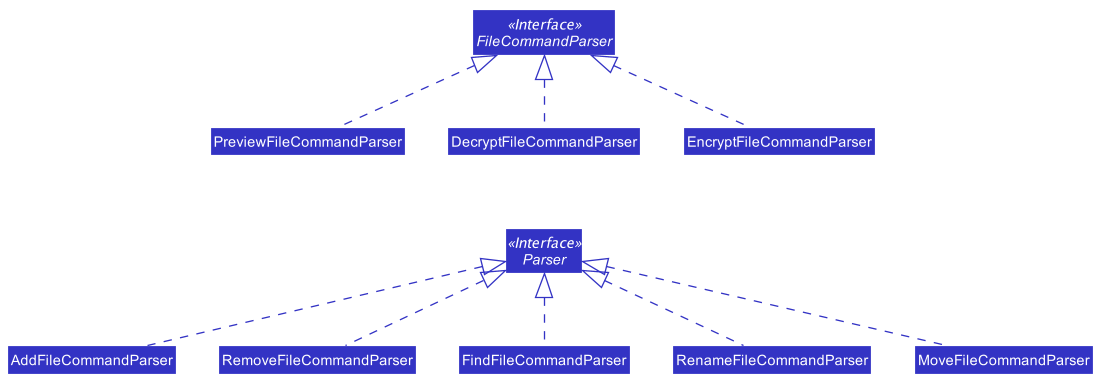
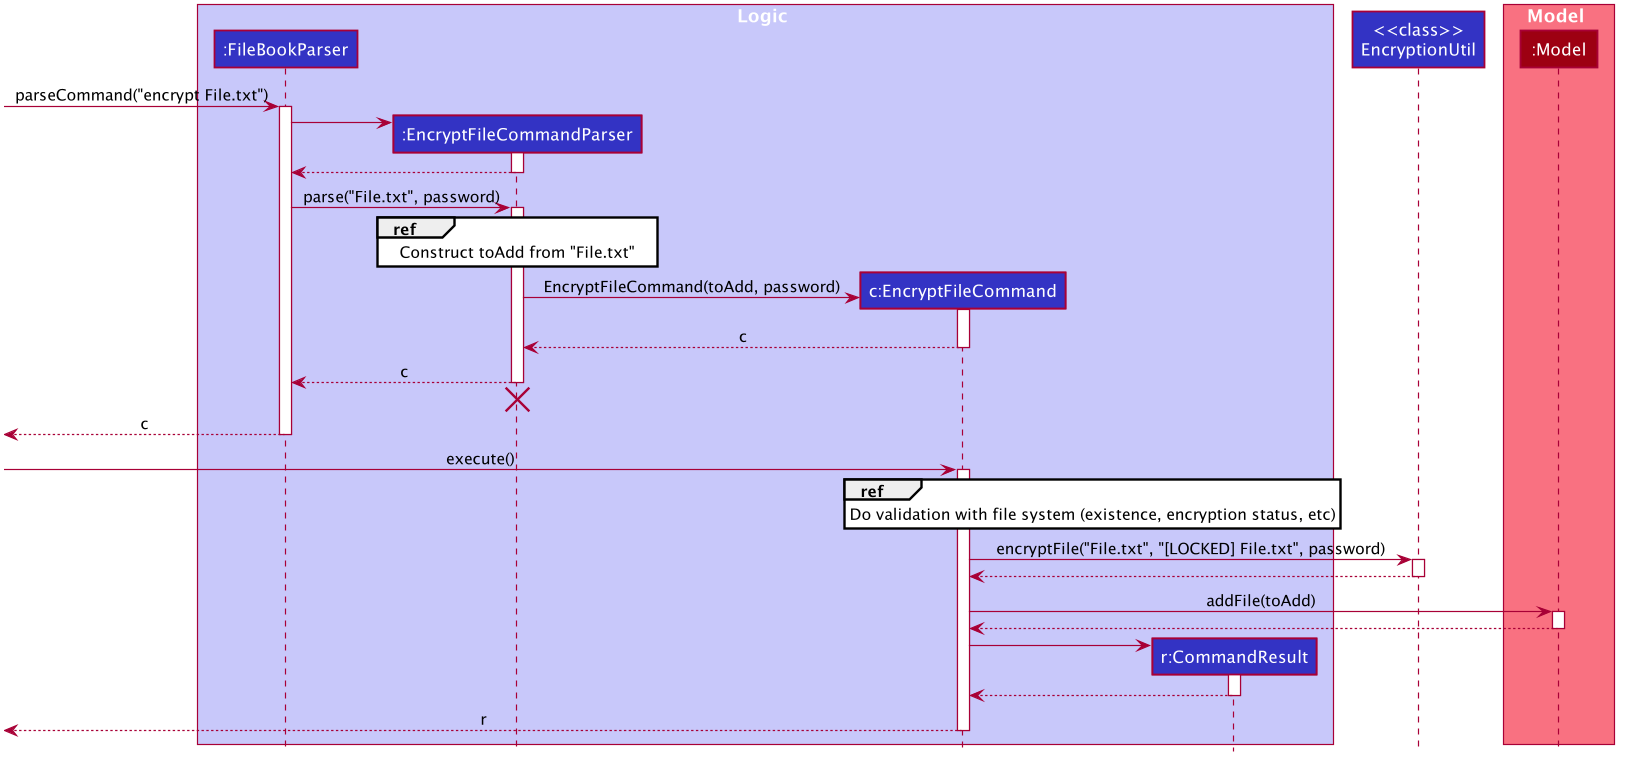
To address the second difference, we separate the access to the file system from the parser. For example, during encryption, at the parsing stage, an EncryptedFile toAdd is created without the knowledge of the actual file. Both the validation and encryption are carried out only at the execution stage. This is illustrated in the following sequence diagram:
3.6.2. Design Considerations
Below is a summary of my considerations and analysis while developing the file manager:
-
When to do file validation with the file system
Alternative 1: When a command is parsed
Pros: There is no need to constructEncryptedFileobjects for invalid files.
Cons: Both the command parsing and execution require interaction with the file system.Parserviolates the single responsibility principle.Alternative 2: When a command is executed
Pros: Interaction with the file system only occurs during execution. Easier to debug.
Cons: Need to constructEncryptedFilewhen file information is not yet available. Cannot initialiseModifiedAtin the constructor.We choose alternative 2 because according to single responsibility principle,
Parsershould only convert user input to correct command format, without the knowledge of files. -
How to implement the file preview feature
Alternative 1: UI components read file content
Pros: There is no need to create extra classes inModel, such asViewableFile.
Cons: UI components have to interact directly with the file system.Alternative 2: Read file content during command execution
Pros: File system access is limited to command execution time only.
Cons: Need to pass the file content to the UI components viaCommandResult.We choose alternative 2 because it is better to keep all access to file system in one place.
3.7. Notes Feature
3.7.1. Open Note
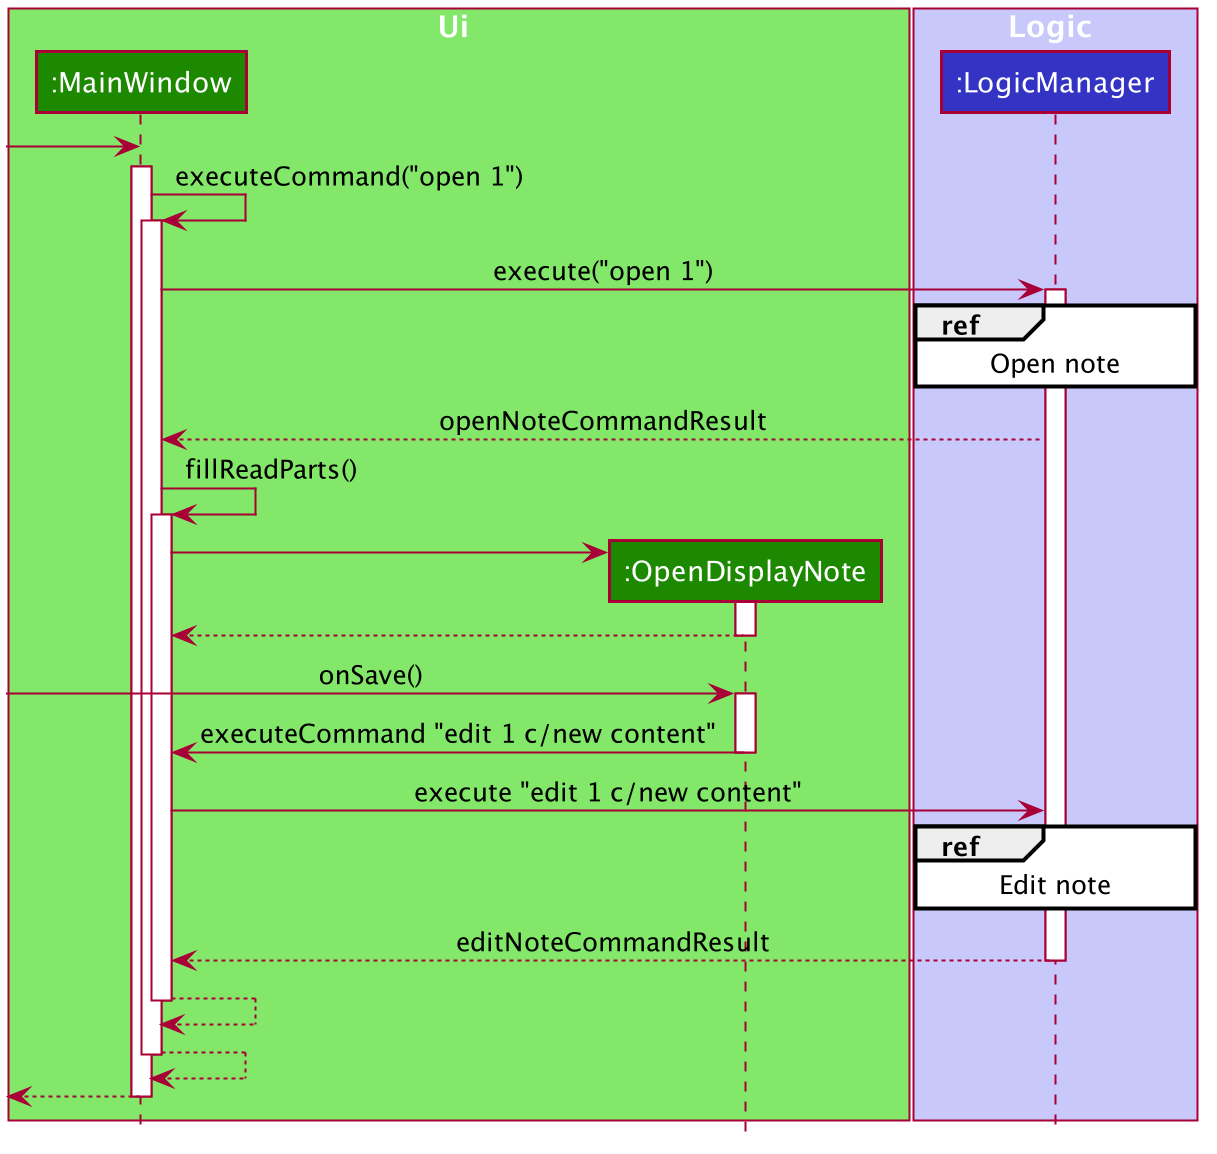
The user is able to open a note in a separate panel to easily read and edit its contents.
The following sequence diagram illustrates how the note is retrieved and edited through the UI via the open command.
Below is the sub-diagram for retrieving the note through the open command.
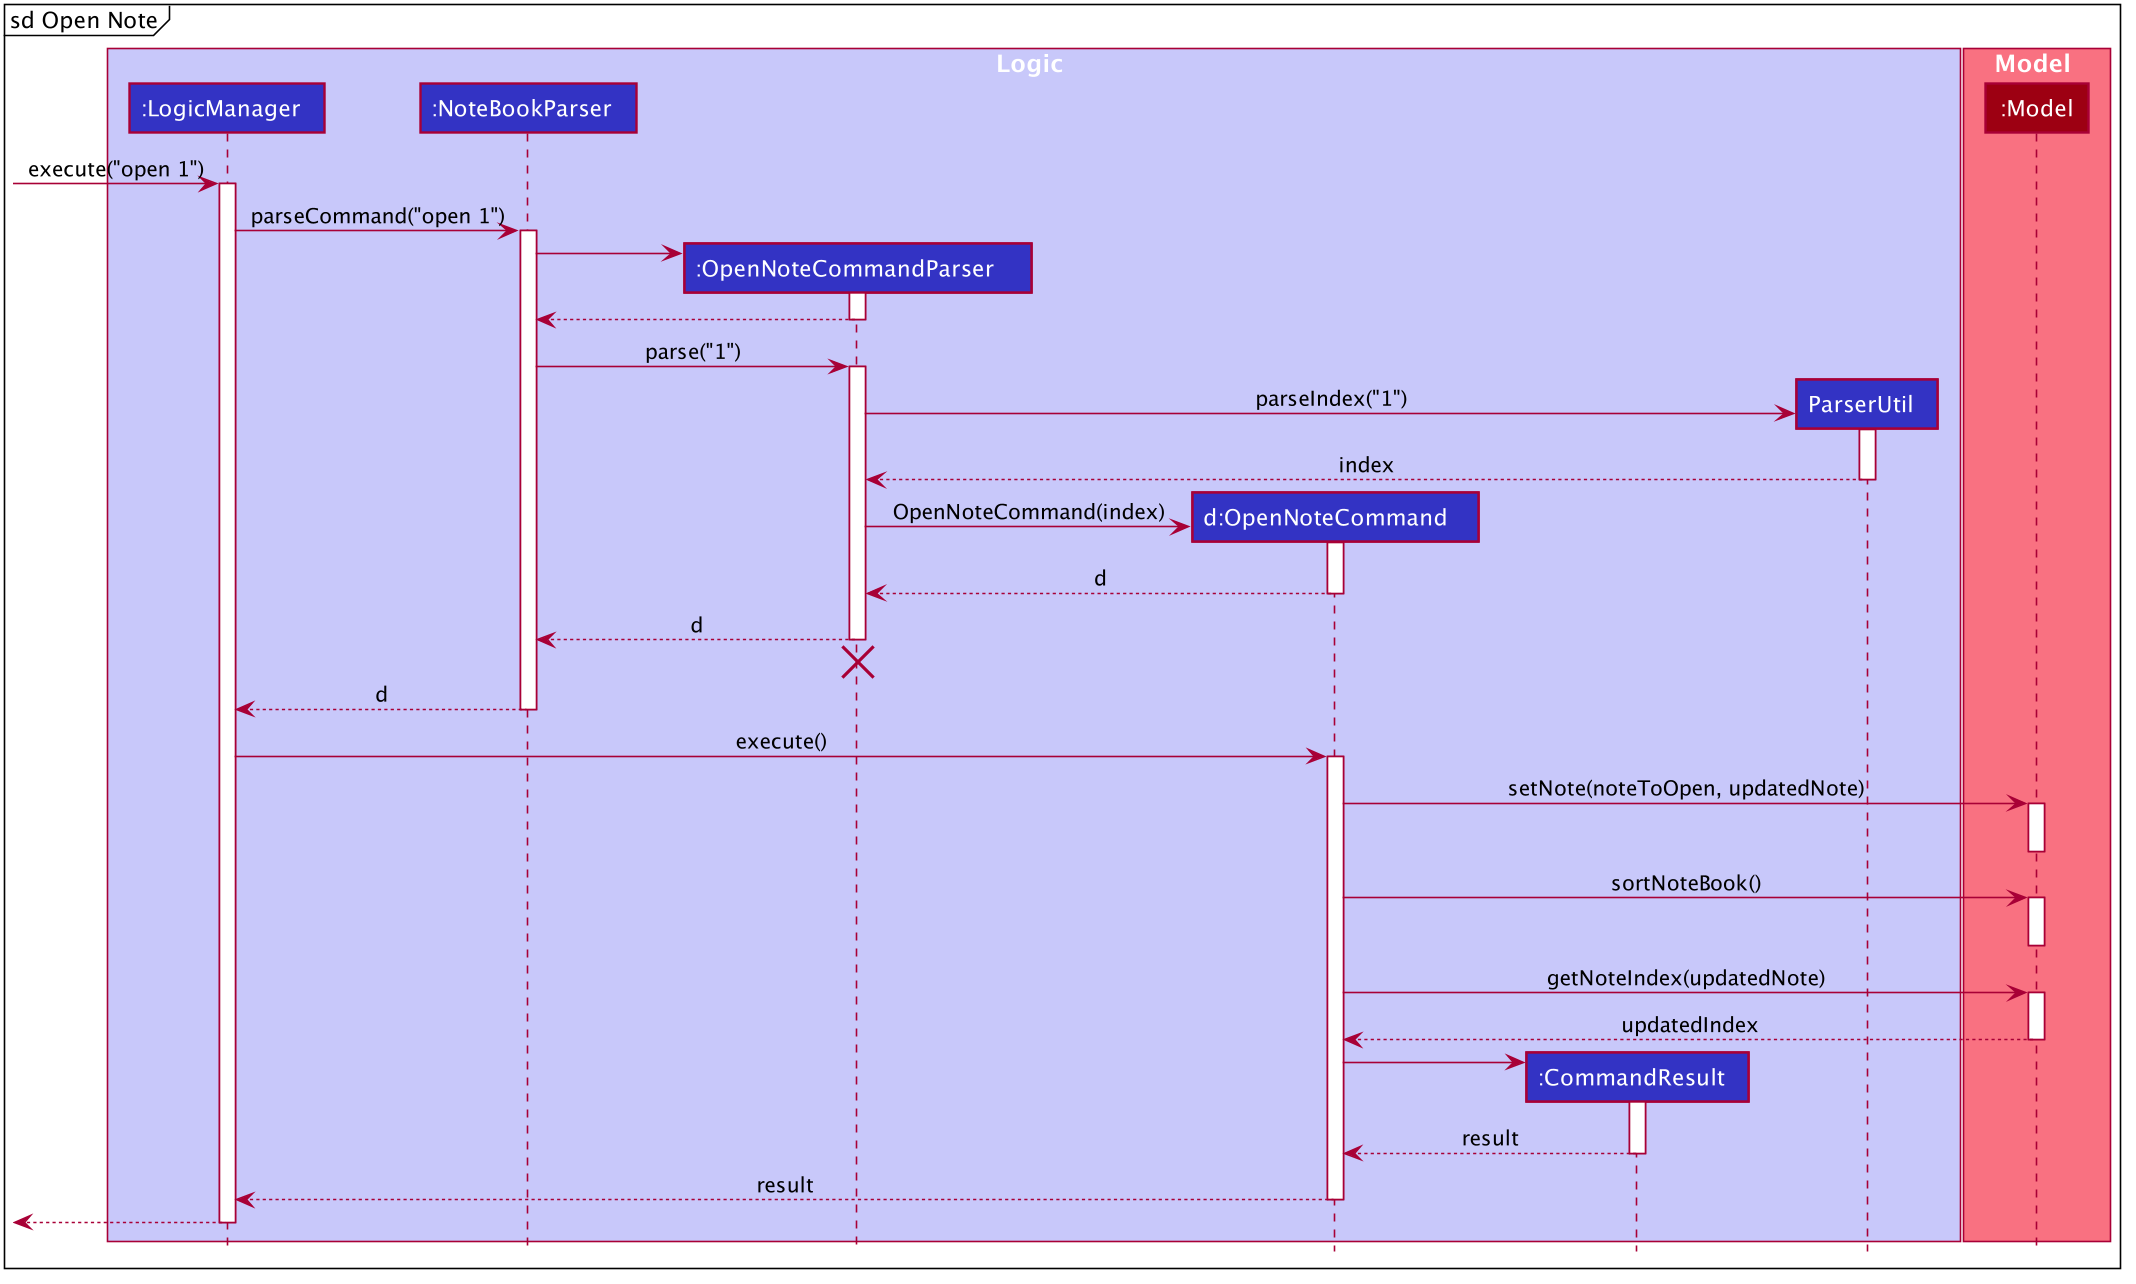
open command.Given below is an example usage of the open command in notes, where a user intends to open a note to read
or edit its contents.
-
Through the
goto notecommand, the user arrives at the notes component of the app. The user can then executes the commandopen 1. -
This invokes the
Model#OpenNoteCommand()command which proceeds to check if the index1given is a valid index using theParserUtil#parseIndex()method. -
If the index given by the user is valid, the corresponding note will be retrieved. This note is shown to the user in a panel on the right within the app.
-
The user can then proceeds to edit the Title, Description and Content field of the note through this panel and saves his edits using the save button. This executes the
Logic#EditNoteCommand()which edits the note in the note book. -
The note book is now updated with the note edited by the user.
3.7.2. Undo/Redo
Implementation
The undo/redo mechanism is facilitated by the VersionedNoteBook, which extends NoteBook with a undo/redo history.
This history is stored in two stacks - the UndoStack and the RedoStack. The UndoStack stores the states of note books
before the current state while the RedoStack stores the states of note books after the current state.
The key operations that support these mechanisms are:
VersionedNoteBook#commit() — Saves the current note book state and its corresponding command in the UndoStack.
VersionedNoteBook#undo() — Restores the previous note book state from the UndoStack and returns its corresponding command
to inform the user what command is undone. It also stores the current state of the note book into the RedoStack.
VersionedNoteBook#redo() — Restores a previously undone note book state from the RedoStack and returns its corresponding
command to inform the user what command is redone. It also stores the current state of the note book into the UndoStack.
Below is a class diagram to illustrate how the classes mentioned above interact with one another.
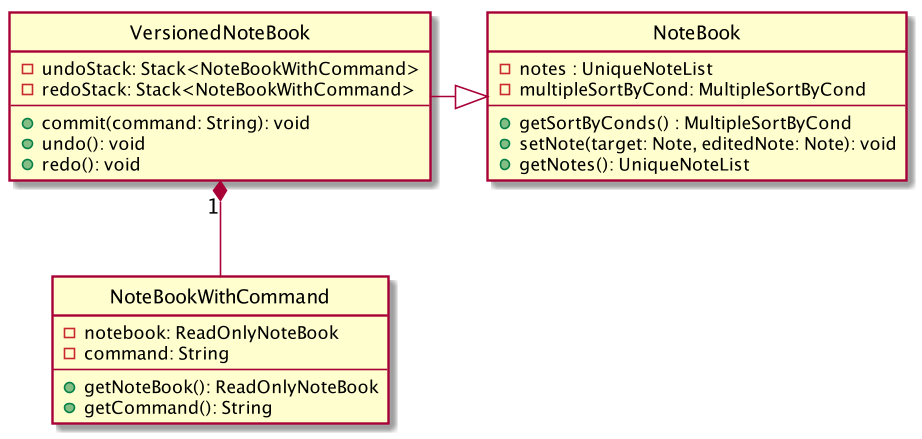
VersionedNoteBook, NoteBook and NoteBookWithCommand.Below is a comprehensive activity diagram to illustrate how the undo & redo mechanism works.
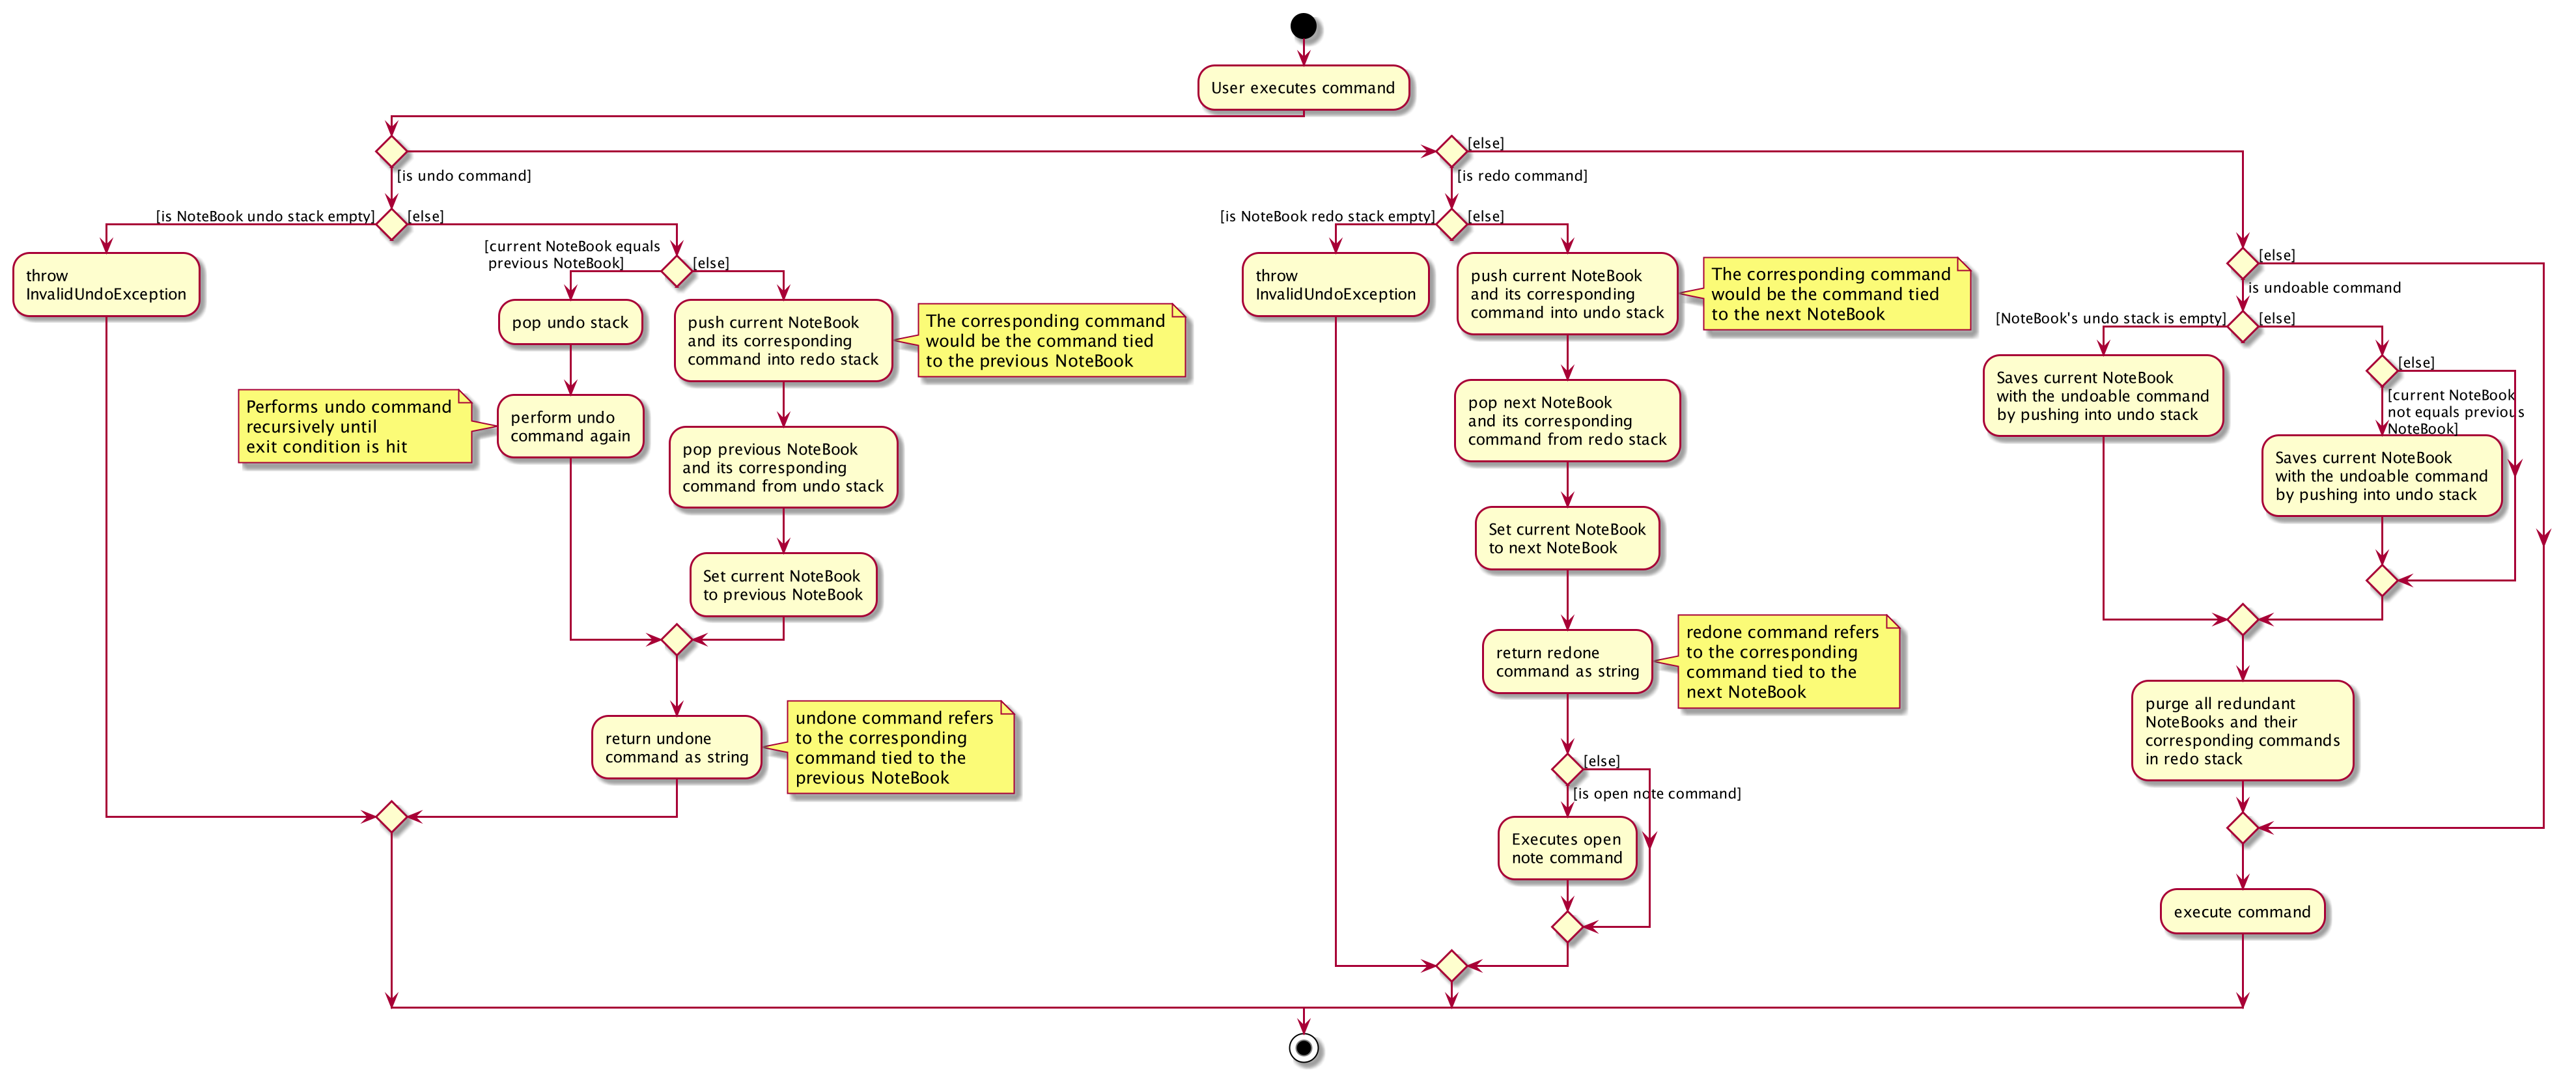
Warning
Not all commands are undoable. Undo-able commands are commands that modifies the note book. They include: add, delete,
clear, edit and open.
Below is an example to illustrate how the undo command is executed:
-
The user launches the application for the first time. The
VersionedNoteBookwill be initialized with the initial note book state, with emptyUndoStackandRedoStack. -
The user executes
delete 5command to delete the 5th note in the note book. The delete command invokes theModel#commitNoteBook(), causing the state of the note book before thedelete 5command is executed to be saved in theUndoStack. The current state of the note book is then updated to the state after thedelete 5command executes. -
The user now decides that deleting the note was a mistake, and wants to undo that action by executing the
undocommand. -
This will call the
Model#undo(), which will first check if theUndoStackis empty.-
The
UndoStackwill be empty if no undoable command were called prior to calling theundocommand. -
The undo mechanism will proceed only if the
UndoStackis not empty, else an error will be returned to the user rather than attempting to perform the undo.
-
-
The current state of the note book is then checked against the previous state of the note book.
-
In the event that they are the same, the previous note book state is popped from the
UndoStackand theundocommand is called recursively (starting from step 2). This recursive call is performed until either the current and previous note book state are different or until theUndoStackis empty. -
In the event that they are different, proceed on to step 6.
-
-
The current state of the note book is stored in the
RedoStack. -
The note book is then reverted to the previous note book state. This same previous note book state is popped from the
UndoStack. -
The undo command is complete.
Note:
-
Step 3 is to prevent users from being able to perform
undoactions when there is no change to be undone.
For the redo command, a key point to note is that it is not logical to redo a command from the RedoStack after an undoable
command is executed. Therefore, anytime an undoable command is executed, the RedoStack is purged. This behavior follows
that of most modern desktop applications as well.
As the rest of the mechanisms of the redo command is similar to that of the undo command but opposite,
its details are omitted.
Aspect: How undo & redo executes
-
Alternative 1 (current choice): Saves the entire note book.
-
Pros: Less complex and easier to implement.
-
Cons: May have performance issues in terms of memory usage.
-
-
Alternative 2: Individual command knows how to undo/redo by itself.
-
Pros: Makes use of lesser memory.
-
Cons: More complex to implement and more prone to bugs as each individual command must be correct to work correctly.
-
The reason why we chose alternative 1: By adopting a simpler implementation, we are able improve testability of the command. This helps in introducing less bugs into system. Furthermore, this implementation better supports future extensions as undoable commands can be added much easier.
Aspect: Data structure to support the undo/redo commands
-
Alternative 1 (current choice): Use two stacks to store the history of note book states - one for undo, and the other for redo.
-
Pros: Very easy to implement.
-
Cons: Using two data structures may incur additional overhead in terms of memory.
-
-
Alternative 2: Use a single linked list to store the history of note book states which supports both undo and redo.
-
Pros: May incur less overhead in terms of memory usage as only one data structure is used.
-
Cons: More complex to implement.
-
The reason why we chose alternative 1: It is easier to visualize the implementation of this method and is less complex to implement. As the code is much cleaner, it is more readable which also helps in improving testability and future extensions as well.
Aspect: Implementation of expiry tagging system
-
Alternative 1 (current choice): Check for expiring and expired cards and add respective tags upon startup.
-
Pros: Adds the tag in real time on startup, removing the concern of updating tags.
-
Cons: Startup time may take longer due to extra processing of information.
-
-
Alternative 2: Add respective expiring and expired tags upon detection of nearing expiry.
-
Pros: Users can visibly see the addition of expiry tags when cards are expiring.
-
Cons: There will be a need to update expiring tags to expired tags, after the card has expired. This may lead to potential bugs.
-
The reason why we chose alternative 1: It is much easier to code, and it is less susceptible to unforeseen circumstances such as a card having both expiring and expired tags.
Aspect: Deciding when the expiry notification should appear
-
Alternative 1 (current choice): Notification should appear upon startup.
-
Pros: User is immediately warned of their expiring cards and is able to take the necessary actions required.
-
Cons: Potentially disruptive as notification would appear every time the user starts up the app, as long as expiring cards exists.
-
-
Alternative 2: Notification should appear upon navigating to card book.
-
Pros: User can immediately tell which cards are in need of attention.
-
Cons: Expiring cards may be left unnoticed if user does not explicitly navigate to the card book.
-
The reason why we chose alternative 1: The main purpose of notifications is to remind users to take action and users can subsequently delete the card so that the notification stops appearing.
3.7.3. Sort Note feature
Sorting of notes is handled by the MultipleSortByCond class, which allows the notes in the NoteBook to be sorted in three different ways - by date modified, date added or number of of times the note is accessed.
Below is a class diagram to illustrate how the NoteBook class and MultipleSortByCond class interact with one another.
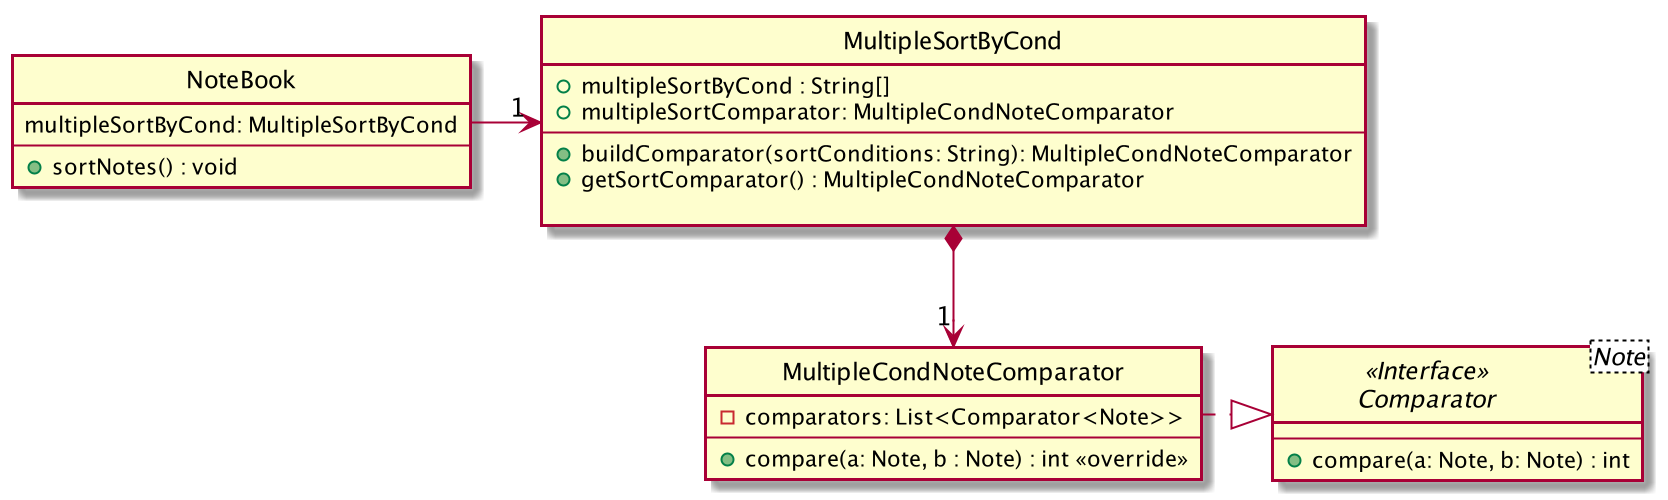
MultipleSortByCond class interacts the other classes.Sorting the note book rearranges the notes according to the sort conditions provided.
More than one of the conditions can be used to sort the notes in the note book at one time, with the first condition having the greatest precedence.
This is handled by the MultipleSortByCond#buildComparator(), which takes in the sort conditions specified by the user and returns a MultipleCondNoteComparator object that is used to sort the list of notes
in NoteBook.
3.8. Logging
We are using java.util.logging package for logging. The LogsCenter class is used to manage the logging levels and logging destinations.
-
The logging level can be controlled using the
logLevelsetting in the configuration file (See Section 3.9, “Configuration”) -
The
Loggerfor a class can be obtained usingLogsCenter.getLogger(Class)which will log messages according to the specified logging level -
Currently log messages are output through:
Consoleand to a.logfile.
Logging Levels
-
SEVERE: Critical problem detected which may possibly cause the termination of the application -
WARNING: Can continue, but with caution -
INFO: Information showing the noteworthy actions by the App -
FINE: Details that is not usually noteworthy but may be useful in debugging e.g. print the actual list instead of just its size
3.9. Configuration
Certain properties of the application can be controlled (e.g user prefs file location, logging level) through the configuration file (default: config.json).
4. Documentation
Refer to the guide here.
5. Testing
Refer to the guide here.
6. Dev Ops
Refer to the guide here.
Appendix A: Product Scope
Target user profile:
-
has a significant number of confidential documents to keep track of
-
prefers localised storage for confidential documents to online or third party vault for storing personal information and passwords
-
can type fast
-
is reasonably comfortable using CLI apps
Value proposition: Remember only one password, and save the hassle of remembering all other confidential documents (account details, credit card details, secret files, secret notes). Have a safe and secure way to store all confidential documents locally, without the use of the online/ third party / cloud-reliant vaults.
Appendix B: User Stories
Priorities: High (must have) - * * *, Medium (nice to have) - * *, Low (unlikely to have) - *
| Priority | As a … | I want to … | So that I can… |
|---|---|---|---|
|
employee with multiple confidential items |
only have to remember a single password |
store all other confidential documents |
|
employee with multiple passwords |
store my passwords |
access the passwords easily if I forget them |
|
employee handling confidential files |
encrypt my files (image , text files) |
other users cannot access my files |
|
employee handling confidential files |
decrypt my files (images, text files) |
re-access my encrypted file/ deem them as no longer confidential |
|
employee with multiple credit/debit cards |
store my credit / debit card information |
access the card information easily if i did not bring it out |
|
employee that has to remember confidential snippets of information |
Store notes |
other users cannot see my notes / I have a list of confidential notes which i can access easily |
|
employee with multiple passwords |
delete my passwords |
my list of passwords will not have any passwords which I do not need |
|
employee with multiple passwords |
update my passwords |
I can have the most updated list of passwords |
|
employee who constantly creates new accounts |
generate strong passwords |
my new accounts will not be cracked easily |
|
employee with multiple passwords |
analyse my passwords |
I know which passwords are vulnerable and that I should change them |
|
employee handling confidential files |
receive confirmation of which files have been encrypted |
I can be sure that I have encrypted the correct files |
|
employee handling confidential files |
see the encryption status of my files |
I can know which files are encrypted at one glance |
|
employee with many credit cards/debit cards |
delete my credit cards/debit cards |
my list of credit cards/debit cards will not have any unnecessary ones |
|
employee with many credit cards/debit cards |
receive expiry date notifications |
I can be sure that my cards are not expired |
|
employee that has to remember confidential snippets of information |
delete notes |
my list of confidential notes will not have any unnecessary confidential notes |
|
employee that has to remember confidential snippets of information |
update notes |
I can change my notes if there are any new updates to the confidential information |
{More to be added}
Appendix C: Use Cases
(For all use cases below, the Actor is the user, the precondition is that user needs to be logged in, unless specified otherwise)
System: PasswordSys, FileSys, NoteSys, CardSys
Use case:
-
UC01 - Access password window
-
UC02 - Access file window
-
UC03 - Access note window
-
UC04 - Access credit card window
UC01 - Access password window
MSS
-
User request to access password window
-
PasswordSys checks if user is logged in and gives access to user
Use case ends.
UC02 - Access file window
MSS
-
User request to access file window
-
FileSys checks if user is logged in and gives access to user
Use case ends.
UC03 - Access note window
MSS
-
User request to access note window
-
NoteSys checks if user is logged in and gives access to user
Use case ends.
UC02 - Access credit card window
MSS
-
User request to access credit card window
-
CardSys checks if user is logged in and gives access to user
Use case ends.
System: PasswordSys
Use case:
-
UC11 - Add a password
-
UC12 - Delete a password
-
UC13 - Update a password
-
UC14 - Generate a password
-
UC15 - Analyse all password
UC11 - Add a password
MSS
-
User chooses to add password
-
User enters details
-
PasswordSys adds the password
Use case ends
Extensions
-
2a. Not all details are entered.
-
2a1. PasswordSys shows an error message
Use case end.
-
UC12 - Delete a password
MSS
-
User chooses to delete a password
-
User enters description of password
-
PasswordSys removes the password
Use case ends
Extensions
-
2a. Description entered is invalid
-
2a1. PasswordSys shows an error message
Use case end.
-
UC13 - Update a password
MSS
-
User chooses to update a password
-
User enters description of password and details of changed password
-
PasswordSys updates the password
Use case ends
Extensions
-
2a. Description entered is invalid
-
2a1. PasswordSys shows an error message
Use case end.
-
UC14 - Generate a password
MSS
-
User chooses to generate a password
-
PasswordSys generates a password Use case ends
Use case ends
Extensions
-
1a. Unidentified prefix entered
-
1a1. PasswordSys shows an error message
Use case end.
-
-
1b. Invalid length prefix entered
-
1b1. PasswordSys shows an error message
Use case end.
-
-
1c. All prefix are set to false
-
1c1. PasswordSys shows an error message
Use case end.
-
UC15 - Analyse all password
MSS
-
User chooses to analyse passwords
-
PasswordSys shows report of analysis
Use case ends
UC16 - Analyse a password
MSS
-
User chooses to analyse a password
-
PasswordSys shows detailed report of analysis
Use case ends
Extensions
-
1a. Index entered is invalid
-
1a1. PasswordSys shows an error message
Use case end.
-
System: FileSys
Use case:
-
UC21 - Encrypt a file
-
UC22 - Decrypt a file
UC21 - Encrypt a file
MSS
-
User chooses to encrypt a file
-
User enter details
-
FileSys encrypts the file
Use case ends
Extensions
-
2a. Details entered are invalid
-
2a1. FileSys shows an error message
Use case ends
-
UC22 - Decrypt a file
MSS
-
User chooses to decrypt a file
-
User enters details
-
FileSys decrypts the file
Use case ends
Extensions
-
2a. Details entered are invalid
-
2a1. FileSys shows an error message
Use case ends
-
System: NoteSys
Use case:
-
UC31 - Add a note
-
UC32 - Delete a note
-
UC33 - Update a note
UC31 - Add a note
Guarantees:
-
Note will be created after step 2 has been executed
MSS
-
User chooses to add a note
-
User enters description of note
-
NoteSys opens a new note
-
User enters note details
-
User submits the note
-
NoteSys saves the note
Use case ends
Extensions
-
2a. Description entered already exists
-
2a1. NoteSys shows an error message
-
2a2. NoteSys requests for a new description
-
2a3. User enters new description
-
Steps 2a1-2a3 are repeated until the description entered is valid
-
Use case resumes from step 4
-
-
5a. No text entered
-
5a1. NoteSys shows a warning message
Use case resumes from step 5
-
UC32 - Delete a note
MSS
-
User chooses to delete a note
-
User enters description of note
-
NoteSys removes the note
Use case ends
Extensions
-
2a. Description entered is invalid
-
2a1. NoteSys shows an error message
Use case ends
-
UC33 - Update a note
MSS
-
User chooses to update a note
-
User enters description of password
-
NoteSys opens the note
-
User edits note details
-
User submits the note
-
NoteSys saves the note
Use case ends
Extensions
-
2a. Description entered is invalid
-
2a1. NoteSys shows an error message
Use case ends
-
-
5a. No text entered
-
5a1. NoteSys shows an error message
Use case ends
-
System: CardSys
Use Case:
-
UC41 - Add a card
-
UC42 - Delete a card
UC41 - Add a card
MSS
-
User chooses to add a card
-
User enters description and details
-
CardSys adds the card
Use case ends
Extensions
-
2a. Details entered are invalid
-
2a1. CardSys shows an error message
-
2a2.CardSys requests for new details
-
2a3. User enters new details
-
Steps 2s1-2s3 are repeated until the details entered are valid
-
Use case resumes from step 3
-
UC42 - Delete a card
MSS
-
User chooses to delete a card
-
User enters description
-
CardSys removes the card
Use case ends
Extensions
-
2a. Description entered does not exist
-
2a1. CardSys shows an error message
Use case ends
-
Appendix D: Non Functional Requirements
Accessibility
-
A user shall be able to download the released JAR file conveniently from the newest tagged release.
-
The app shall be accessible by anyone who has downloaded the released JAR file.
-
Should be accommodating for both advanced, seasoned users as well as new users.
Efficiency
-
The response of the app to any user action shall appear within 5 seconds.
Performance
-
The app shall be able to contain up to 1000 items without any drop in performance.
Reliability
-
The app shall throw appropriate exceptions when any user input is invalid or any user action fails to execute completely.
Security
-
The app shall resist unauthorised, accidental or unintended usage and provide access only to legitimate users.
Usability
-
A user with above average typing speed for regular English (i.e. not code, not system admin commands) shall be able to accomplish most of the tasks faster using commands than using the mouse.
Data Integrity
-
Should be able to check for the data integrity as to verify that no one has modified the files within secureIT in an unauthorised fashion.
-
Should work on any mainstream OS as long as it has Java
11or above installed. -
Should be able to hold up to 1000 notes without a noticeable sluggishness in performance for typical usage.
-
A user with above average typing speed for regular English text (i.e. not code, not system admin commands) should be able to accomplish most of the tasks faster using commands than using the mouse.
-
{More to be added}
Appendix F: Product Survey
Product Name
Author: …
Pros:
-
…
-
…
Cons:
-
…
-
…
Appendix G: Instructions for Manual Testing
Given below are instructions to test the app manually.
| These instructions only provide a starting point for testers to work on; testers are expected to do more exploratory testing. |
G.1. Launch and Shutdown
-
Initial launch
-
Download the jar file and copy into an empty folder
-
Double-click the jar file
Expected: Shows the GUI with a set of sample contacts. The window size may not be optimum.
-
-
Saving window preferences
-
Resize the window to an optimum size. Move the window to a different location. Close the window.
-
Re-launch the app by double-clicking the jar file.
Expected: The most recent window size and location is retained.
-
{ more test cases … }
G.2. Deleting a note
-
Deleting a note while all notes are listed
-
Prerequisites: List all notes using the
listcommand. Multiple notes in the list. -
Test case:
delete 1
Expected: First contact is deleted from the list. Details of the deleted contact shown in the status message. Timestamp in the status bar is updated. -
Test case:
delete 0
Expected: No note is deleted. Error details shown in the status message. Status bar remains the same. -
Other incorrect delete commands to try:
delete,delete x(where x is larger than the list size) {give more}
Expected: Similar to previous.
-
{ more test cases … }
G.3. Saving data
-
Dealing with missing/corrupted data files
-
{explain how to simulate a missing/corrupted file and the expected behavior}
-
{ more test cases … }